


Grab some containers from the recycling bin, a small bag of potting soil, and seeds. That's it. Total cost sits around $5-$8. The whole project takes about 30 minutes. Fresh veggies grow right on the windowsill within weeks.
No fancy supplies needed. No trip to the garden center required. Just stuff already sitting in most kitchens.
This project works for toddlers through teenagers. Everyone gets a job. Everyone watches something grow.
What supplies are needed for a DIY windowsill veggie planter?
The supply list stays short on purpose.
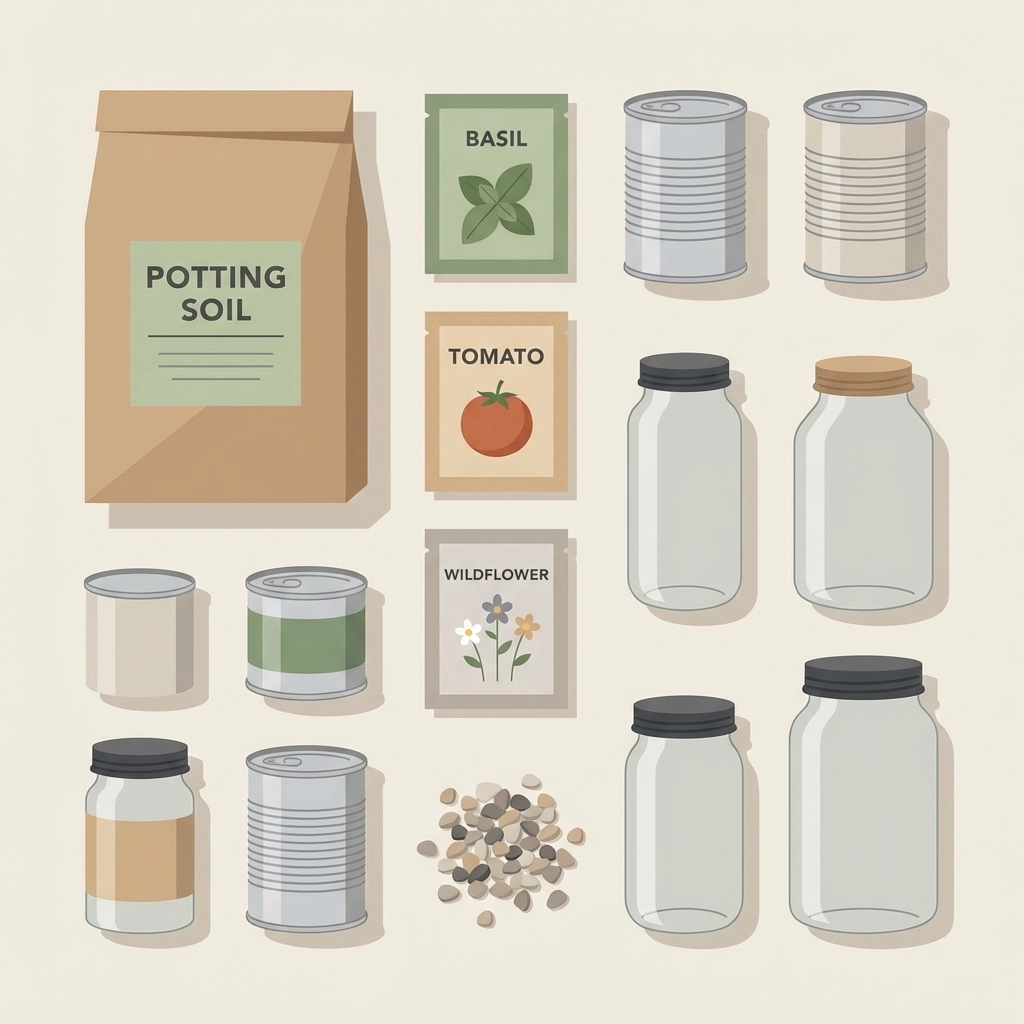
Containers (free):
- Empty tin cans
- Plastic yogurt cups
- Glass jars
- Cut plastic bottles
- Old mugs with chips
From the store ($3-$5):
- Small bag of potting soil
Seeds ($1-$3):
- Lettuce
- Radishes
- Green onions
- Cherry tomatoes
- Herbs like basil or cilantro
For drainage (free):
- Small rocks from outside
- Broken pottery pieces
- Pebbles from the driveway
That's the entire list. Most families already have containers and rocks. The only real expense becomes soil and seeds.
Why do recycled containers work perfectly for this project?
Recycled containers cost nothing.
They come in all sizes. Different depths work for different plants. Shallow containers grow lettuce. Deeper ones handle tomatoes.
The imperfect look adds charm. Mismatched containers lined up on a windowsill create visual interest. Each family member picks their own container.
Tin cans need the labels removed. A quick soak in warm water loosens the glue. Kids love peeling off paper labels.
Plastic bottles get cut in half. The bottom half becomes the planter. The top half becomes a mini greenhouse cover for seedlings.
Glass jars work but need extra drainage material at the bottom. No holes get drilled in glass. A thick layer of rocks compensates.
How do drainage holes get added to containers?
Drainage holes prevent root rot. Every container needs them.
For tin cans:
- Flip the can upside down
- Use a hammer and nail
- Punch 4-5 holes in the bottom
- Kids old enough to handle tools love this step
For plastic containers:
- Heat a nail over a candle flame (adult job)
- Push the hot nail through the plastic
- Make 3-4 holes
- Let cool before handling
For containers that can't be punctured:
- Add a 1-inch layer of rocks at the bottom
- This creates a drainage reservoir
- Water collects below the soil line
- Roots stay above the water
The drainage step matters. Skipping it kills plants. Soggy roots rot within days.

What vegetables grow best on a windowsill?
Windowsill real estate stays limited. Some veggies thrive in small spaces. Others need more room.
Best performers for beginners:
- Lettuce – Grows fast, harvests in 3-4 weeks
- Green onions – Regrows from kitchen scraps
- Radishes – Ready in 25 days
- Cherry tomatoes – Need deeper containers
- Herbs – Basil, cilantro, parsley, mint
What to avoid:
- Full-size tomatoes
- Peppers (need more root space)
- Squash
- Cucumbers
- Anything that vines
Lettuce wins for impatient kids. Visible growth happens within days. Radishes reward patience with actual vegetables to pull from soil.
Green onions cheat the system entirely. Buy a bunch from the grocery store. Cut off the green parts for dinner. Stick the white root ends in soil. New green shoots appear in days. Infinite green onions from one purchase.
How does the family assembly process work?
Set up a workspace everyone can reach. Kitchen table works great. Cover it with newspaper for easy cleanup.
Step 1: Prepare containers
Assign the oldest kids to drainage duty. Younger ones wash and dry containers. Everyone contributes.
Step 2: Add drainage layer
Each person adds a small handful of rocks to their container. About half an inch deep. This takes 30 seconds.
Step 3: Fill with soil
Scoop potting soil into containers. Leave one inch of space at the top. Pack soil lightly: not too tight.
Toddlers excel at this step. Getting hands dirty becomes the highlight.
Step 4: Plant seeds
Read the seed packet together. Most seeds go about half an inch deep. Poke a finger into the soil. Drop in 2-3 seeds. Cover gently.
Step 5: Water
Use a spray bottle for the first watering. Heavy watering displaces seeds. A gentle mist settles everything in place.
Step 6: Find the sunny spot
South-facing windows work best. Six hours of direct sunlight daily keeps plants happy. Rotate containers weekly so all sides get light.
What does ongoing care look like?
Daily attention takes less than five minutes.
Watering schedule:
- Check soil moisture every morning
- Stick a finger one inch into soil
- Dry soil needs water
- Damp soil waits another day
Signs of overwatering:
- Yellow leaves
- Wilting despite wet soil
- Mold on soil surface
- Mushy stems
Signs of underwatering:
- Drooping leaves
- Dry, cracked soil
- Slow growth
- Brown leaf edges
Assign each family member a plant to monitor. Ownership creates investment. Kids remember to check their personal plant.
A simple chart on the fridge tracks watering. Each person marks their plant's column after checking. Habits form within a week.
How do kids stay engaged after planting day?
The first week tests patience. Seeds sit underground doing invisible work.
Keep interest alive:
- Measure and record growth daily
- Take photos from the same angle each day
- Create a time-lapse video
- Name each plant
- Predict which plant grows fastest
Lettuce sprouts within 5-7 days. That first green shoot emerging from soil creates genuine excitement.
Radishes show green tops quickly but hide the good stuff underground. Pulling the first radish becomes an event.
Harvesting matters most. Eating something grown from a tiny seed completes the cycle. Even picky eaters try vegetables they grew themselves.

What if something goes wrong?
Problems happen. Plants die sometimes. This teaches more than perfect success.
Leggy seedlings (tall and thin):
- Not enough light
- Move closer to window
- Add a small lamp nearby
Seeds that never sprout:
- Planted too deep
- Soil stayed too wet
- Seeds were old
- Try again with fresh seeds
Mold on soil surface:
- Too much moisture
- Not enough air circulation
- Scrape off mold
- Let soil dry slightly
- Open a nearby window
Bugs appearing:
- Fruit flies love moist soil
- Let soil dry between waterings
- Cover with a thin sand layer
Failure becomes a lesson, not a disaster. Try again with a new container. Adjust one variable. See what changes.
What's the total cost breakdown?
Transparency helps with budgeting.
| Item | Cost |
|---|---|
| Containers | Free (recycled) |
| Drainage rocks | Free (from outside) |
| Potting soil (small bag) | $3-$5 |
| Seed packets (2-3 varieties) | $2-$3 |
| Total | $5-$8 |
Staying under $10 happens easily. Often the total lands closer to $5.
One bag of soil fills 6-8 small containers. One seed packet contains dozens of seeds. The cost per plant drops to pennies.
Why does this project matter beyond growing vegetables?
Fresh lettuce from a windowsill tastes different. Better. Because someone grew it.
The project costs almost nothing. The lessons cost nothing. The time together costs nothing.
Kids learn patience. They learn responsibility. They learn that small efforts create real results.
A windowsill garden grows more than vegetables. It grows curiosity, confidence, and connection.
Start this weekend. Gather the containers tonight. The windowsill awaits.


