


A functional DIY aquaponics system costs between $35 and $500 to build from scratch.
The cheapest option uses a 10-gallon aquarium and PVC pipe.
Total cost: around $50–$60.
Build time: one afternoon.
Mid-range systems using IBC totes run approximately $400–$500.
These produce meaningful harvests.
Year-round greens become possible.
The savings come from three sources:
- Using recycled or repurposed materials
- Eliminating pre-made kit markups
- Customizing to available space
Building the system yourself could cut costs by as much as 50–70% compared to purchasing commercial setups.
The trade-off is time and troubleshooting.
What Makes Aquaponics Systems Expensive in the First Place?
Commercial aquaponics kits range from $500 to $5,000 for home-scale systems.
The markup exists for convenience.
Pre-cut materials.
Matched components.
Detailed instructions.
The actual raw materials cost far less.
A typical commercial kit includes:
- Fish tank or container
- Grow bed
- Water pump
- Air pump
- Grow media
- Plumbing fittings
- Siphon or overflow system
Each component can be sourced independently.
Often for a fraction of retail kit pricing.
The labor is the hidden value in commercial kits.
DIY building trades money for time.
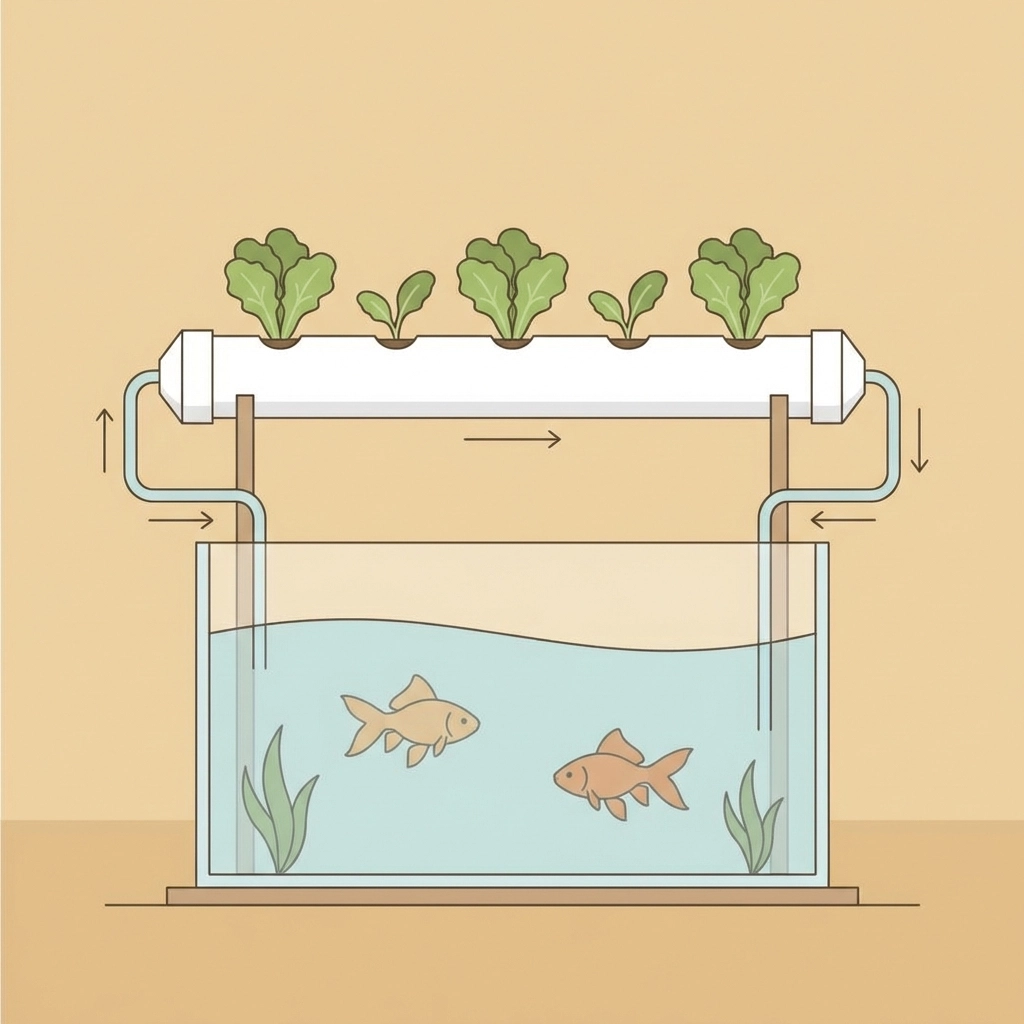
What Is the Cheapest Aquaponics System to Build?
The tabletop aquaponics system costs approximately $35–$50.
This design uses a 10-gallon aquarium as the fish tank.
A section of PVC pipe serves as the grow bed.
A small submersible pump circulates water.
The system supports 2–4 small fish.
Goldfish or guppies work at this scale.
Leafy greens grow in the PVC pipe above.
Tabletop System Shopping List
| Item | Estimated Cost |
|---|---|
| 10-gallon aquarium | $15–$20 |
| 4-inch PVC pipe (2 ft section) | $5–$8 |
| PVC end caps (2) | $3–$4 |
| Small submersible pump (80–100 GPH) | $8–$12 |
| Airline tubing | $2–$3 |
| Air pump (optional but recommended) | $5–$10 |
| Clay pebbles or perlite (small bag) | $5–$8 |
| Aquarium sealant | $4–$6 |
Total: $35–$55
Tools Required
- Drill with hole saw bit
- Measuring tape
- Marker
One hole drilled into the PVC pipe.
That connects to pump tubing.
Water flows up, through the grow media, and drains back to the tank.
Limitations of the Tabletop System
Production is minimal.
Expect a few lettuce plants at a time.
Maybe some herbs.
The fish load stays small.
No tilapia.
No edible fish at this scale.
This system teaches the principles.
It does not feed a household.
Consider it a proof of concept.
Or a classroom demonstration.
Or a stepping stone to larger builds.
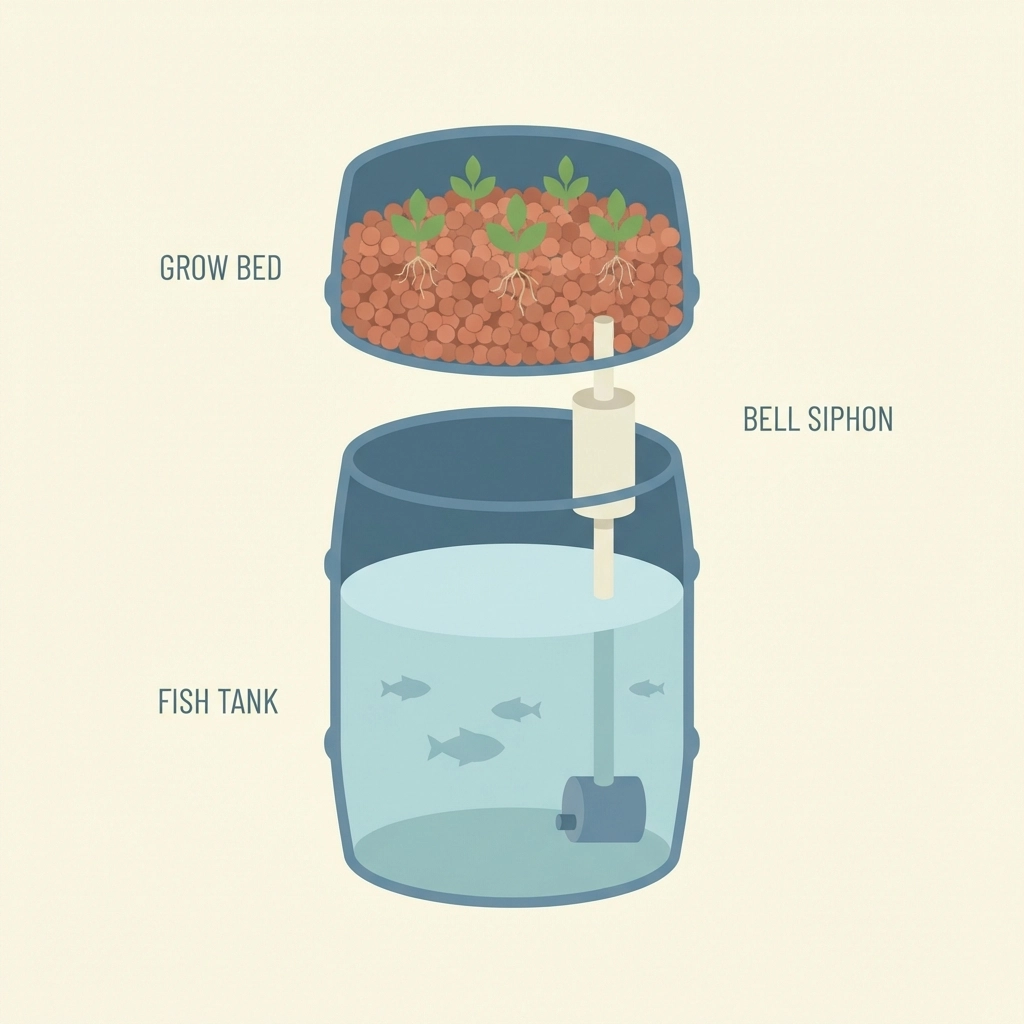
How Do Single-Barrel Systems Work?
The single-barrel aquaponics system costs $75–$150.
A 55-gallon food-grade barrel serves dual purpose.
The bottom holds fish.
The top becomes the grow bed.
One barrel.
Cut horizontally.
Stacked vertically.
The top section sits above the bottom.
Gravity returns water to the fish below.
Single-Barrel Shopping List
| Item | Estimated Cost |
|---|---|
| 55-gallon food-grade barrel | $15–$30 (often free) |
| Submersible pump (200–400 GPH) | $15–$25 |
| PVC pipe and fittings | $15–$20 |
| Bell siphon components | $10–$15 |
| Clay pebbles (50 lbs) | $25–$40 |
| Air pump with air stones | $15–$20 |
| Bulkhead fittings | $8–$12 |
| Stand or frame materials | $0–$30 |
Total: $75–$150
Where to Find Cheap Barrels
Food-grade 55-gallon barrels appear in several places:
- Craigslist and Facebook Marketplace
- Local bottling companies
- Car washes (soap barrels)
- Restaurant supply surplus
- Soda syrup distributors
Many businesses give barrels away.
Others sell them for $10–$20.
Critical requirement: food-grade certification.
No chemical residue.
No industrial solvents.
Blue barrels often indicate food-safe plastic.
Single-Barrel Build Steps
Step 1: Cut the barrel
Mark a line approximately one-third from the top.
Use a jigsaw or reciprocating saw.
The larger bottom section becomes the fish tank.
The smaller top section becomes the grow bed.
Step 2: Drill drainage holes
The grow bed needs a drain.
Install a bulkhead fitting at the lowest point.
This connects to the bell siphon.
Step 3: Build the bell siphon
A bell siphon automates flood-and-drain cycling.
No electricity required for the drain mechanism.
Only the pump uses power.
Components:
- 1-inch PVC standpipe
- 2-inch PVC bell (covers the standpipe)
- 4-inch PVC media guard
The standpipe sets water height.
The bell creates the siphon effect.
The media guard prevents clogs.
Step 4: Install the pump
Place the submersible pump in the fish tank.
Run tubing up to the grow bed.
Water pumps up continuously.
The bell siphon drains it in cycles.
Step 5: Add grow media
Fill the grow bed with clay pebbles.
Rinse them first.
Dust clogs pumps and irritates fish.
Step 6: Build or source a stand
The grow bed sits above the fish tank.
A sturdy frame is essential.
Water weighs 8.3 pounds per gallon.
A full 55-gallon barrel weighs over 450 pounds.
Cinder blocks work.
So do welded metal frames.
Or reinforced wooden platforms.
Single-Barrel System Capacity
This system supports 5–10 small fish.
Or 3–5 medium fish.
Tilapia become possible at this scale.
So do goldfish, koi, or catfish fingerlings.
The grow bed handles 8–15 plants.
Lettuce, herbs, chard, kale.
Compact vegetables.
Not enough for year-round self-sufficiency.
Enough to supplement meals consistently.
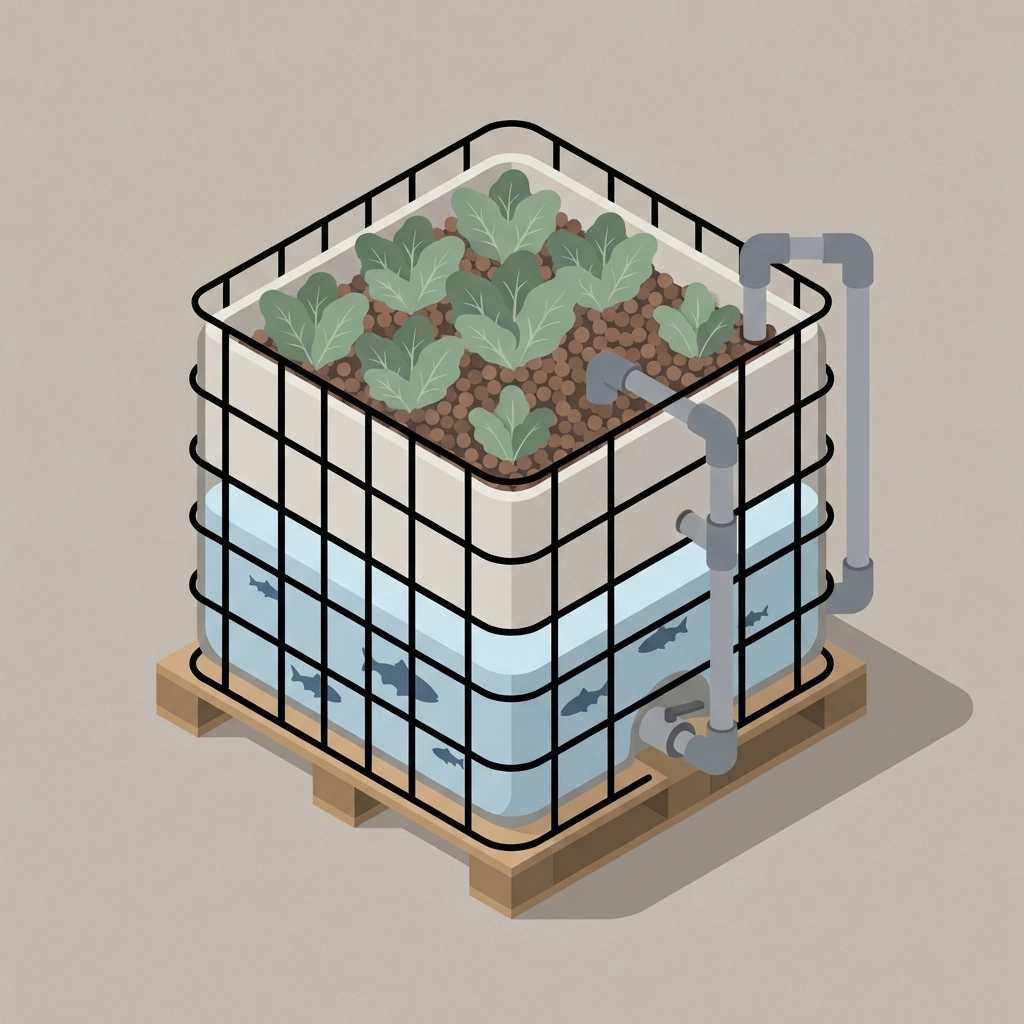
What Does an IBC Tote System Cost?
The IBC tote aquaponics system costs approximately $400–$500.
This is the most popular DIY design.
Intermediate complexity.
Meaningful production.
An IBC (Intermediate Bulk Container) is a 275–330 gallon plastic tank in a metal cage.
Industrial facilities use them for liquid transport.
They are widely available secondhand.
One IBC tote converts into both fish tank and grow bed.
The top section becomes the grow bed.
The bottom holds fish.
IBC Tote System Shopping List
| Item | Estimated Cost |
|---|---|
| IBC tote (275–330 gallon) | $50–$100 |
| Submersible pump (400–800 GPH) | $30–$50 |
| Air pump (commercial grade) | $25–$40 |
| Air stones (4–6) | $10–$15 |
| PVC pipe and fittings | $40–$60 |
| Bell siphon components | $15–$20 |
| Bulkhead fittings | $15–$25 |
| Clay pebbles or expanded shale (200+ lbs) | $80–$120 |
| Plumbing sealant and tape | $10–$15 |
| Water test kit | $25–$40 |
| Fish (starter stock) | $20–$50 |
| Beneficial bacteria starter | $15–$25 |
| Fish food (initial supply) | $15–$25 |
Total: $350–$500
IBC Tote Sourcing
IBC totes cost $50–$100 used.
Sometimes free.
Sources include:
- Chemical supply companies
- Food processing plants
- Beverage distributors
- Industrial surplus dealers
- Farm supply stores
Requirement: verify previous contents.
Food-grade totes held edible liquids.
Soap, juice, wine, cooking oil.
Avoid totes that held:
- Pesticides
- Herbicides
- Industrial chemicals
- Petroleum products
The plastic absorbs residue.
Contamination transfers to fish.
IBC System Build Overview
Cutting the tote
The standard cut removes the top 12–14 inches.
This becomes the grow bed.
The remaining 200+ gallons becomes the fish tank.
Some builders cut the tote at an angle.
This creates a deeper grow bed on one side.
More planting flexibility.
Structural considerations
A full IBC system weighs 2,000–2,500 pounds.
The metal cage provides some support.
Additional reinforcement is often necessary.
Concrete floors handle the weight.
Wooden decks may not.
Ground-level outdoor placement works well.
Plumbing layout
Water pumps from fish tank to grow bed.
Gravity returns it through the bell siphon.
The cycle repeats continuously.
A timer can pulse the pump.
Or run it 24/7.
Continuous flow works for most setups.
Aeration
Fish need dissolved oxygen.
Air pumps and air stones provide it.
Multiple air stones distribute bubbles evenly.
Larger systems need commercial-grade air pumps.
Aquarium pumps often lack sufficient output.
IBC System Production Capacity
A properly cycled IBC system supports:
- 20–50 fish (depending on species and size)
- 30–50 plants in the grow bed
This produces meaningful harvests.
Weekly salads.
Fresh herbs year-round.
Supplemental vegetables.
Not complete food independence.
A significant contribution to household produce.
What Are the Hidden Costs of DIY Aquaponics?
The shopping lists cover hardware.
Additional costs appear during operation.
Startup Biological Costs
| Item | Cost Range |
|---|---|
| Beneficial bacteria starter | $15–$30 |
| Ammonia source (for fishless cycling) | $5–$10 |
| Initial fish stock | $20–$100 |
| Starter plants or seeds | $10–$30 |
Cycling the system takes 4–8 weeks before adding fish.
Beneficial bacteria must colonize the grow media.
These bacteria convert fish waste to plant nutrients.
Rushing this step kills fish.
Patience costs nothing but time.
Ongoing Operating Costs
| Item | Monthly Cost |
|---|---|
| Fish food | $10–$30 |
| Electricity (pump and air) | $5–$15 |
| Replacement plants/seeds | $5–$15 |
| Water test supplies | $5–$10 |
| pH adjusters | $5–$10 |
Annual operating costs: $300–$600 for a mid-size system.
Emergency and Replacement Costs
Pumps fail.
Fish die.
Plants succumb to disease.
Budget for replacements:
- Backup pump: $30–$50
- Fish restocking: $20–$50 annually
- Grow media top-off: $20–$40
The first year costs more.
Systems stabilize over time.
Replacement frequency decreases.
What Are the Trade-Offs of Cheaper Systems?
Lower cost introduces specific compromises.
Production Volume
Cheaper systems grow less food.
A $50 tabletop system produces garnishes.
A $500 IBC system produces salads.
Meaningful household contribution requires investment.
Minimum viable production starts around $300–$400.
System Stability
Larger water volumes stabilize easier.
Small systems fluctuate rapidly.
Temperature swings.
pH crashes.
Ammonia spikes.
A 10-gallon system requires daily monitoring.
A 200-gallon system tolerates occasional neglect.
Water volume acts as a buffer.
More water means more forgiveness.
Fish Options
Small systems limit fish choices.
Goldfish and guppies fit.
Edible species do not.
Tilapia need 50+ gallons minimum.
Preferably 100+ gallons.
Catfish require similar space.
Eating the fish requires a larger system.
Budget accordingly if protein production matters.
Durability
Cheap materials degrade faster.
Thin plastic cracks.
Undersized pumps burn out.
Improvised fittings leak.
Investing slightly more in quality components reduces long-term replacement costs.
The $15 pump lasts 6 months.
The $40 pump lasts 3 years.
What Are the Best Ways to Save Money on Aquaponics?
Cost reduction happens at every stage.
Material Sourcing
- Barrels and totes: Free or cheap from industrial sources
- PVC pipe: Hardware store clearance sections
- Grow media: Expanded shale costs less than clay pebbles
- Fish tanks: Used aquariums from classifieds
- Pumps: Pond supply stores often beat aquarium retailers
Design Choices
- Bell siphons eliminate timer costs
- Gravity-fed designs reduce pump requirements
- Single-container systems minimize plumbing
- Outdoor placement eliminates grow light costs (seasonal)
Operational Savings
- Duckweed cultivation supplements fish food
- Black soldier fly larvae provide free protein
- Rainwater collection reduces water costs
- Solar air pumps cut electricity use
Scaling Strategy
Start small.
Learn the system.
Expand incrementally.
A failed $50 experiment teaches cheaply.
A failed $500 system teaches expensively.
Build the tabletop version first.
Graduate to barrels.
Then IBC totes.
Each stage builds knowledge.
Mistakes cost less at smaller scales.

What Tools Are Needed for DIY Aquaponics Builds?
Most builds require basic tools.
Essential Tools
- Drill with multiple bit sizes
- Hole saw set (various diameters)
- Jigsaw or reciprocating saw
- Measuring tape
- Level
- Adjustable wrench
- Screwdrivers
- Utility knife
Helpful Additions
- PVC pipe cutter
- Heat gun (for bending PVC)
- Silicone caulk gun
- Socket set
- Clamps
Specialized Equipment
- Water test kit (pH, ammonia, nitrite, nitrate)
- Thermometer
- Timer (if not using bell siphons)
- Air line tubing cutter
Most households already own the essential tools.
Specialized items add $50–$100 to initial costs.
How Long Does Building Take?
Build times vary by system complexity.
| System Type | Build Time |
|---|---|
| Tabletop (10 gallon) | 2–4 hours |
| Single barrel | 4–8 hours |
| IBC tote | 8–16 hours |
These estimates assume:
- Materials already sourced
- Tools available
- Basic DIY competence
First-time builders take longer.
Planning and measuring consume time.
Mistakes require corrections.
The build itself is the fast part.
Cycling takes weeks.
Full production takes months.
What Is the Minimum Budget for Meaningful Production?
Meaningful production requires approximately $300–$500.
This budget covers:
- IBC tote or equivalent fish tank
- Adequate grow bed space
- Quality pump and aeration
- Sufficient grow media
- Starter fish and plants
- Testing supplies
- Operating reserve
Below $300, production remains hobbyist-level.
Educational value exists.
Food production remains marginal.
Above $500 adds capacity and convenience.
Larger grow beds.
Better equipment.
Backup systems.
The sweet spot for most home growers: $400–$600.
This range delivers:
- Weekly fresh greens
- Herb production for cooking
- Educational experience
- Foundation for expansion
Final Considerations
DIY aquaponics construction saves 50–70% over commercial kits.
The savings require:
- Time investment
- Problem-solving willingness
- Patience during cycling
- Ongoing attention
A $400 DIY system matches a $1,200 commercial kit in function.
The difference is labor and learning.
The learning has value beyond money.
System understanding enables troubleshooting.
Troubleshooting enables long-term success.
Commercial kits include support.
DIY builds include education.
Both approaches work.
Budget and preference determine the path.
Start small.
Build knowledge.
Scale with confidence.
The fish and plants will follow.


4 Comments
The Science of Aquaponics for Kids: How Fish Help Plants Grow Without Soil – Tierney Family Farms
January 19, 2026, at 9:16 pm[…] you're itching to build your own system at home, check out our guide on how to build a DIY aquaponics system on a budget for step-by-step instructions the whole family can […]
Family Sustainability 101: Easy Ways to Go Green Together This Weekend – Tierney Family Farms
January 19, 2026, at 9:16 pm[…] your family catches the sustainability bug this weekend, we've got more projects waiting. Learn how to build a DIY aquaponics system on a budget or explore how much space you need for a productive hydroponic […]
Easy Hydroponic Herbs: How to Grow Fresh Basil and Mint in Just Water – Tierney Family Farms
January 19, 2026, at 9:18 pm[…] Once you've mastered basil and mint, the hydroponic world is your oyster. Try lettuce, cilantro, or even cherry tomatoes. If you're curious about scaling up your indoor garden, check out our guide on how much space you need for a productive hydroponic garden or learn how to build a DIY aquaponics system on a budget. […]
The Future of Farming: Exploring AI and High-Tech Growing with Your Kids – Tierney Family Farms
January 21, 2026, at 4:10 am[…] your family has explored hydroponic gardening or DIY aquaponics, you've already dipped your toes into this […]