


A mini solar oven works by combining three elements: a black heat-absorbing surface, reflective material to concentrate sunlight, and a clear barrier to trap heat inside. The most effective DIY version uses a pizza box, aluminum foil, plastic wrap, and black paper. Total build time runs about 30 minutes. The result reaches temperatures high enough to melt cheese, make s’mores, and reheat leftovers.
This project teaches real science. Kids see thermodynamics in action. Teachers get a hands-on STEM lesson. Families create something functional from recycled materials.
No electricity. No batteries. Just sunlight doing what it does best.
What Materials Are Needed for a Pizza Box Solar Oven?
Gather these items before starting:
Essential supplies:
- One large pizza box (clean, with attached lid)
- Aluminum foil (standard kitchen roll)
- Clear plastic wrap
- Black construction paper
- Clear packing tape or masking tape
- Scissors or a box cutter
- A ruler or wooden dowel
- Glue stick or non-toxic craft glue
Optional additions:
- A small oven thermometer
- Extra cardboard for insulation
- Dark-colored dish or plate
Most households already have these materials. A trip to a dollar store fills any gaps.
The pizza box size matters. Larger boxes capture more heat. A standard 16-inch pizza box works well for small cooking projects.

How Does a Solar Oven Actually Work?
Three principles drive the heating process.
Reflection. Aluminum foil bounces sunlight into the cooking chamber. Angling the foil-covered flap directs rays downward. More reflection means more concentrated heat.
Absorption. Black surfaces absorb light energy and convert it to heat. The black paper lining the bottom of the box pulls in warmth. Dark colors absorb; light colors reflect.
Insulation. Plastic wrap creates a sealed window. Light enters. Heat stays trapped. The same principle powers greenhouses and car interiors on sunny days.
These three forces combine to raise the internal temperature significantly above ambient air temperature. On a clear day with direct sun, a well-built pizza box oven reaches 150–200°F (65–93°C).
That range melts chocolate. Softens cheese. Warms bread. Cooks simple foods slowly and safely.
What Are the Step-by-Step Instructions?
Follow this sequence for reliable results.
Step 1: Prepare the Box
Start with a clean, dry pizza box. Grease stains reduce effectiveness but do not ruin the project entirely.
Close the lid. Draw a square on the top of the lid, leaving a 2-inch border on three sides. The fourth side (closest to the hinge) remains uncut.
Step 2: Cut the Flap
Use scissors or a box cutter to cut along three sides of the square. Leave the side near the back hinge intact. This creates a flap that opens upward.
Fold the flap back gently. It should stand up without tearing.
Step 3: Add the Reflector
Cover the underside of the flap completely with aluminum foil. Smooth out wrinkles. Secure with tape or glue.
Shiny side faces outward. This surface bounces sunlight into the oven chamber.
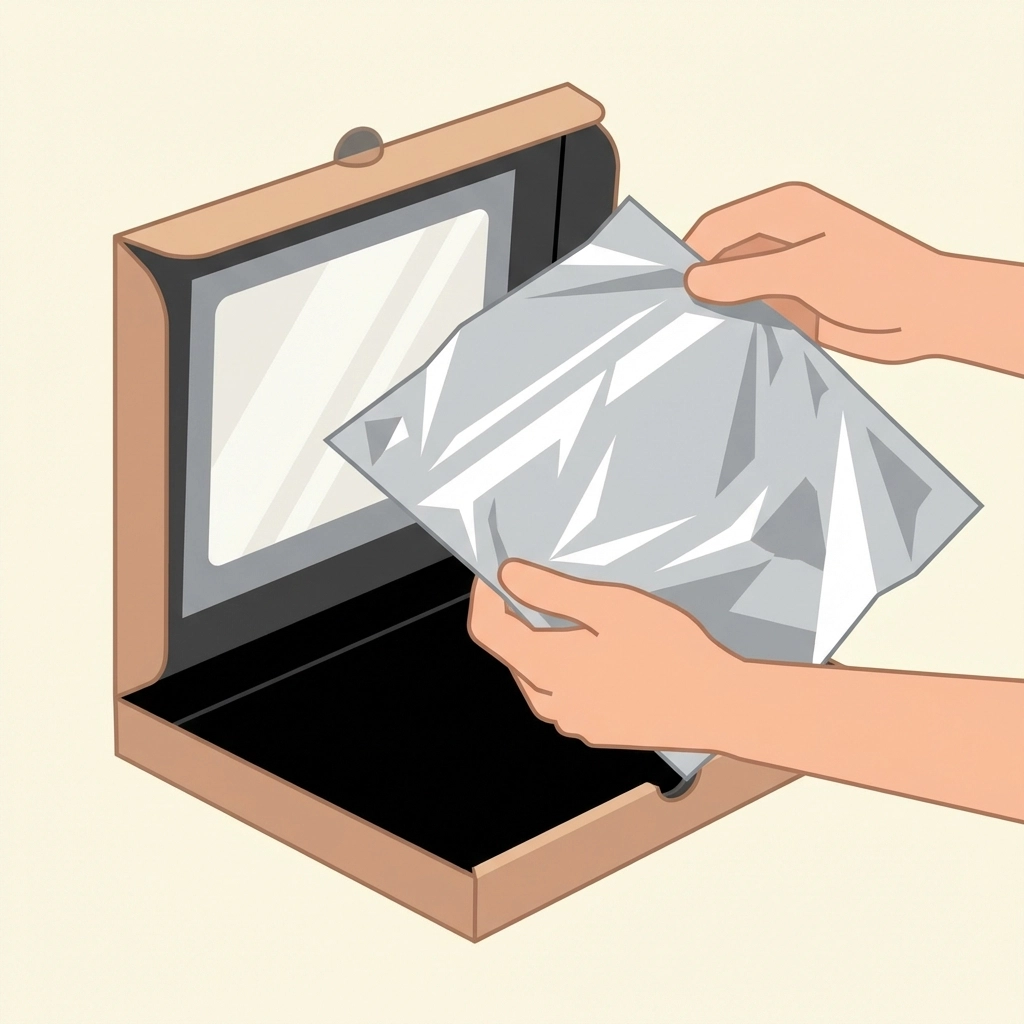
Step 4: Create the Window
Stretch a sheet of plastic wrap across the opening left by the raised flap. Tape it tightly on all four edges. No gaps. No loose corners.
This plastic acts as a heat-trapping window. Air and moisture stay inside.
A second layer of plastic wrap adds extra insulation. Double-layering improves heat retention noticeably.
Step 5: Line the Interior
Open the pizza box lid fully. Glue black construction paper to the entire bottom interior surface. Cover the inner sides as well for maximum absorption.
Black paper is the heat engine. It converts light to thermal energy.
Step 6: Add Insulation (Optional)
Crumpled newspaper or extra cardboard layers beneath the black paper boost insulation. Heat escapes more slowly through thicker walls.
This step is optional but improves performance on cooler days.
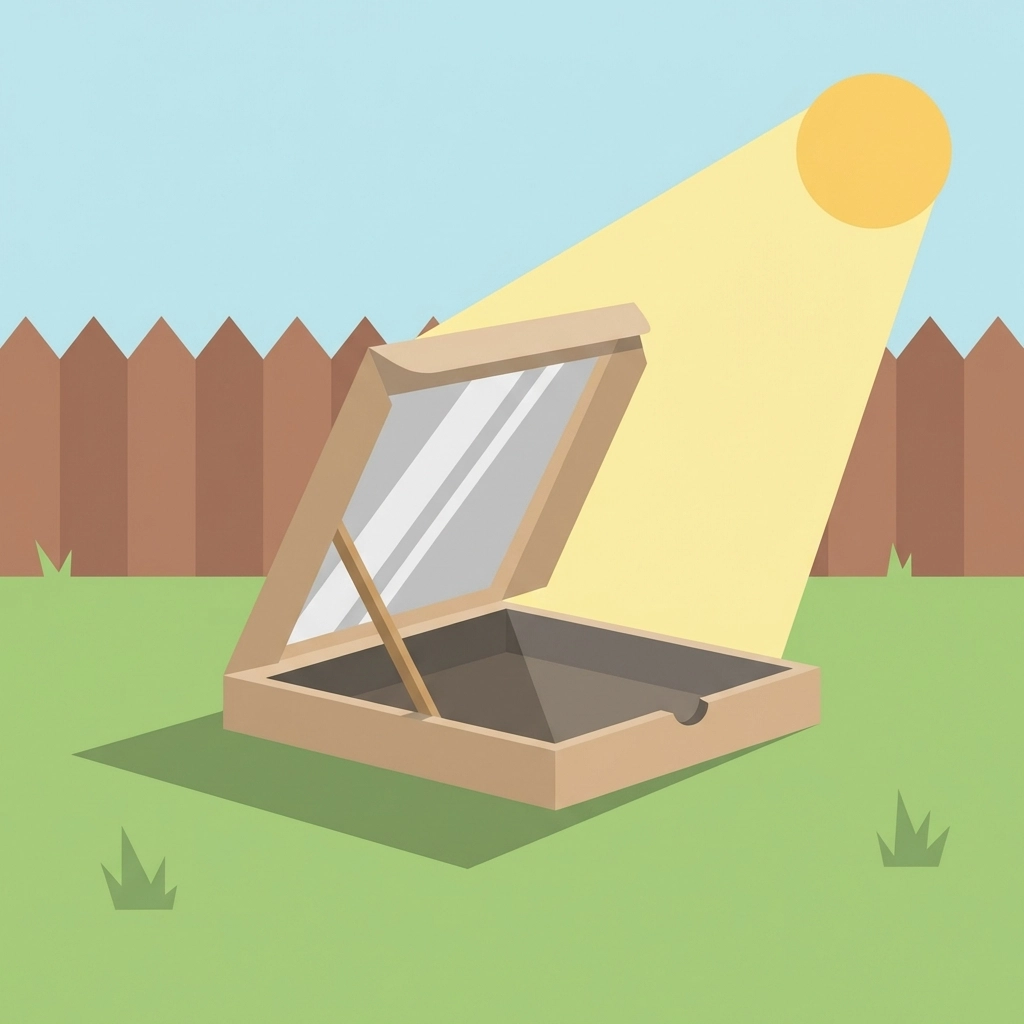
Step 7: Prop the Flap
Use a ruler, wooden dowel, or chopstick to hold the reflector flap open. Aim for a 90-degree angle or slightly more.
Adjust the angle based on sun position. The goal: maximum sunlight bouncing off the foil into the box interior.
What Foods Work Best in a Mini Solar Oven?
Stick to simple, low-temperature recipes for the first attempts.
Ideal beginner foods:
- S’mores (graham crackers, chocolate, marshmallows)
- Nachos with cheese
- Hot dogs in buns
- Quesadillas
- Reheated pizza slices
- Melted butter on bread
What to avoid:
- Raw meat (temperatures too low for food safety)
- Foods requiring sustained high heat
- Anything needing precise timing
Solar cooking is slow. Expect 30 minutes to an hour for most items. Patience is part of the lesson.

How Should the Solar Oven Be Positioned?
Placement determines success.
Face the oven toward the sun. The reflector flap should catch direct rays and bounce them into the cooking chamber.
Check the shadow. If the oven casts a shadow behind it, the angle is correct.
Reposition every 15–20 minutes as the sun moves. Tracking the sun maintains consistent heat.
Ideal conditions:
- Clear sky
- Midday sun (10 AM–2 PM)
- Minimal wind
- Outdoor temperature above 70°F (21°C)
Cloudy days reduce performance significantly. Partial sun still works but extends cooking time.
What Science Concepts Does This Project Teach?
A solar oven covers multiple STEM principles in one activity.
Thermodynamics. Heat moves from hot to cold. Trapping heat inside an insulated space raises internal temperature.
Light behavior. Reflection and absorption. Shiny surfaces bounce light. Dark surfaces capture it.
Renewable energy. Solar power requires no fuel. Sunlight is free and abundant.
Engineering design. Small changes: tighter seals, better angles, darker surfaces: improve performance. Iteration matters.
This project scales for different age groups. Younger kids focus on building. Older students measure temperatures, graph results, and test variables.
What Are Common Mistakes to Avoid?
A few errors reduce effectiveness.
Loose plastic wrap. Gaps let heat escape. Seal edges completely.
Wrinkled foil. Crumpled foil scatters light instead of directing it. Smooth surfaces reflect better.
Wrong angle. A flat reflector catches less sunlight. Prop it open to aim rays downward.
Shaded location. Trees, buildings, or fences blocking sunlight prevent heating. Full sun exposure is essential.
Impatience. Opening the oven repeatedly releases trapped heat. Check food sparingly. Every opening resets progress.
Can This Oven Be Improved?
Yes. Upgrades increase temperature and reliability.
- Add a second box inside the first for double-wall insulation.
- Paint the interior walls black instead of using paper.
- Use a small dark-colored metal tray to hold food (metal conducts heat faster).
- Replace plastic wrap with a sheet of clear acrylic for durability.
- Add side reflectors using additional foil-covered cardboard panels.
Each modification builds on the same core principles. Experiment. Measure. Improve.
Why Build a Solar Oven?
This project combines science, sustainability, and hands-on fun.
Kids learn by doing. Abstract concepts become tangible. The sun becomes a tool.
Teachers gain a multidisciplinary activity. Science, math, and environmental education in one box.
Families share an afternoon outdoors. The reward: warm s’mores made by sunlight alone.
A pizza box. Some foil. Thirty minutes of effort.
Real cooking. Real science. Real results.


