


Yes, you can absolutely grow a living moss sofa for your child's toys: and it costs less than $10! By building a tiny cardboard or wire frame and encouraging live moss to spread across it, you'll create an enchanting piece of miniature nature furniture that looks like it belongs in a fairy tale. The whole project takes about 30 minutes to set up, and your moss will fill in beautifully over 3-6 weeks with just a little misting and patience.
This is one of those projects that feels like pure magic. Your kiddo gets to watch something actually grow into furniture for their favorite action figures, dolls, or woodland creature toys. It's science, it's art, and it's a whole lot of whimsy rolled into one sticky, mossy afternoon.
Let's get our hands dirty.
Why Grow a Moss Sofa Instead of Gluing One?
Here's the thing: you could just hot-glue some preserved moss onto a tiny frame and call it a day. Plenty of folks do that, and it looks nice enough. But where's the wonder in that?
Growing a living moss sofa teaches kids about how plants spread, what conditions they need to thrive, and the satisfying reward of patience. Plus, a living moss sofa stays soft, stays green (as long as you mist it), and actually improves over time as the moss fills in the gaps.
It's the difference between buying a plastic plant and watching a seed sprout. One is decoration. The other is an adventure.

What You'll Need (Budget: Under $10)
Most of these materials are probably already hiding in your recycling bin or backyard. Here's the full shopping list:
For the Frame:
- Cardboard from a cereal box or shipping box (free)
- Scissors and a ruler
- Hot glue gun or white school glue
For the Moss:
- A small clump of live moss from your yard, a shady sidewalk crack, or a garden center ($0–$5)
- A spray bottle filled with water (free)
- A shallow dish or tray to catch drips (free)
Optional but Helpful:
- A small piece of burlap or natural fabric scraps (helps moss grip)
- Buttermilk or plain yogurt (acts as a "moss starter" to encourage spreading)
Total cost: Free to $8, depending on whether you forage your moss or buy a small container.
Step-by-Step: Building Your Moss Sofa Frame
Before moss can grow, it needs something to grow on. We're building a simple sofa shape that's sturdy enough to hold moisture but porous enough for moss to grip.
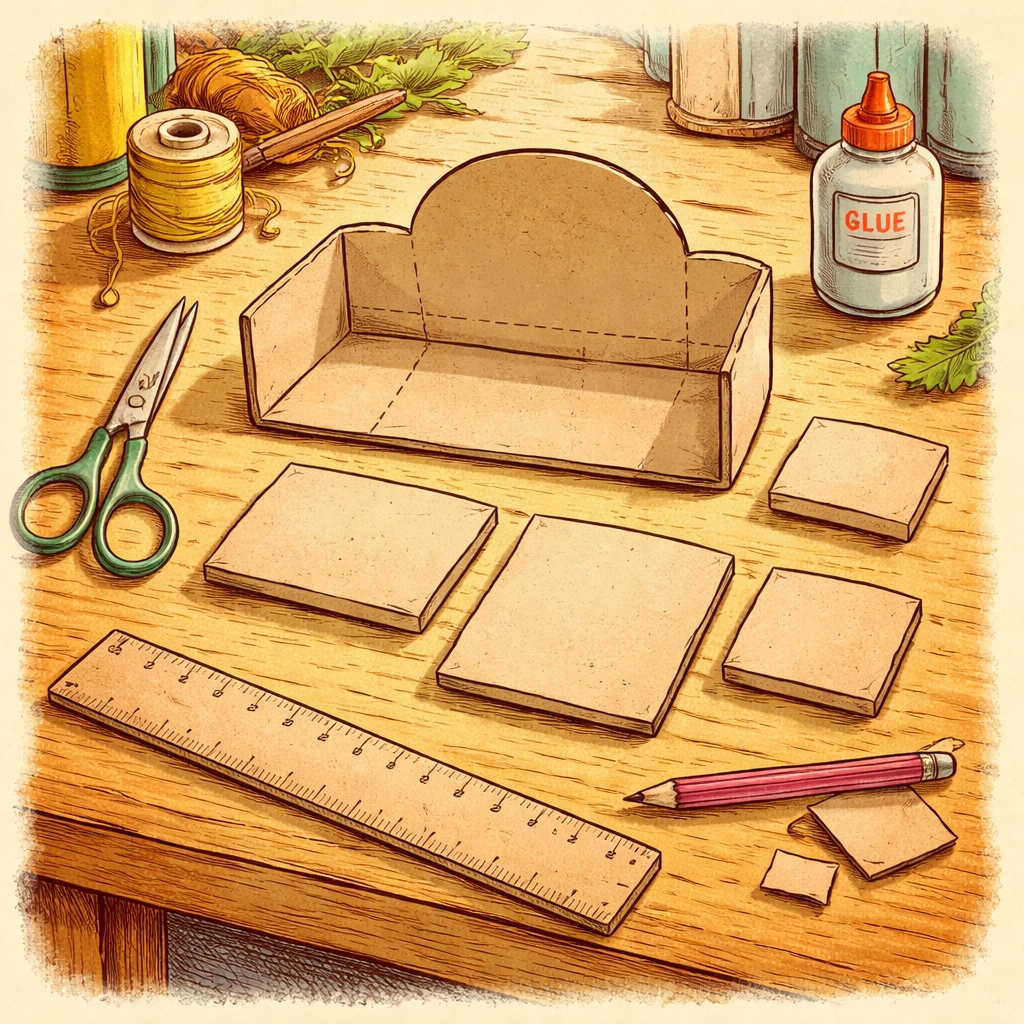
Step 1: Cut Your Cardboard Pieces
Grab that cereal box and cut out:
- 1 seat piece (about 3 inches wide × 2 inches deep)
- 1 back piece (about 3 inches wide × 2.5 inches tall)
- 2 armrest pieces (about 1 inch wide × 2 inches tall)
These measurements work great for action figures and small dolls. Scale up or down depending on which toys need a place to sit!
Step 2: Assemble the Sofa Shape
Using hot glue (adults should handle this part) or generous amounts of white school glue, attach the back piece to the rear edge of the seat. Then glue the armrests to each side. You should now have a tiny sofa skeleton.
Let it dry completely: at least 20 minutes for hot glue, overnight for school glue.
Step 3: Wrap It in Burlap (Optional but Recommended)
Cut small strips of burlap or rough natural fabric and glue them around the frame. This gives the moss something textured to grip onto as it spreads. Moss has a hard time sticking to smooth, shiny cardboard, so this step really helps.
No burlap? Rough up the cardboard surface with sandpaper or score it with a fork. Moss isn't picky: it just needs texture.
Step-by-Step: Growing the Moss
Now for the living part! This is where patience becomes your superpower.
Step 4: Collect or Purchase Your Moss
Head outside and look for moss growing in shady, damp spots: the north side of trees, between sidewalk cracks, on old bricks, or along the edges of your garden beds. Gently peel up a small section (about the size of your palm) and keep it moist in a plastic bag until you're ready to use it.
If foraging isn't an option, most garden centers sell small containers of live sheet moss for $3–$5. That's plenty for several tiny furniture projects.
Step 5: Make the "Moss Milkshake" (Optional Booster)
Want your moss to spread faster and fill in those gaps? Blend a small handful of moss with about half a cup of buttermilk or plain yogurt and a cup of water. This creates a "moss slurry" that you can paint directly onto your sofa frame.
The dairy provides nutrients and helps the moss spores stick. It sounds weird, but gardeners have used this trick for decades to grow moss on rocks and garden walls.

Step 6: Apply the Moss
If using the slurry method: Paint it generously over the entire burlap-wrapped frame using a cheap paintbrush. Then press small pieces of live moss onto the wet surface.
If skipping the slurry: Mist the frame thoroughly with water, then press chunks of live moss directly onto the damp burlap. Use a bit of white glue on the undersides if needed to help them stay put initially.
Cover as much surface area as you can. The moss will spread to fill in the bare spots over time.
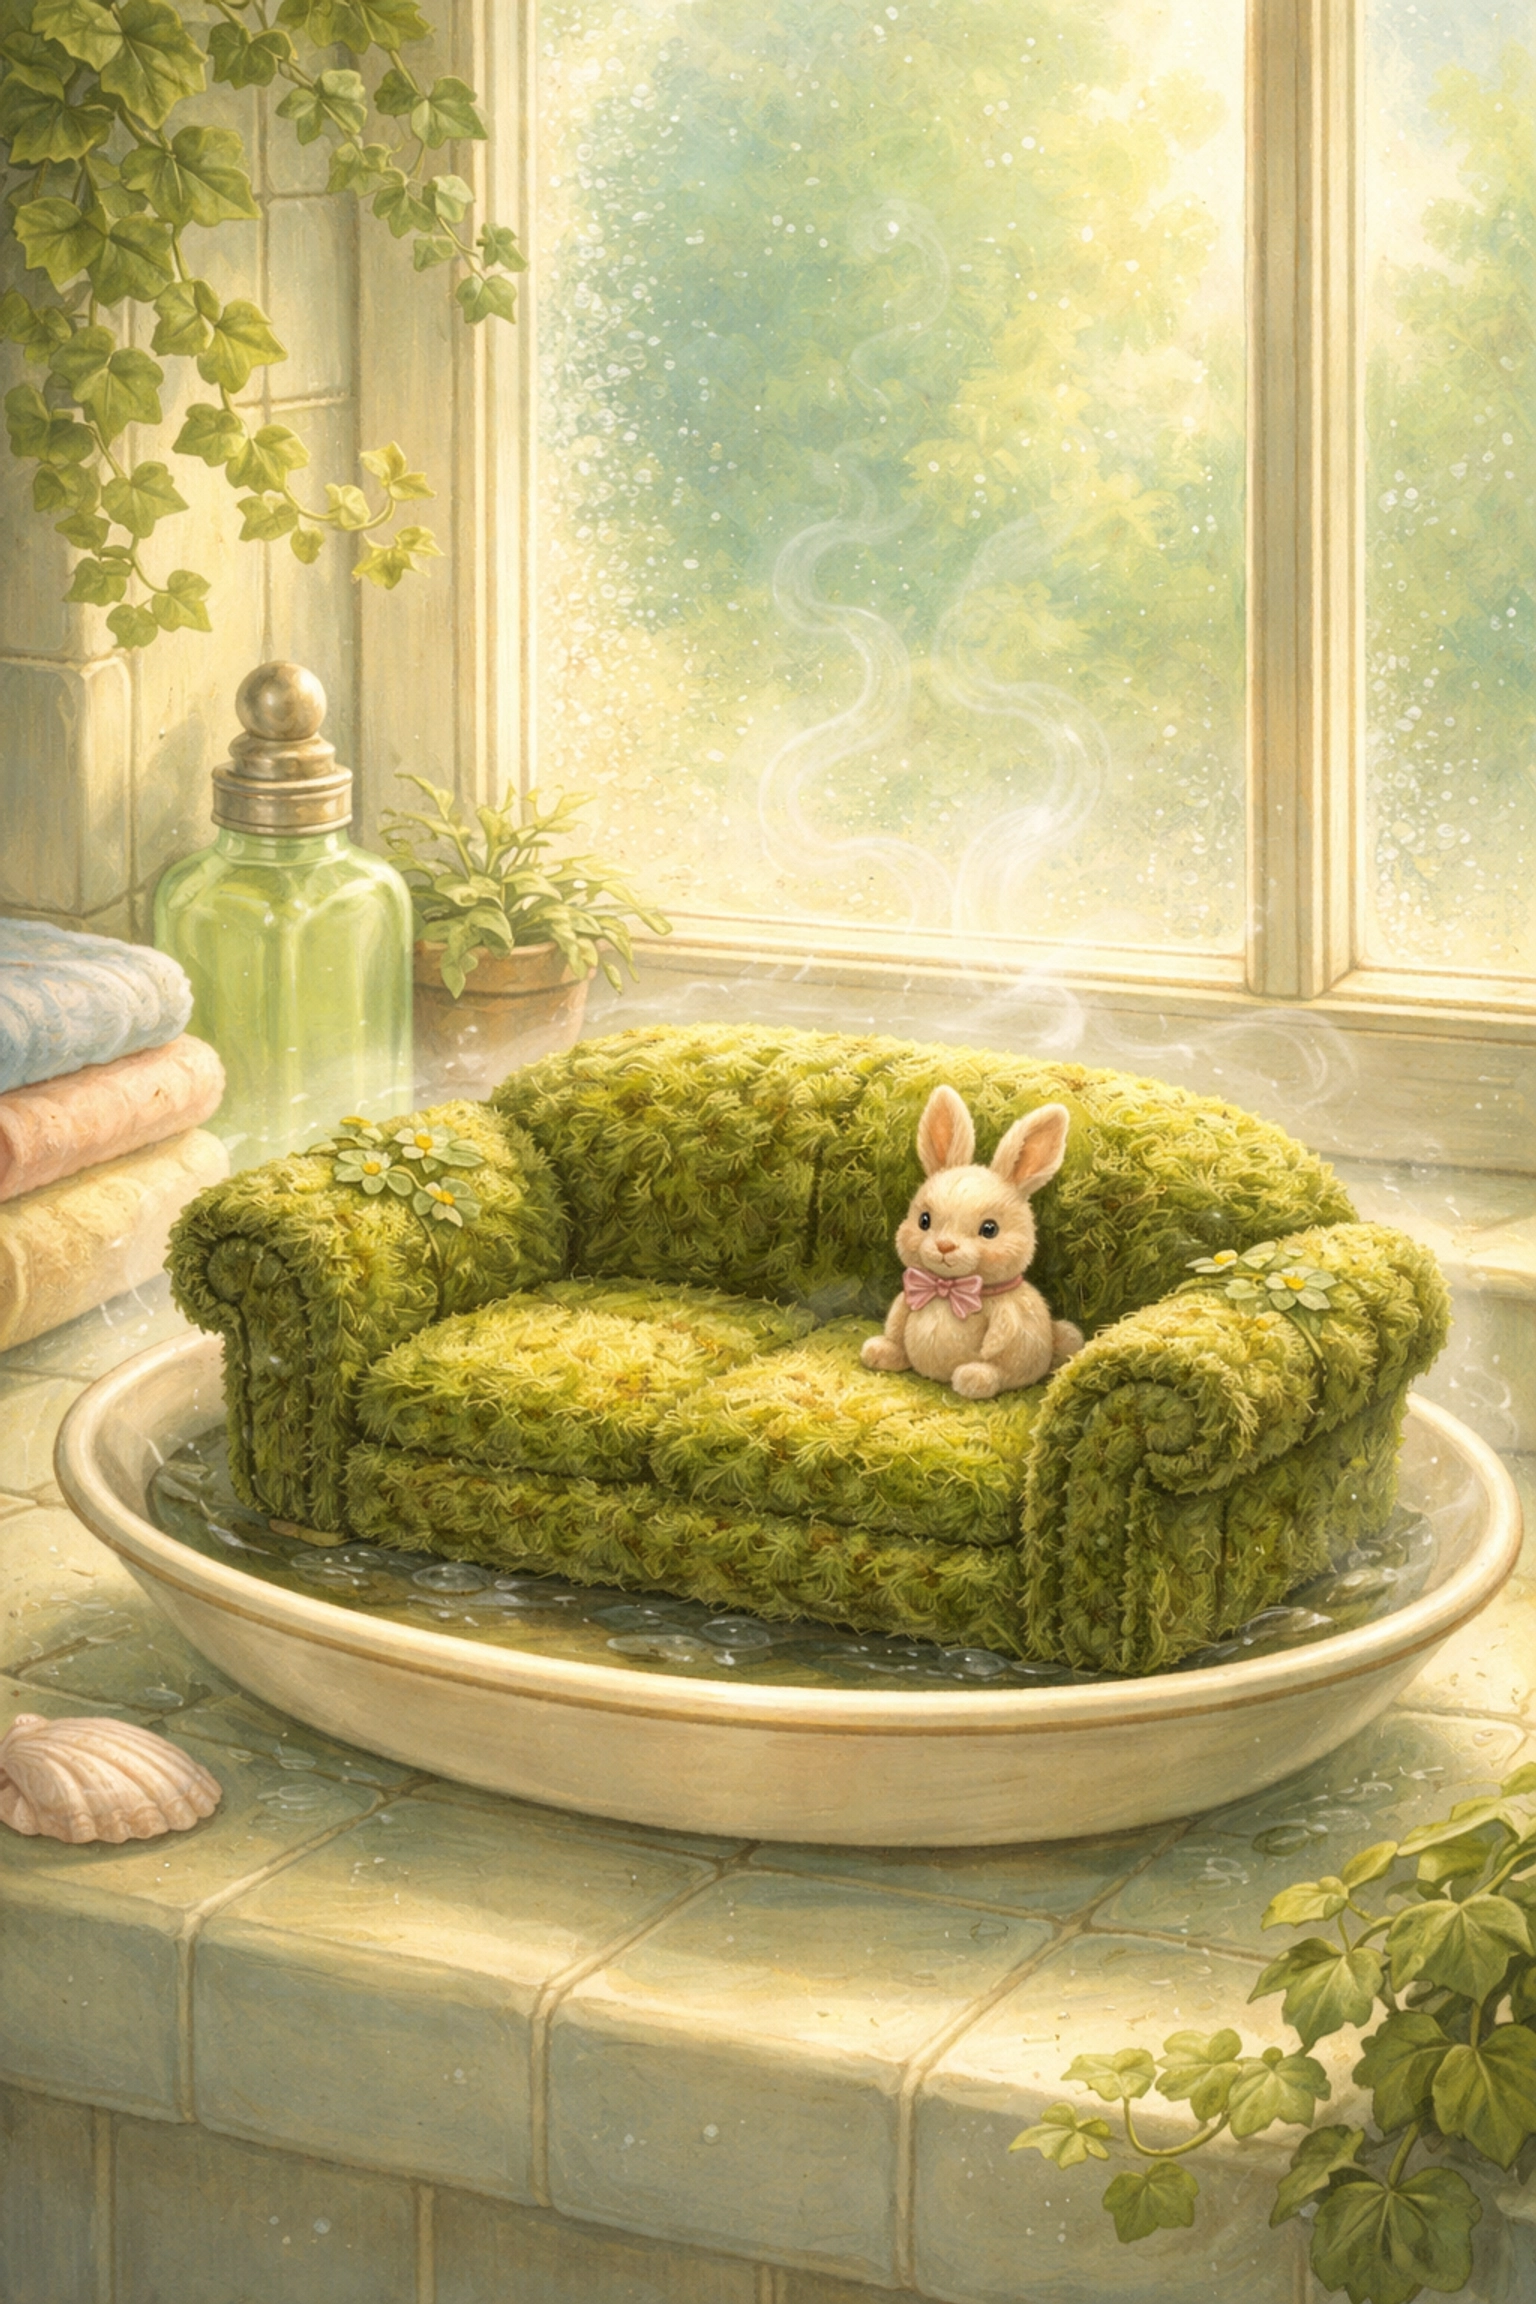
Step 7: Create a Humid Home
Place your moss sofa in a shallow dish or tray and set it somewhere with:
- Indirect light (no direct sun: moss prefers shade!)
- Good humidity (a bathroom windowsill works wonderfully)
- Room temperature (avoid heating vents or drafty spots)
Mist your sofa generously every day: moss loves moisture. If your house is dry, you can loosely tent a clear plastic bag over the top to trap humidity, just leave one end open for airflow.

What to Expect: The Growing Timeline
- Week 1: Not much visible change. The moss is settling in and adjusting to its new home.
- Week 2-3: You might notice the moss looking greener and starting to "grip" the frame better.
- Week 4-6: New growth appears! The moss spreads to cover bare spots, and your sofa starts looking lush and cushiony.
After about six weeks, you'll have a fully fuzzy, fairy-tale-worthy piece of living furniture. Keep misting it a few times a week to maintain that soft green look.
Troubleshooting Tips
The moss is turning brown: It's too dry or getting too much direct sunlight. Move it to a shadier spot and increase your misting.
The moss smells funky: Too much moisture with not enough airflow. Remove any plastic covering and let it breathe for a day.
The cardboard is getting soggy: This happens over time. For a longer-lasting project, consider using a wire frame or a small wooden craft form instead of cardboard.
Take It Further: Build a Whole Living Room Set!
Once your kids see that moss sofa come to life, they're going to want more. Try making:
- A moss ottoman (just a small cube shape)
- A moss bed (rectangular frame with low sides)
- A moss rug (flat piece of cardboard covered in moss)
Before you know it, you've got an entire miniature living room that looks like it belongs in an enchanted forest. Pair it with our DIY mini greenhouse project and you've got a whole tiny plant-filled world.
Frequently Asked Questions
Can I use moss from the craft store?
Craft store moss is usually preserved (dried and dyed), so it won't grow or spread. It looks nice but stays static. For a living project, you need fresh, live moss.
Is any type of moss okay to use?
Most common mosses work fine! Sheet moss and cushion moss are easiest to work with. Avoid moss that's already brown or crumbly: look for vibrant green patches.
How long will a moss sofa last?
With regular misting, a living moss sofa can thrive for months or even years. If you stop watering, it will go dormant and brown but may revive when moisture returns.
Can we keep it outside?
Absolutely! Moss sofas do great outdoors in shady garden spots. Just know that critters might investigate, and rain will handle your watering duties.
Is this safe for pets or younger siblings who might nibble?
Common lawn moss is non-toxic, but it's not meant to be eaten. Keep the project out of reach of babies and curious pets who taste-test everything.
What if we can't find moss in our yard?
Check shady areas near buildings, under trees, or along creek beds. You can also ask neighbors with shady yards or purchase live moss online or at garden centers.
Does the buttermilk mixture smell bad?
It has a mild dairy smell when wet, but it fades as it dries. Within a day or two, you won't notice it at all.
Can kids do this project alone?
Kids can handle the moss application and misting independently. Adults should manage the hot glue gun and any cutting with sharp scissors.
References
- University of Vermont Extension: Growing Moss in the Garden
- Missouri Botanical Garden: Moss Cultivation Basics
- The Moss Gardener's Handbook by Annie Martin


