


Quick Answer: You can build a working soda bottle hydroponic planter for under $5 by cutting a 2-liter bottle in half, using an old cotton sock as a wick, and filling it with a simple perlite and peat moss mixture. The top half becomes your growing container, the bottom becomes your water reservoir, and the wick draws moisture up to your plant's roots. Most of the materials are likely already sitting in your recycling bin or junk drawer!
This classic upcycling project is one of the easiest ways to introduce kids (and curious grown-ups) to the world of soil-free gardening. It takes about 15 minutes to build, costs next to nothing, and can grow herbs like basil or leafy greens like lettuce right on your kitchen windowsill.
Let's walk through exactly how to make one.
What You'll Need (The Budget Breakdown)
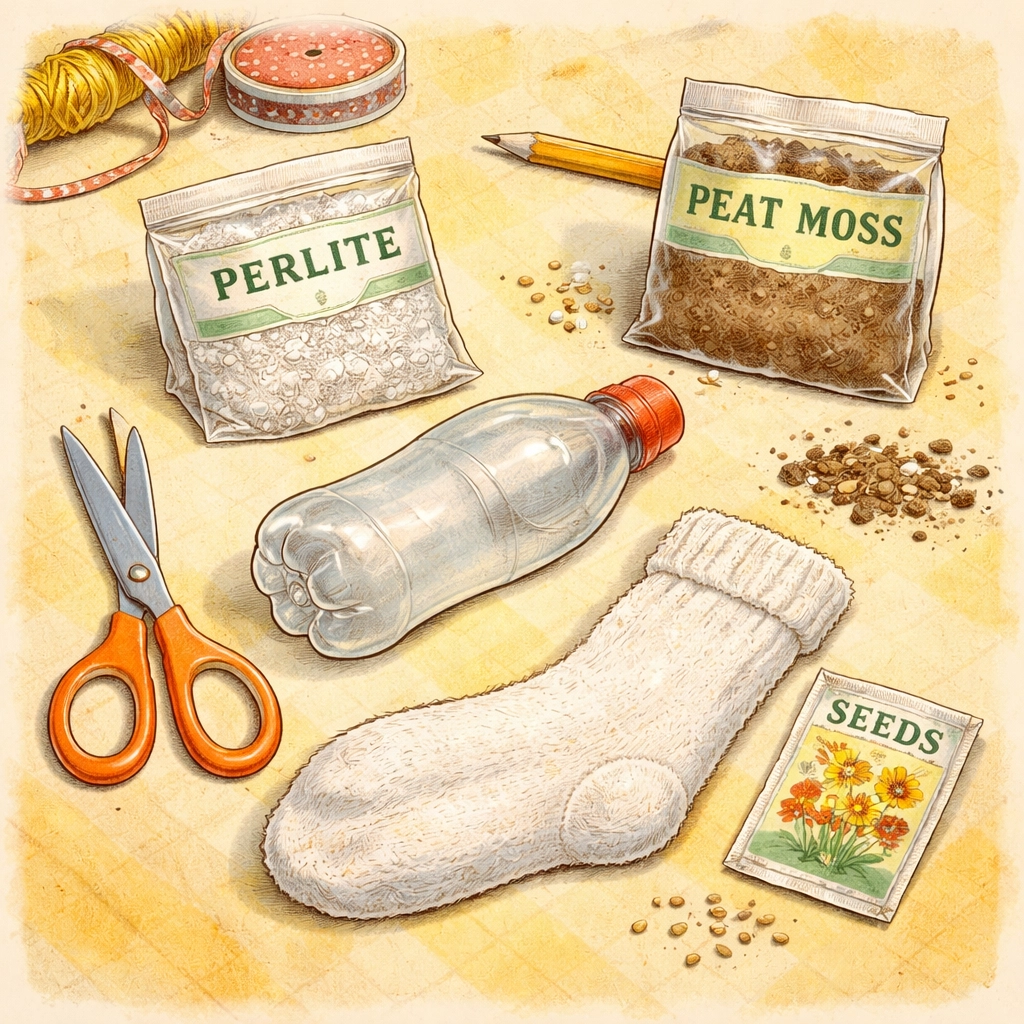
One of the best things about this project is that you probably won't need to buy much, if anything at all. Here's what goes into a basic soda bottle hydroponic planter:
| Item | Where to Find It | Estimated Cost |
|---|---|---|
| 2-liter soda bottle | Recycling bin | Free |
| Old cotton sock or cloth strip | Sock drawer | Free |
| Scissors or craft knife | Junk drawer | Already owned |
| Perlite (small bag) | Garden center or dollar store | $1.50–$3.00 |
| Peat moss or coconut coir | Garden center | $1.50–$3.00 |
| Seeds (lettuce, basil, or herbs) | Dollar store or saved from cooking | $0.50–$1.00 |
| Plastic wrap (optional) | Kitchen drawer | Already owned |
Total estimated cost: $3.50–$5.00 (and often less if you have perlite or peat moss on hand from previous projects)
Step-by-Step Instructions
Step 1: Clean and Cut Your Bottle
Grab that empty 2-liter soda bottle and give it a good rinse. Peel off the label if you'd like a cleaner look, warm soapy water usually does the trick.
Using scissors or a craft knife, cut the bottle in half horizontally, roughly around the middle. You'll end up with two pieces: the top half with the cap and neck, and the bottom half that looks like a little cup. Keep both, they each have an important job.
Safety note for families: If younger kids are helping, an adult should handle the cutting part. Those plastic edges can be surprisingly sharp!
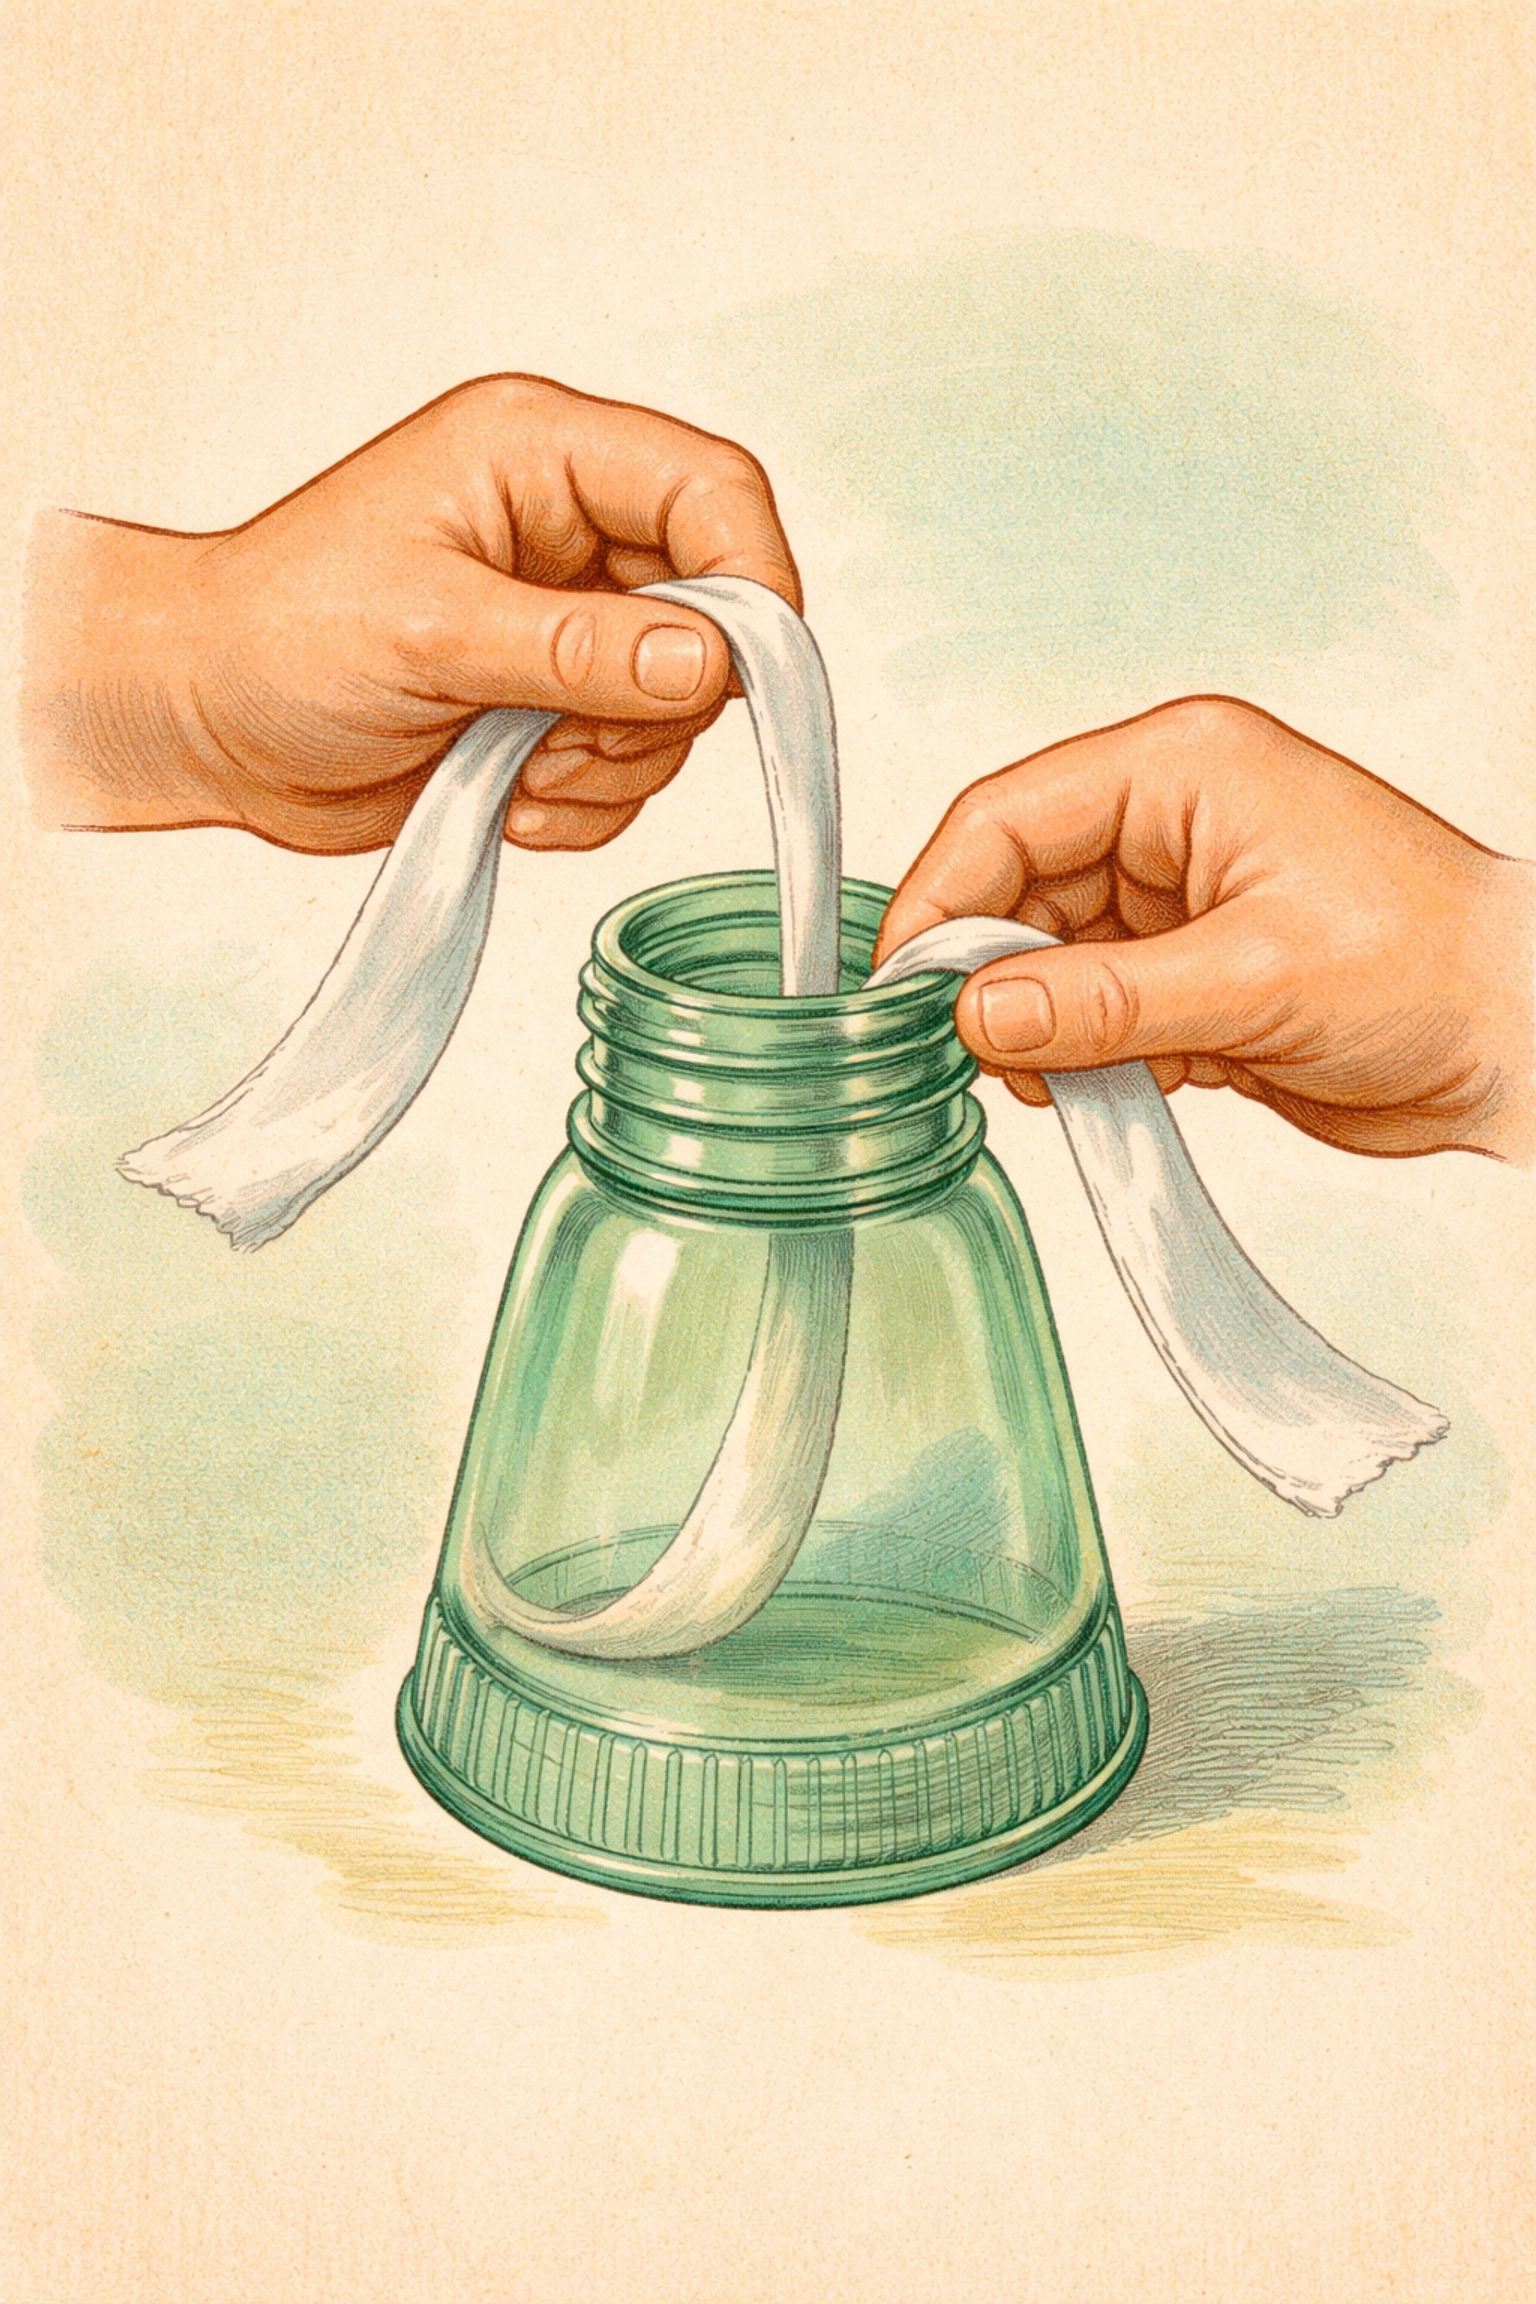
Step 2: Create Your Wick
This is where that lonely sock comes in handy. Cut a strip of cotton fabric about 6–8 inches long and roughly an inch wide. An old sock, a worn-out washcloth, or even a strip from a cotton t-shirt works beautifully.
Thread the fabric strip through the bottle's neck opening so that it hangs down a few inches on one side (this will dangle into the water) and bunches up a bit on the other side (this will sit in your growing medium).
The wick's job is to pull water up from the reservoir to your plant's roots through capillary action. Cotton works especially well because it absorbs and transfers water efficiently.
Step 3: Mix Your Growing Medium
In a small bowl or bucket, combine equal parts perlite and peat moss (or coconut coir if you prefer). For a single bottle planter, about one cup of each should be plenty.
Give it a gentle mix with your hands until it's evenly combined. This lightweight mixture holds moisture while still allowing plenty of air to reach the roots, something plants really appreciate in hydroponic setups.
Why not just use regular dirt? Soil can compact and clog your wick, plus it may contain pests or diseases. The perlite-peat mixture stays fluffy and clean.
Step 4: Assemble Your Planter
Here's where it all comes together:
Fill the bottom half of your bottle (the reservoir) with water, leaving about an inch of space at the top.
Remove the bottle cap from the top half.
Flip the top half upside down and nestle it into the bottom half, so the neck points downward into the water. The wick should extend at least 2 centimeters into the reservoir.
Gently pack your growing medium into the inverted top section, around the wick. Fill it nearly to the top, leaving about half an inch of space.
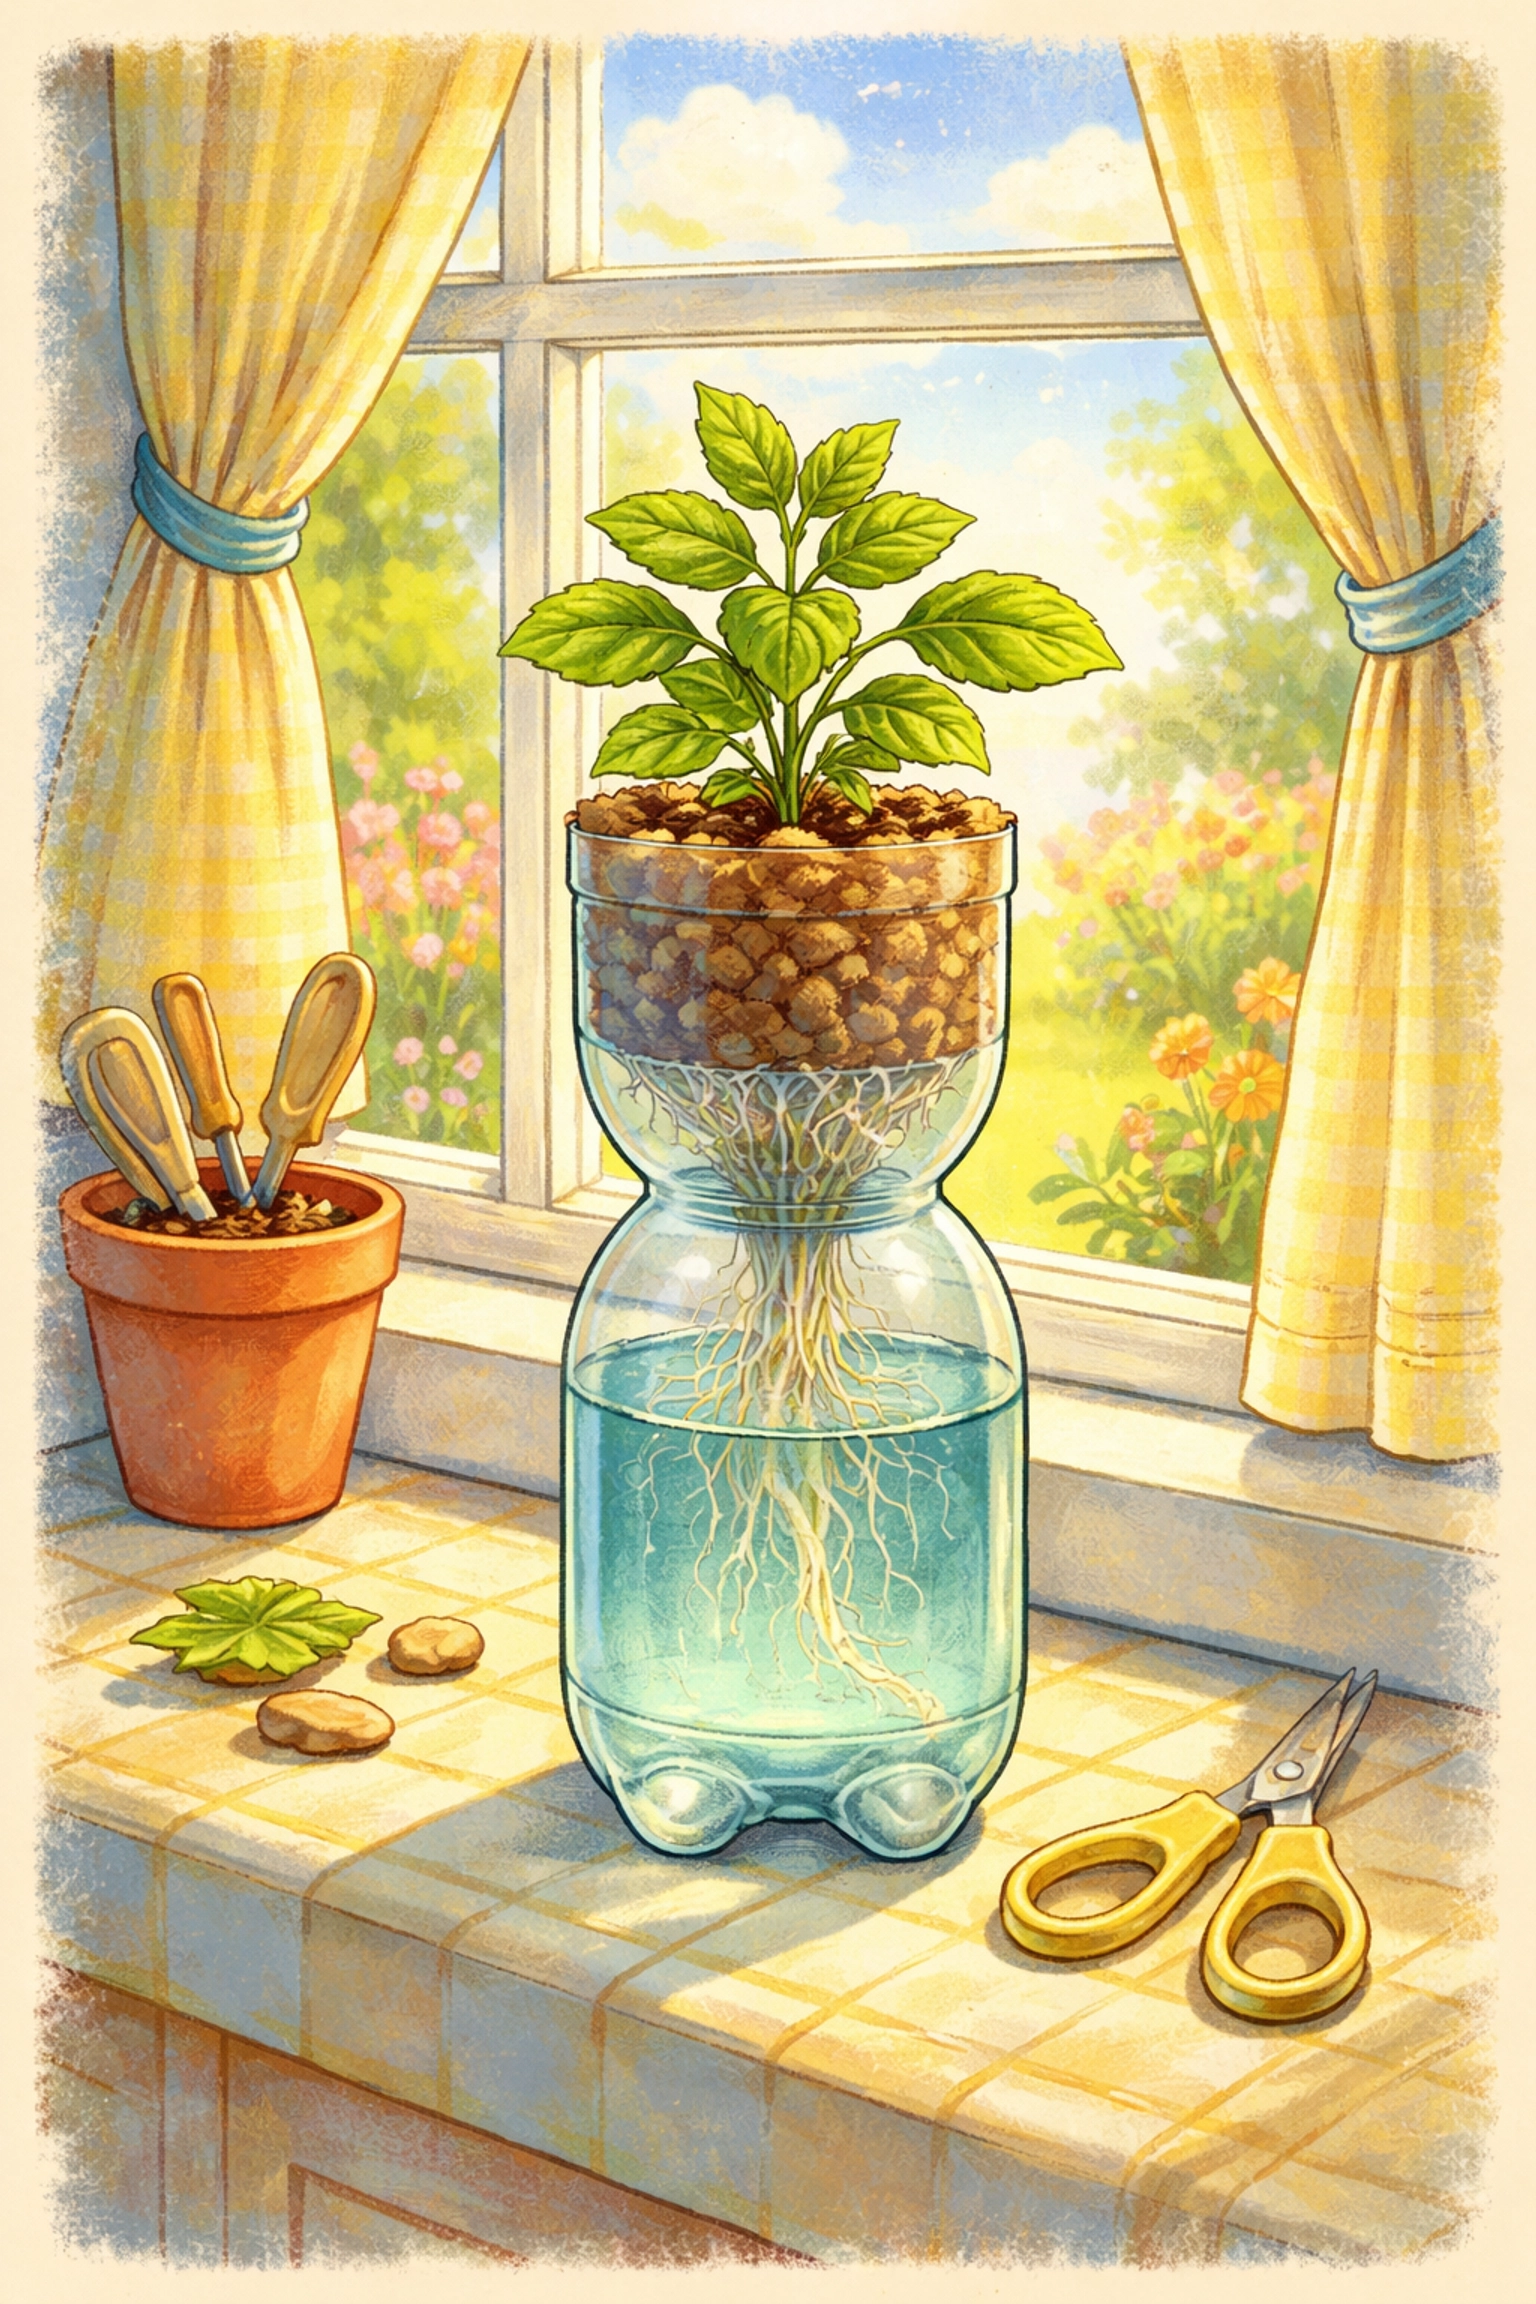
Step 5: Plant Your Seeds
Moisten your growing medium by slowly pouring about a cup of water over it. Let it drain through and absorb for a minute or two.
Poke a small hole about half an inch deep in the center of your medium and drop in 2–3 seeds. Lightly cover them with the surrounding mixture. Starting with a few extra seeds helps ensure at least one germinates, you can thin them out later if needed.
Great starter plants for this system:
- Lettuce
- Basil
- Cilantro
- Spinach
- Small herbs
Step 6: Create a Mini Greenhouse (Optional but Helpful)
To speed up germination, loosely cover the top of your planter with plastic wrap. This traps humidity and warmth, creating a cozy little greenhouse environment that seeds tend to love.
Place your planter somewhere warm but out of direct sunlight while you wait for sprouts to appear.
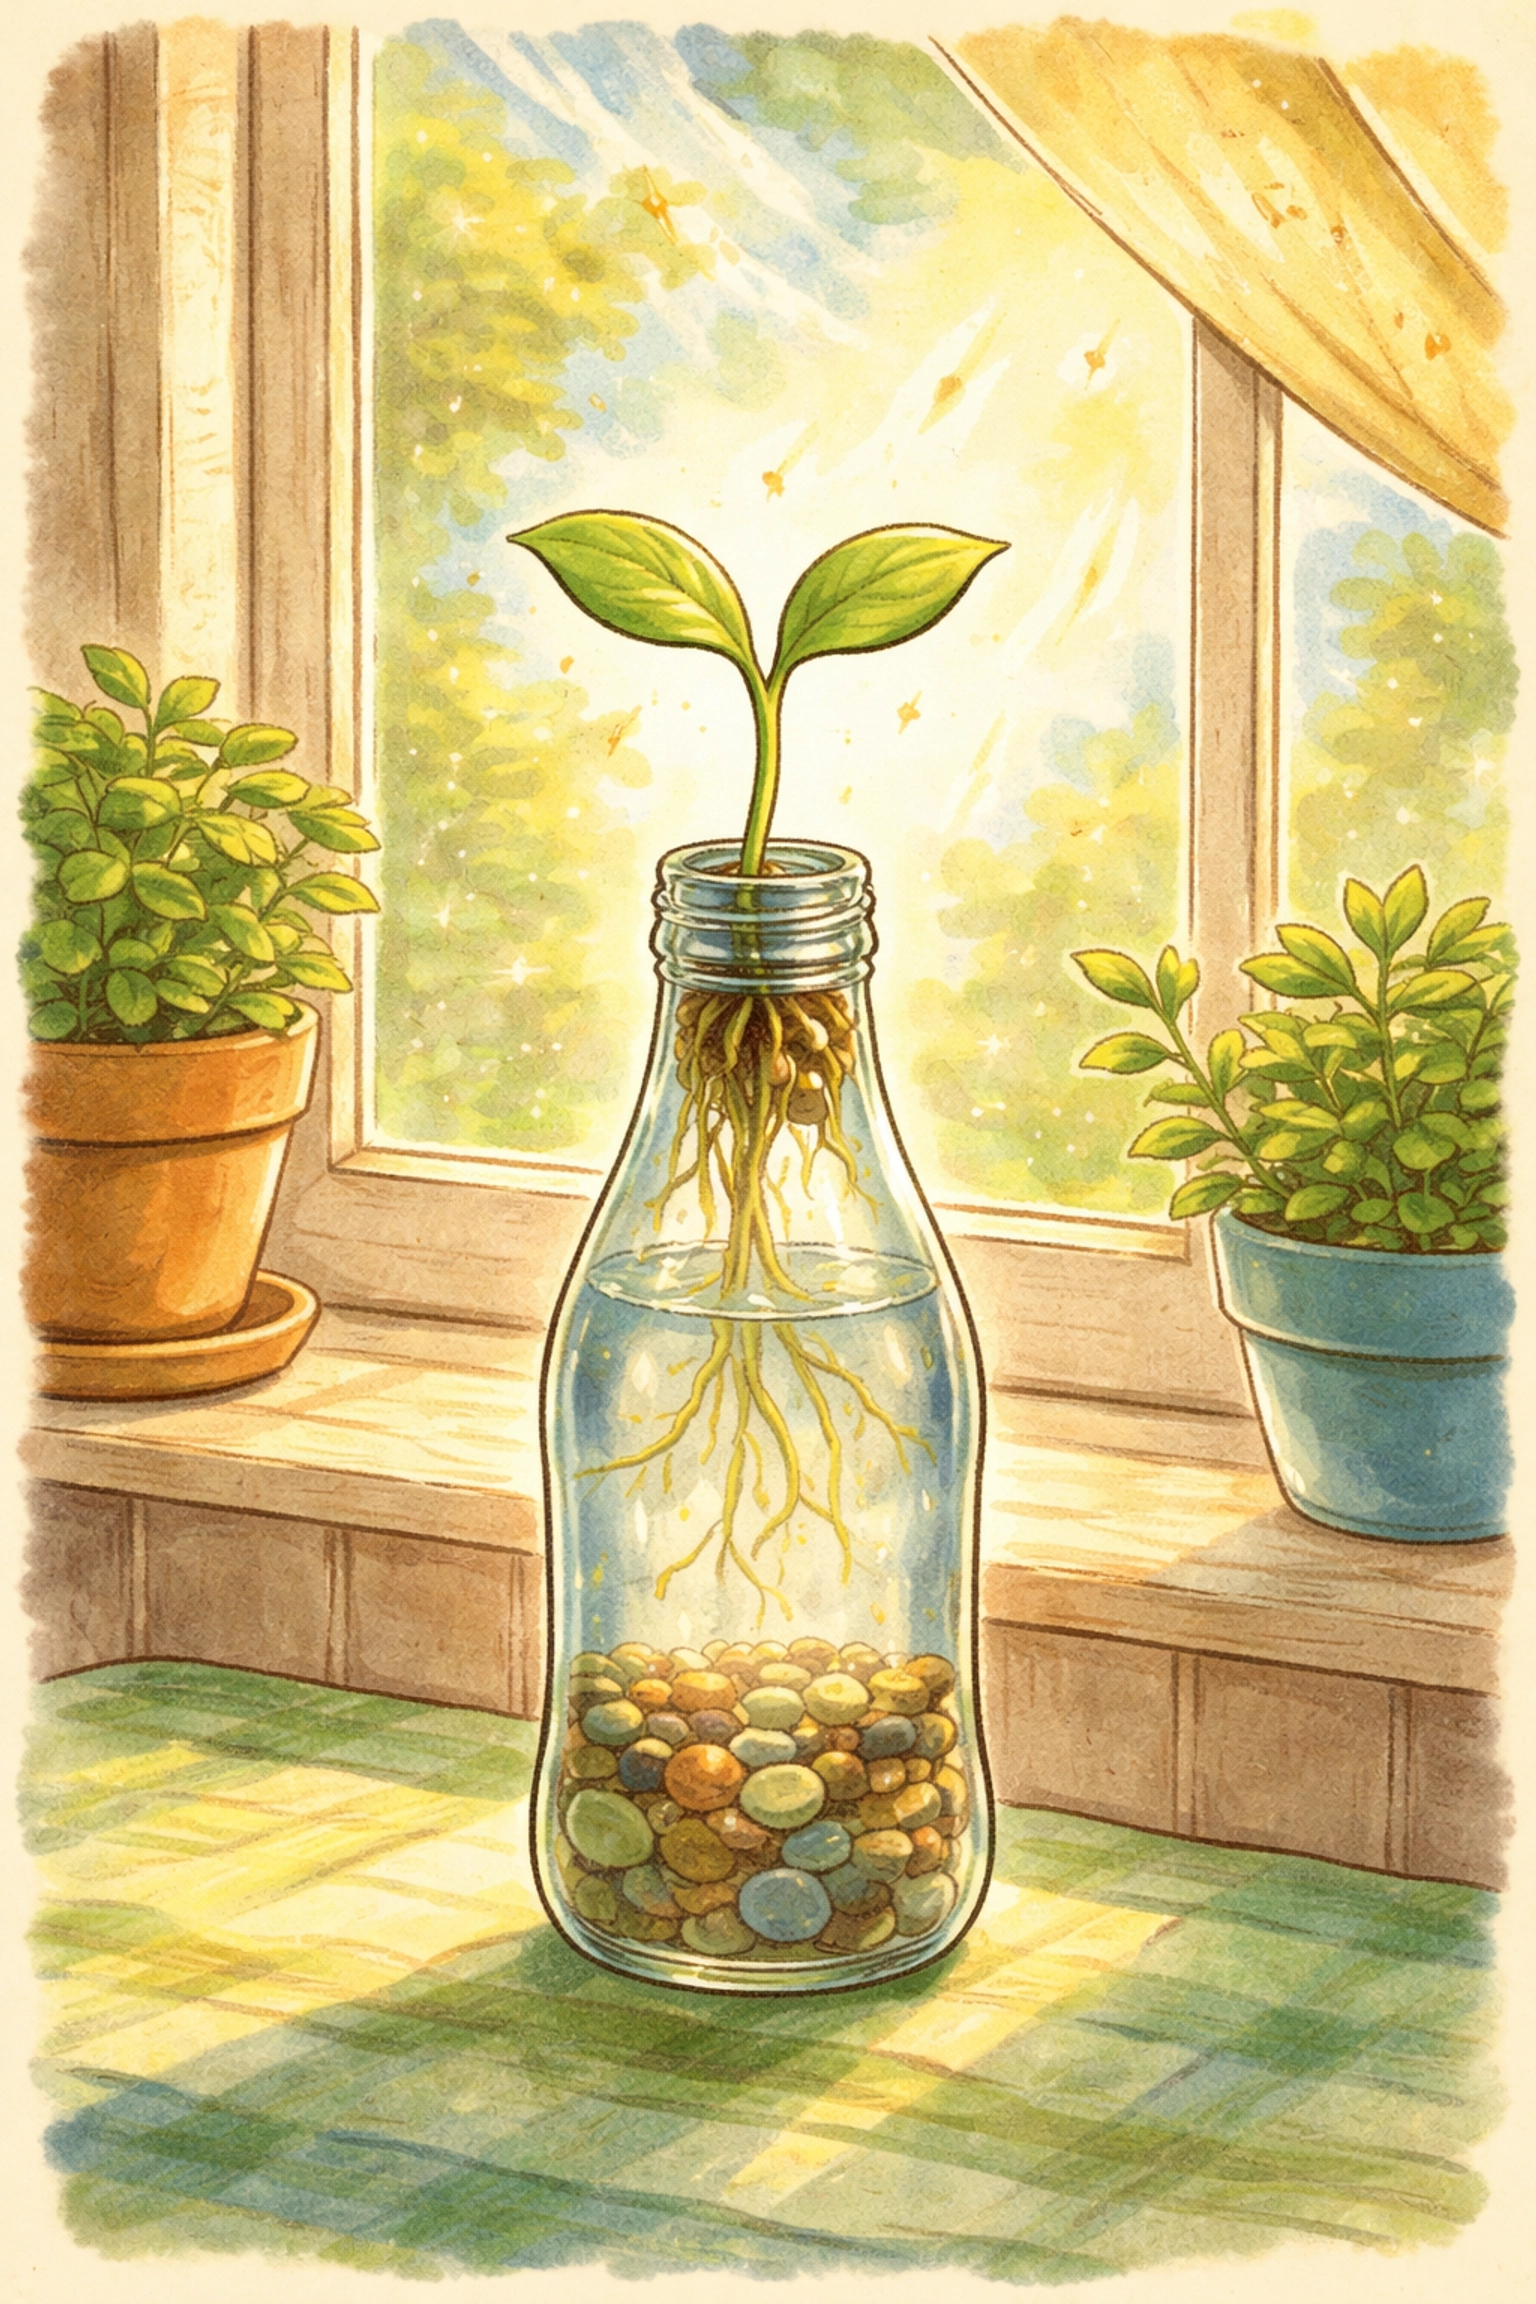
Step 7: Move to Light and Watch It Grow
Once you spot green sprouts poking through, usually within 5–10 days depending on what you planted, remove the plastic wrap and move your planter to a sunny windowsill.
A south-facing window typically works best, giving your plants around 6–8 hours of light daily. If natural light is limited, a simple desk lamp positioned nearby can help supplement.
Tips for Long-Term Success
Check your water level regularly. Peek into the reservoir every few days and top it off when it gets low. The wick can only do its job if there's water to pull up!
Consider adding nutrients later. Plain water works fine for germination and the first couple of weeks, but growing plants eventually appreciate a diluted liquid fertilizer. A weak solution of fish emulsion or a balanced hydroponic nutrient added to the reservoir can help your plants thrive.
Rotate your bottle. Plants naturally lean toward light, so give your planter a quarter turn every few days to encourage even, upright growth.
If you're curious about expanding your hydroponic setup, check out our guide on how much space you need for a productive hydroponic garden for ideas on scaling up!
Frequently Asked Questions
What kind of plants grow best in a soda bottle hydroponic planter?
Leafy greens and small herbs tend to perform especially well. Lettuce, spinach, basil, cilantro, and parsley are all solid choices. Larger or fruiting plants like tomatoes typically need bigger systems with more root space.
How often do I need to refill the water reservoir?
It depends on your plant size and environment, but checking every 2–3 days is a good habit. Smaller seedlings use less water, while mature plants may need refills more frequently.
Can I use tap water or does it need to be filtered?
Most tap water works just fine. If your water is heavily chlorinated, letting it sit out overnight allows some chlorine to evaporate. Plants generally aren't too picky!
Do I have to use perlite and peat moss?
Not necessarily. Coconut coir can replace peat moss, and some folks use vermiculite instead of perlite. The key is choosing a medium that holds moisture but doesn't compact.
Why is my wick not pulling up water?
Make sure the wick extends far enough into the reservoir and that the cotton material is actually touching the water. A dry or too-short wick can't do its job.
Can I grow this planter indoors year-round?
Absolutely! As long as your plants receive adequate light (natural or supplemental), indoor hydroponic growing works in any season.
Is this safe for kids to help with?
Yes! Just have an adult handle the bottle cutting. The rest of the project: mixing medium, planting seeds, adding water: is perfectly hands-on for curious young gardeners.
How long until I can harvest something?
Leaf lettuce can often be ready for a first harvest in 3–4 weeks. Herbs like basil may take 4–6 weeks to reach a size where you can start snipping leaves.
References
- Basic hydroponic wick system construction methods and growing medium ratios adapted from established DIY hydroponic gardening resources.
Looking for more budget-friendly projects to try with your family? Our Kids Crafts collection has plenty of hands-on ideas that won't break the bank!


