


To make a rubber band guitar with kids, stretch rubber bands of different thicknesses across a cardboard box or tissue box with a hole cut in the center. Elevate the bands with popsicle sticks on either side of the hole so they can vibrate freely, then pluck away to create music. This simple DIY instrument typically takes about 20–30 minutes to build and costs less than $10 using materials you likely have around the house already.
My kids have made countless versions of this project over the years, and it remains one of our favorite rainy-day activities. There's something genuinely magical about watching a child realize they've created an actual instrument that makes real sounds. Plus, it sneaks in a little science lesson about vibrations and pitch without feeling like school.
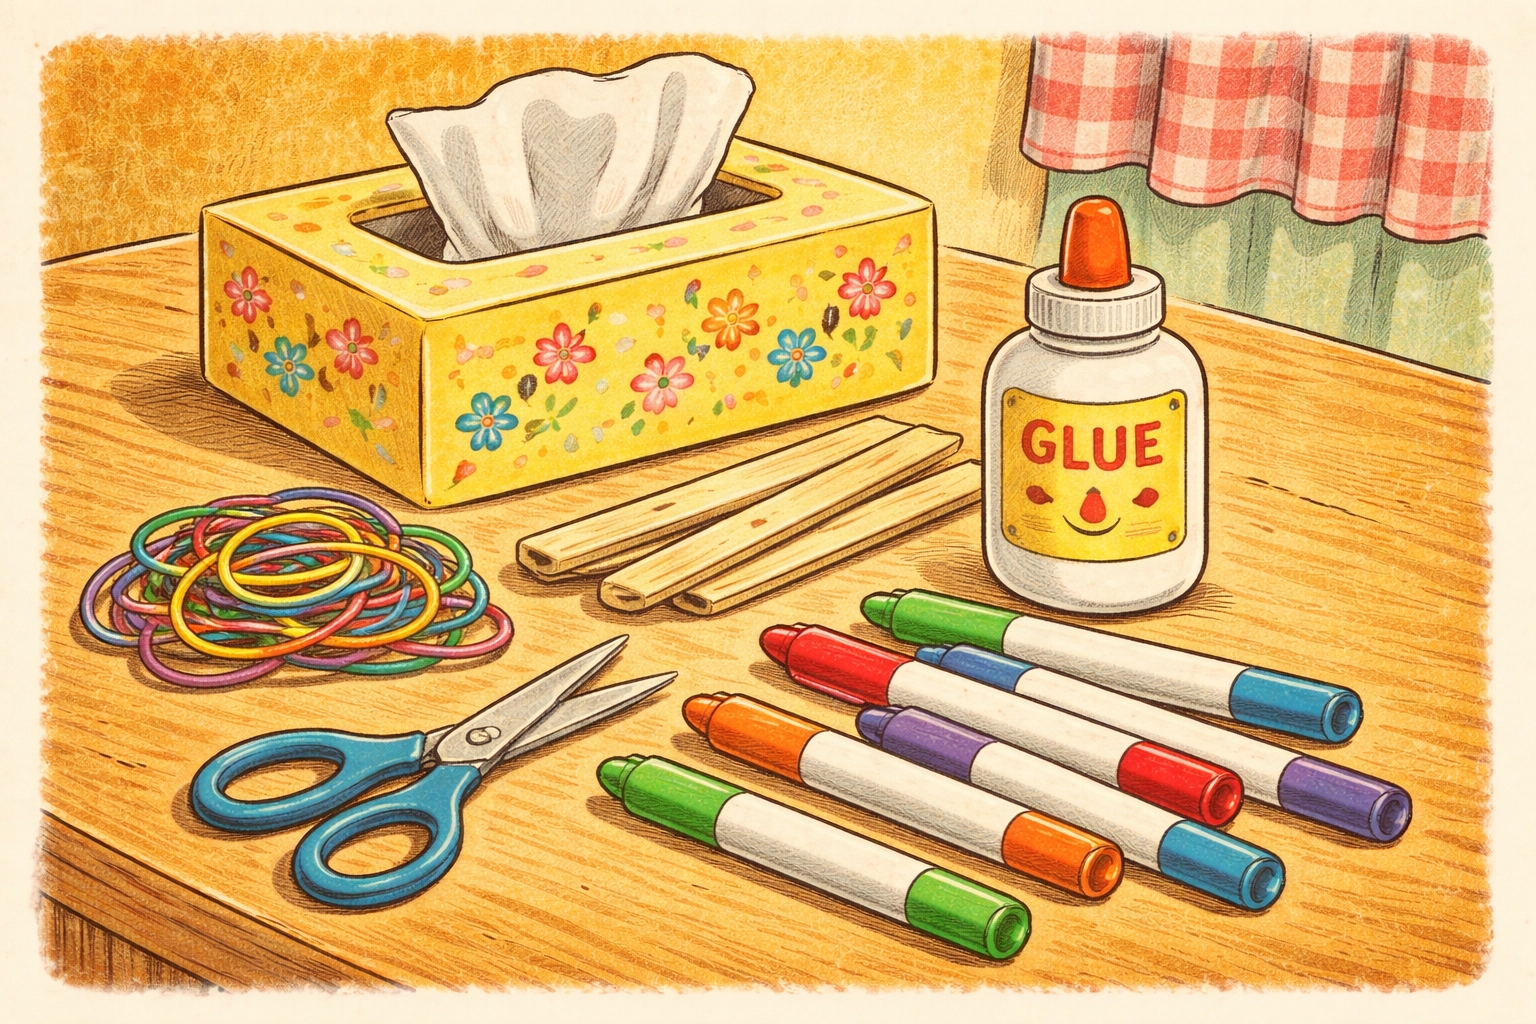
What You'll Need: Materials List
Here's everything required to build your rubber band guitar. Most families have these items tucked away in junk drawers or recycling bins.
| Material | Approximate Cost | Notes |
|---|---|---|
| Cardboard box or tissue box | Free–$2 | Shoe boxes, cereal boxes, and tissue boxes work well |
| Rubber bands (assorted sizes) | $1–$3 | Different thicknesses create different pitches |
| Popsicle sticks or wooden dowels | $1–$2 | These lift the "strings" for better sound |
| Tape or glue | $1–$2 | Hot glue works faster; school glue works fine |
| Scissors or craft knife | Already owned | Adult supervision needed for cutting |
| Decorating supplies (optional) | $0–$3 | Markers, paint, stickers, washi tape |
| Cardboard tube (optional) | Free | Paper towel roll for the guitar neck |
Total estimated cost: $3–$10
Age Range and Time Estimate
Recommended ages: This project tends to work well for children ages 3 and up, though the level of independence varies quite a bit.
- Ages 3–4: Can stretch rubber bands over the box and handle most decorating. Adults should do all cutting.
- Ages 5–7: Can participate in nearly every step with supervision. May need help with precise cutting.
- Ages 8+: Often capable of completing the entire project independently with minimal guidance.
Time to complete: Plan for roughly 20–30 minutes for the basic build. Add another 15–20 minutes if your crew wants to get creative with decorations or add a cardboard tube neck.
Step-by-Step Instructions
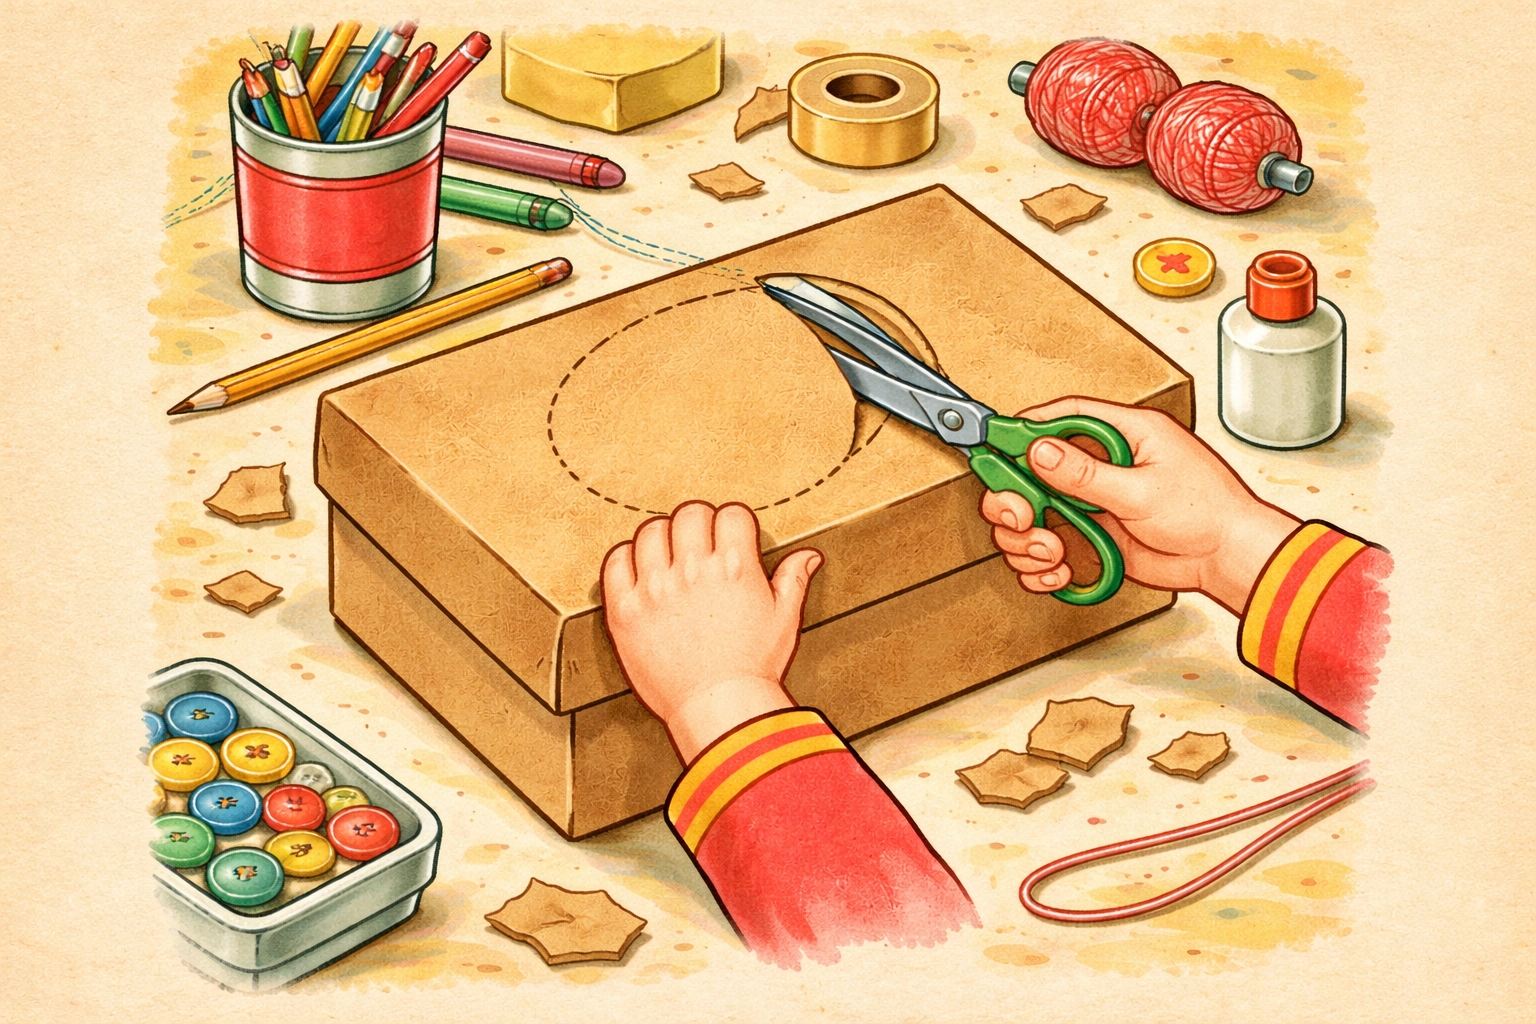
Step 1: Prepare Your Guitar Body
Grab your cardboard box or tissue box. If using a tissue box, you're already set: that oval opening becomes your sound hole. For a shoe box or similar container, use scissors or a craft knife to cut a circular or oval hole in the center of the lid (about 3–4 inches in diameter works nicely for most boxes).
Tip: The size of your box affects the sound. Larger boxes tend to produce deeper, more resonant tones, while smaller containers create higher, tinnier sounds.
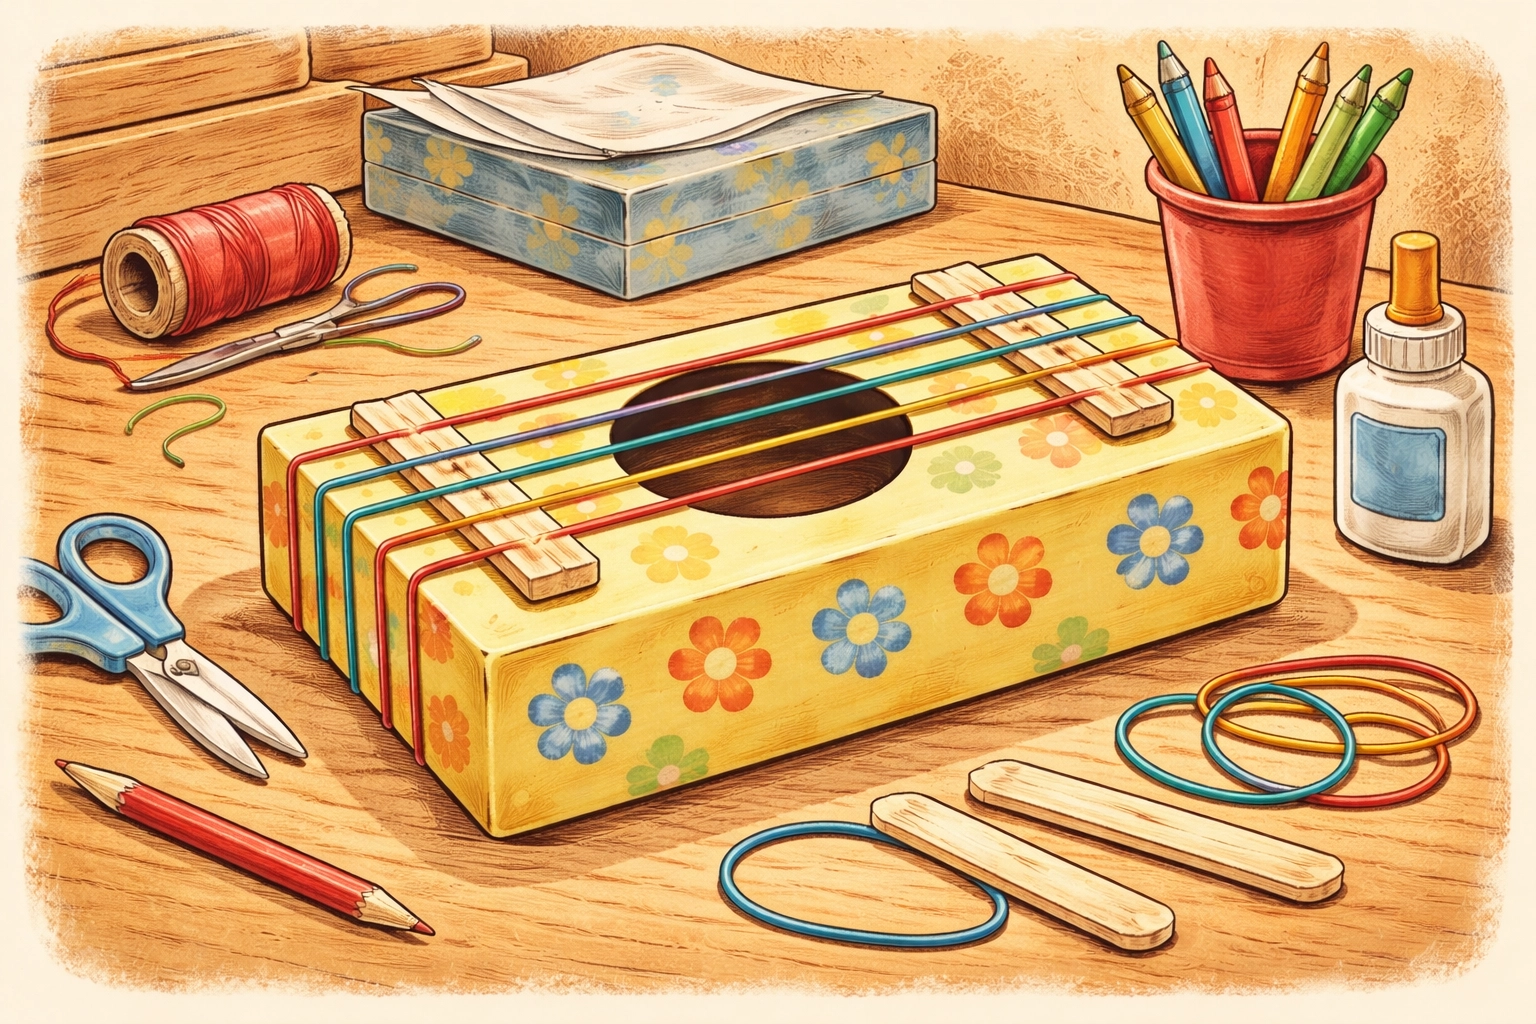
Step 2: Add the Bridge Supports
This step makes a surprisingly big difference in sound quality. Take two popsicle sticks and glue them parallel to each other on either side of the sound hole, running perpendicular to where your rubber band "strings" will go.
These supports lift the rubber bands slightly off the box surface, allowing them to vibrate more freely. Without them, your guitar might sound a bit muffled or quiet.
Let the glue dry for a few minutes before moving on. If you're using hot glue, this happens quickly. White school glue needs a bit more patience.
Step 3: String Your Guitar
Now for the satisfying part. Stretch your rubber bands lengthwise across the box, positioning them over the sound hole and resting on top of your popsicle stick bridges.
A few things to keep in mind:
- Thicker rubber bands generally produce lower-pitched sounds
- Thinner rubber bands tend to create higher-pitched sounds
- Tighter bands sound higher than looser bands of the same thickness
Start with 4–6 rubber bands spaced evenly apart. You can experiment with more or fewer depending on your box size and how many different "notes" you want.
Step 4: Add a Neck (Optional but Fun)
Want your guitar to look more like the real thing? Grab a cardboard tube from a paper towel roll or wrapping paper.
Cut a small notch in one end of the tube so it can sit flush against the box. Tape or glue it securely to one end of your guitar body. Some kids like to add "tuning pegs" by poking pencils or small dowels through holes in the tube top: these don't actually tune anything, but they look pretty cool.
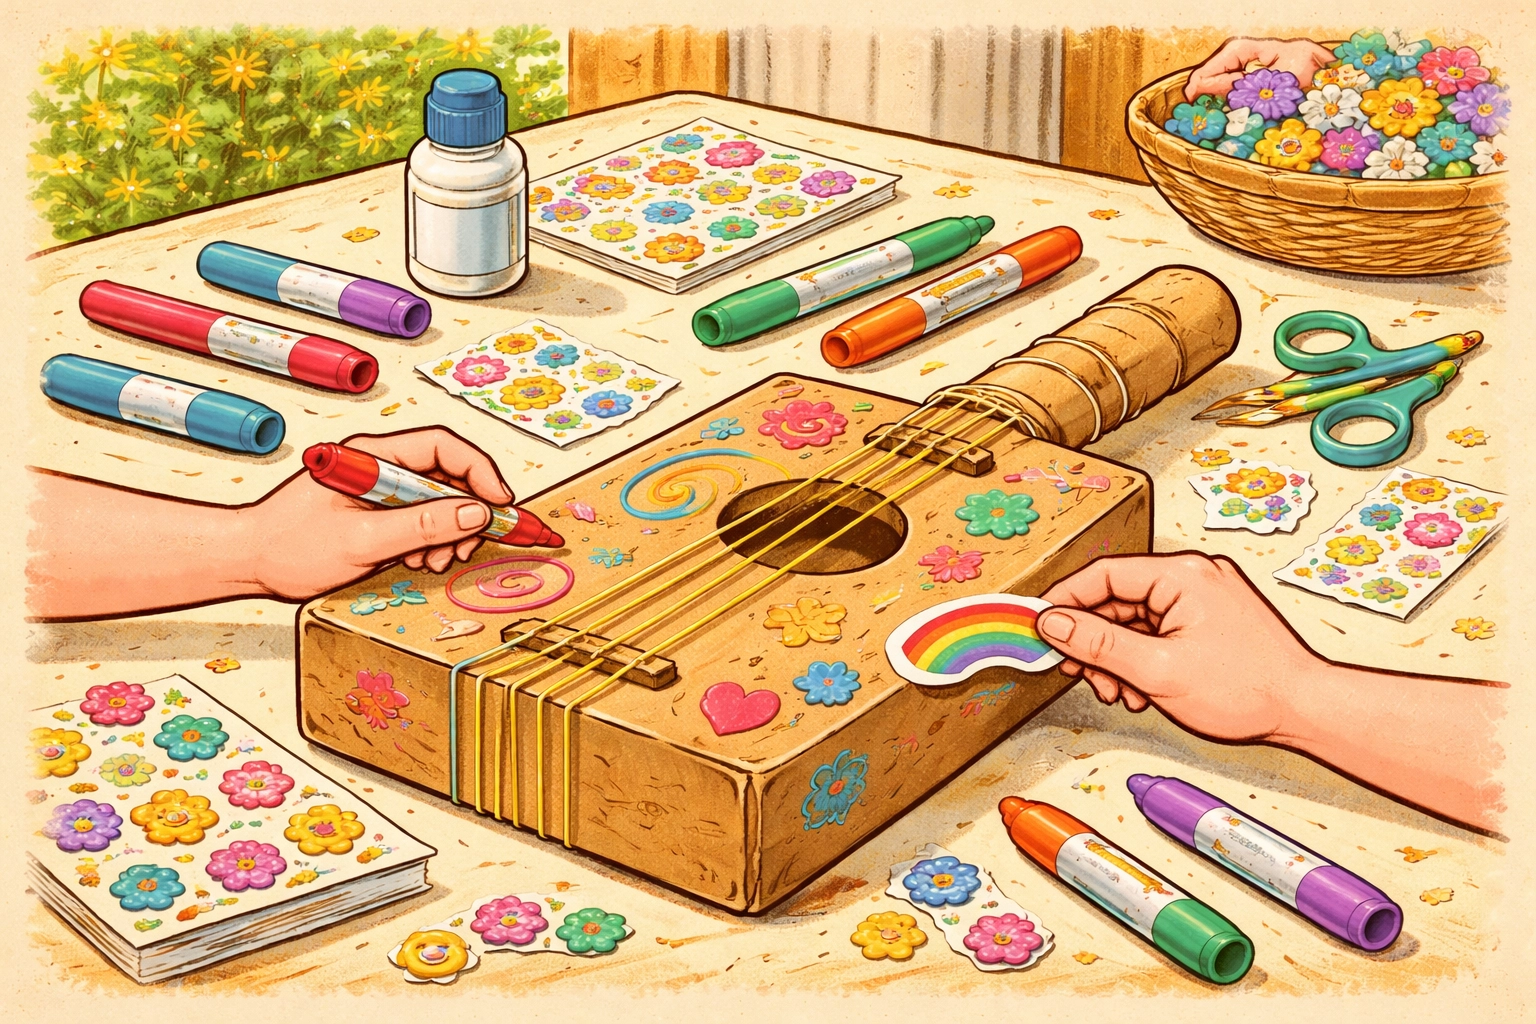
Step 5: Decorate Your Instrument
Here's where personalities really shine through. Break out the markers, paint, stickers, or whatever craft supplies you have on hand.
Important: If you're using paint, try to decorate before adding the rubber bands. Paint can sometimes affect rubber band elasticity, and it's just easier to work with a flat surface anyway.
Some decoration ideas we've seen:
- Racing stripes and flames for a rock-and-roll vibe
- Flowers and butterflies for a garden guitar
- A child's name in big bubble letters
- Abstract swirls and patterns
How to Play Your Rubber Band Guitar
Playing is intuitive: pluck the rubber bands with your fingers and listen to the different sounds each one makes.
Changing pitch: Press down on a rubber band with one finger while plucking with another. This shortens the vibrating length and raises the pitch, similar to how frets work on a real guitar.
Volume control: Pluck gently for softer sounds, or give the bands a firmer twang for louder notes.
Making music together: Consider building several guitars using different-sized boxes and rubber bands. Each instrument will have its own tonal character, and you can create a little family band with a range of sounds.
The Science Behind the Sound
This is a great opportunity to sneak in some learning without making it feel like a lesson. When you pluck a rubber band, it vibrates back and forth very quickly. Those vibrations travel through the air as sound waves, which your ears interpret as musical notes.
The sound hole amplifies those vibrations by allowing air inside the box to resonate. That's why a rubber band stretched over a solid surface sounds much quieter than one stretched over a hollow container.
Kids often find it fascinating to experiment with what changes the sound. Try covering the sound hole with your hand while plucking: notice how the tone shifts? That's physics in action.
Frequently Asked Questions
Can I use something other than a cardboard box?
Definitely. Plastic containers, metal tins, and even sturdy Tupperware can work. Each material produces a slightly different sound quality, which can be fun to explore.
What if I don't have rubber bands?
Hair ties can work in a pinch, though they tend to be thicker and produce lower tones. You might also check office supply drawers: rubber bands seem to accumulate there mysteriously.
How many rubber bands should I use?
Most guitars sound good with 4–6 bands, but there's no strict rule. Some kids prefer just 2–3, while others want to pack on as many as possible.
Why does my guitar sound quiet or muffled?
The rubber bands might be sitting too flat against the box. Make sure your popsicle stick bridges are elevating them properly. Also check that the sound hole isn't blocked.
Can younger toddlers do this project?
With plenty of adult help, kids as young as 2 can participate in stretching rubber bands and decorating. Just keep small items away from mouths and handle all cutting yourself.
How do I make the sounds higher or lower?
Use thinner bands for higher pitches, thicker bands for lower pitches. You can also pull bands tighter (higher sound) or leave them looser (lower sound).
Will this actually teach my child about music?
It can introduce basic concepts like pitch, rhythm, and how vibrations create sound. It's not a replacement for music lessons, but it's a wonderful hands-on introduction to how instruments work.
How long will the guitar last?
Rubber bands do dry out and snap over time, especially in sunlight. Stored indoors, your guitar should stay playable for several weeks. Bands are easy to replace when needed.
Looking for more hands-on projects to try with your kids? Check out our Kids Crafts collection for dozens of budget-friendly activities that spark creativity and learning.


