


What's the Easiest Way to Build a DIY Marble or Car Maze?
The simplest way to build a marble or car maze is to glue drinking straws and cardboard strips inside a shallow box lid, creating walls and pathways that kids navigate by tilting the box. This hands-on STEM project typically takes about 30 to 45 minutes to complete, costs under ten dollars with materials most families already have at home, and teaches children about engineering, problem-solving, and physics through pure play.
Whether your little ones prefer racing tiny cars through winding tracks or guiding marbles through tricky tunnels, this project adapts beautifully to whatever rolls best in your house.
Why Kids Love This Project
There's something almost magical about tilting a homemade maze and watching a marble wind its way through passages you designed yourself. This activity combines creative thinking with trial-and-error engineering: kids get to be both the architect and the player.
Beyond the fun factor, marble and car mazes help develop:
- Fine motor skills through cutting, gluing, and precise placement
- Spatial reasoning as kids visualize paths and dead ends
- Problem-solving abilities when testing reveals design flaws
- Patience and persistence during the build-test-adjust cycle
Plus, once the maze is finished, the entertainment keeps going. Kids can challenge siblings, time their runs, or redesign sections for added difficulty.
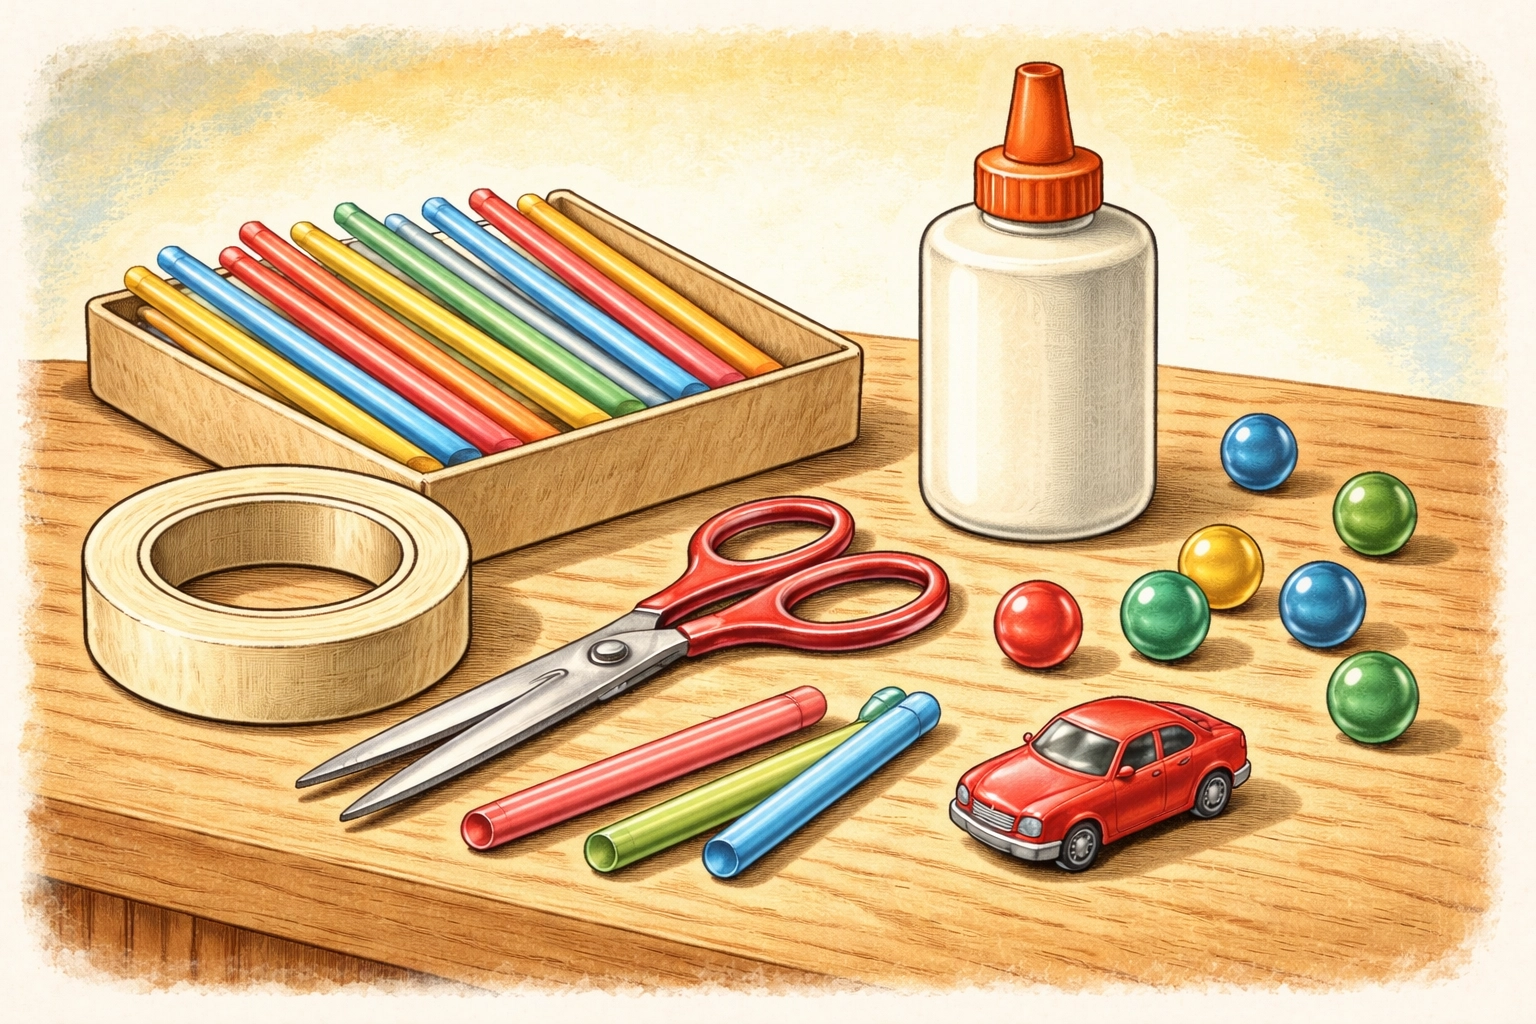
Materials You'll Need
| Material | Estimated Cost | Notes |
|---|---|---|
| Shallow cardboard box lid | Free | Shoebox lids, pizza box tops, or shipping box lids work well |
| Drinking straws | $1–$2 | Paper or plastic; bendable straws add curve options |
| Cardboard scraps | Free | Cereal boxes, shipping materials, or cardstock |
| White glue or glue stick | $1–$2 | Hot glue works faster but requires adult supervision |
| Masking tape | $1–$2 | Helpful for quick adjustments |
| Scissors | Already owned | Kid-safe scissors for younger builders |
| Marbles or small toy cars | $1–$3 | Use what you have; bouncy balls work too |
| Markers or crayons | Already owned | For decorating and marking start/finish |
Total estimated cost: Under $10 (often free with household supplies)
Age Range and Time Estimate
Best suited for ages: 4 to 10 years old
| Age Group | Skill Level | Adult Help Needed |
|---|---|---|
| 4–5 years | Decorating, testing, simple wall placement | Significant help with cutting and gluing |
| 6–7 years | Designing paths, placing most walls | Moderate help with tricky cuts |
| 8–10 years | Full design and construction | Minimal supervision |
Time to complete: 30 to 45 minutes for basic mazes; up to an hour for elaborate designs with tunnels and multiple paths.
Step-by-Step Instructions
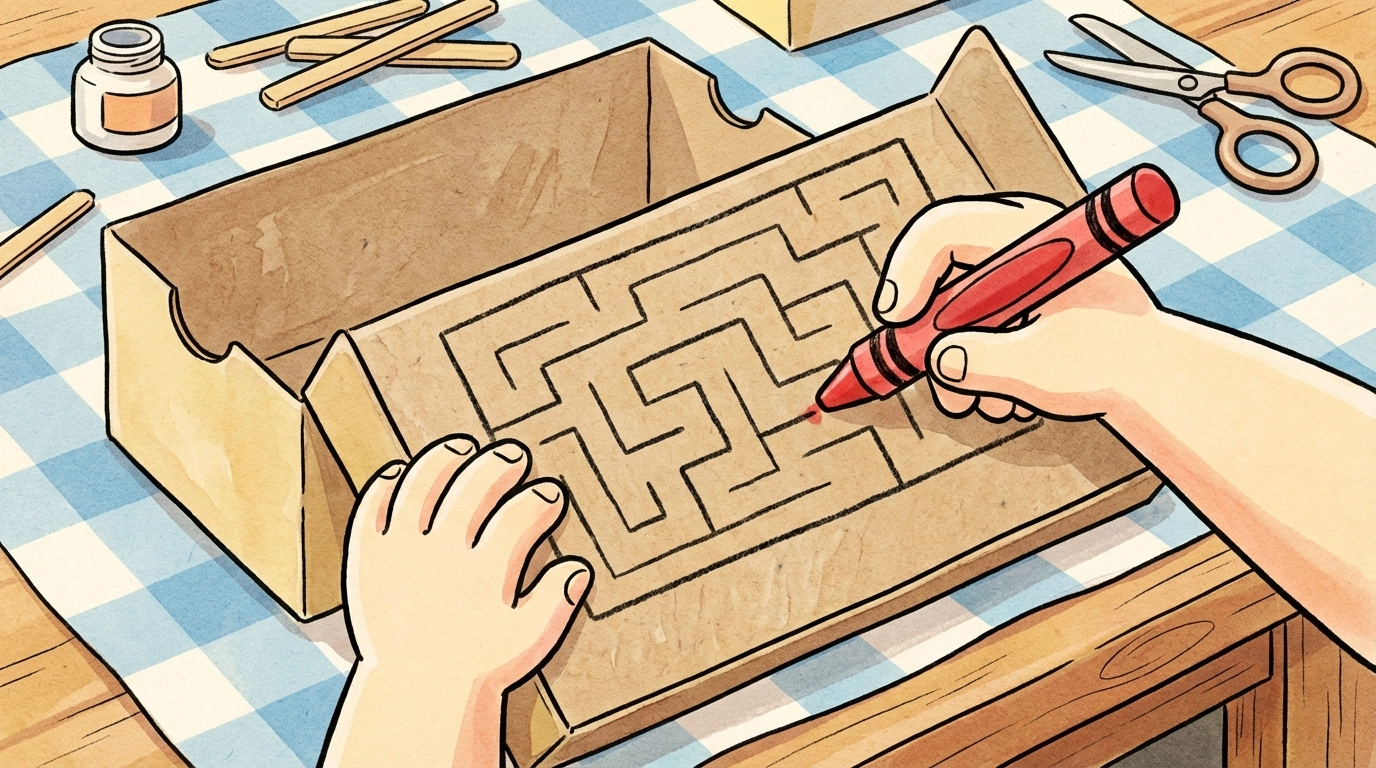
Step 1: Gather Your Base and Plan the Layout
Find a shallow box lid: shoebox lids are ideal because they have raised edges that keep marbles from escaping during play. If you're making a car maze, you may want a slightly larger base like a pizza box top.
Before gluing anything down, have your child sketch out a rough maze design. This planning phase is actually a valuable engineering exercise. Discuss questions like:
- Where should the start and finish be?
- Do we want one path or multiple routes?
- Should there be dead ends to make it trickier?
You don't need a perfect blueprint: just a general idea of the flow.
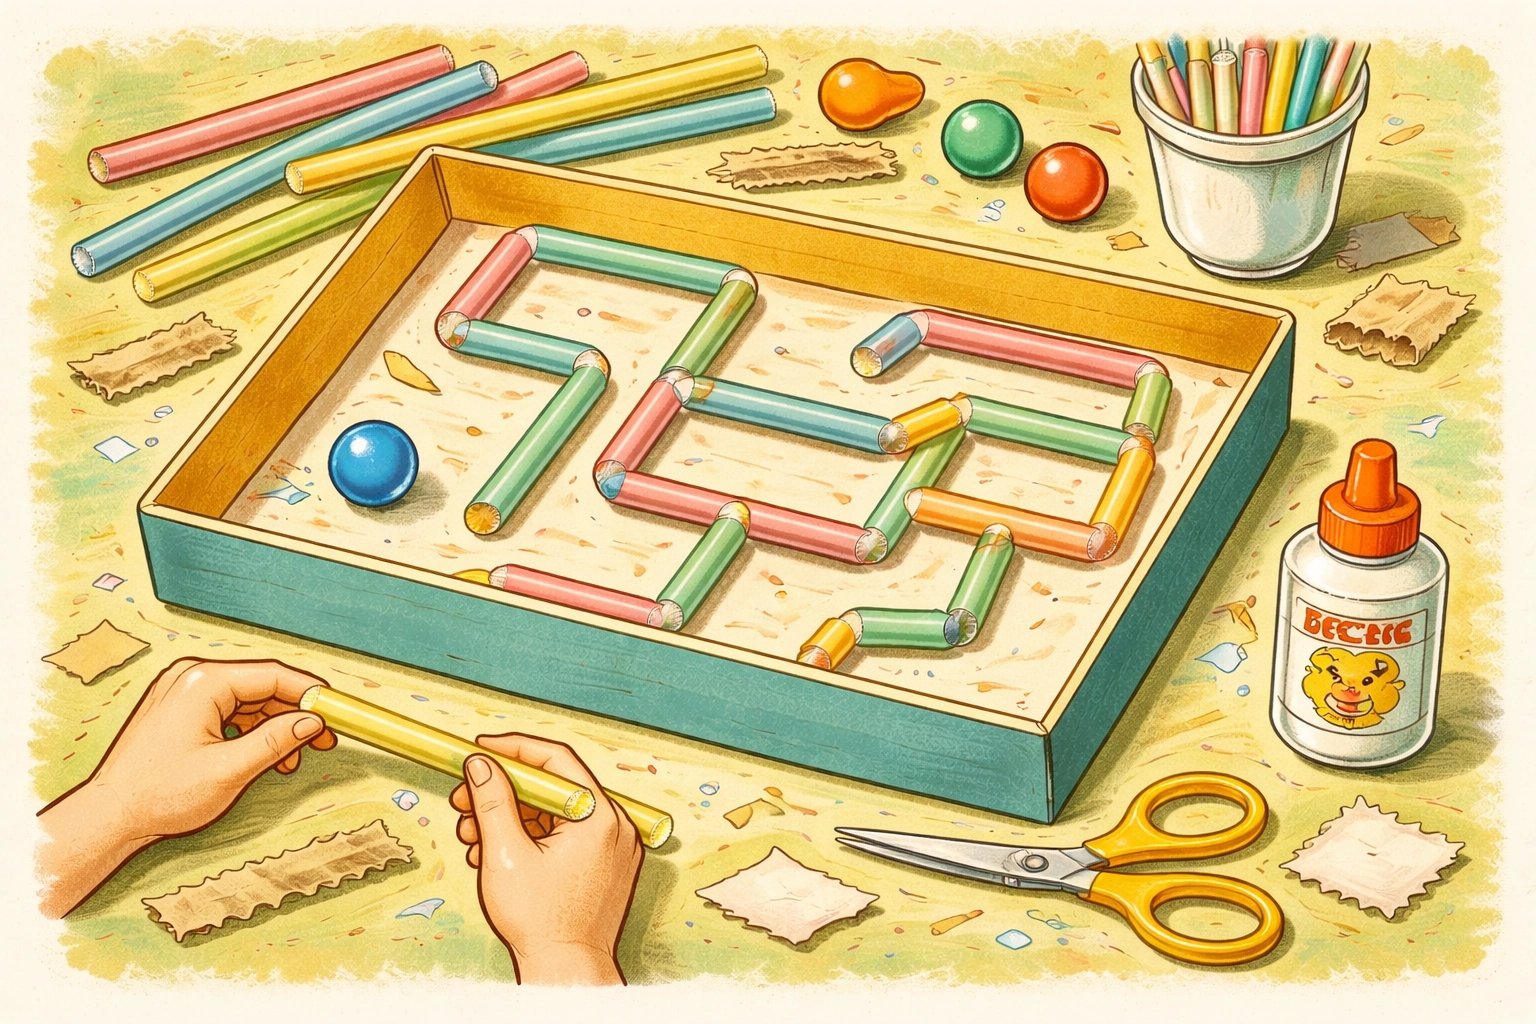
Step 2: Cut Your Wall Materials
Cut drinking straws into various lengths: some long for main walls, some short for small barriers. If you're using cardboard strips, cut them about half an inch to one inch wide and in varying lengths.
Pro tip: For car mazes, make your pathways wider than marble mazes. Those little Hot Wheels need more room to maneuver than a rolling marble does.
Step 3: Create the Outer Walls
Start by securing walls along any open edges of your box lid. Even if the lid has raised sides, adding straw or cardboard walls along the perimeter helps prevent escapes and gives the maze a more finished look.
Use white glue or masking tape to attach these outer walls. If you're working with impatient little builders, masking tape allows for faster progress while glue dries.
Step 4: Build the Interior Maze Walls
Now comes the creative part. Working from your rough plan, begin attaching interior walls to create pathways, dead ends, and challenging turns.
Helpful building tips:
- Leave enough space between walls for your marble or car to pass through comfortably
- Create a mix of long straightaways and tight turns
- Add at least two or three dead ends to increase the challenge
- Test-roll your marble frequently as you build: it's much easier to adjust before glue dries
For younger children, simpler mazes with fewer walls work better. Older kids often enjoy adding complexity with multiple possible routes or hidden shortcuts.
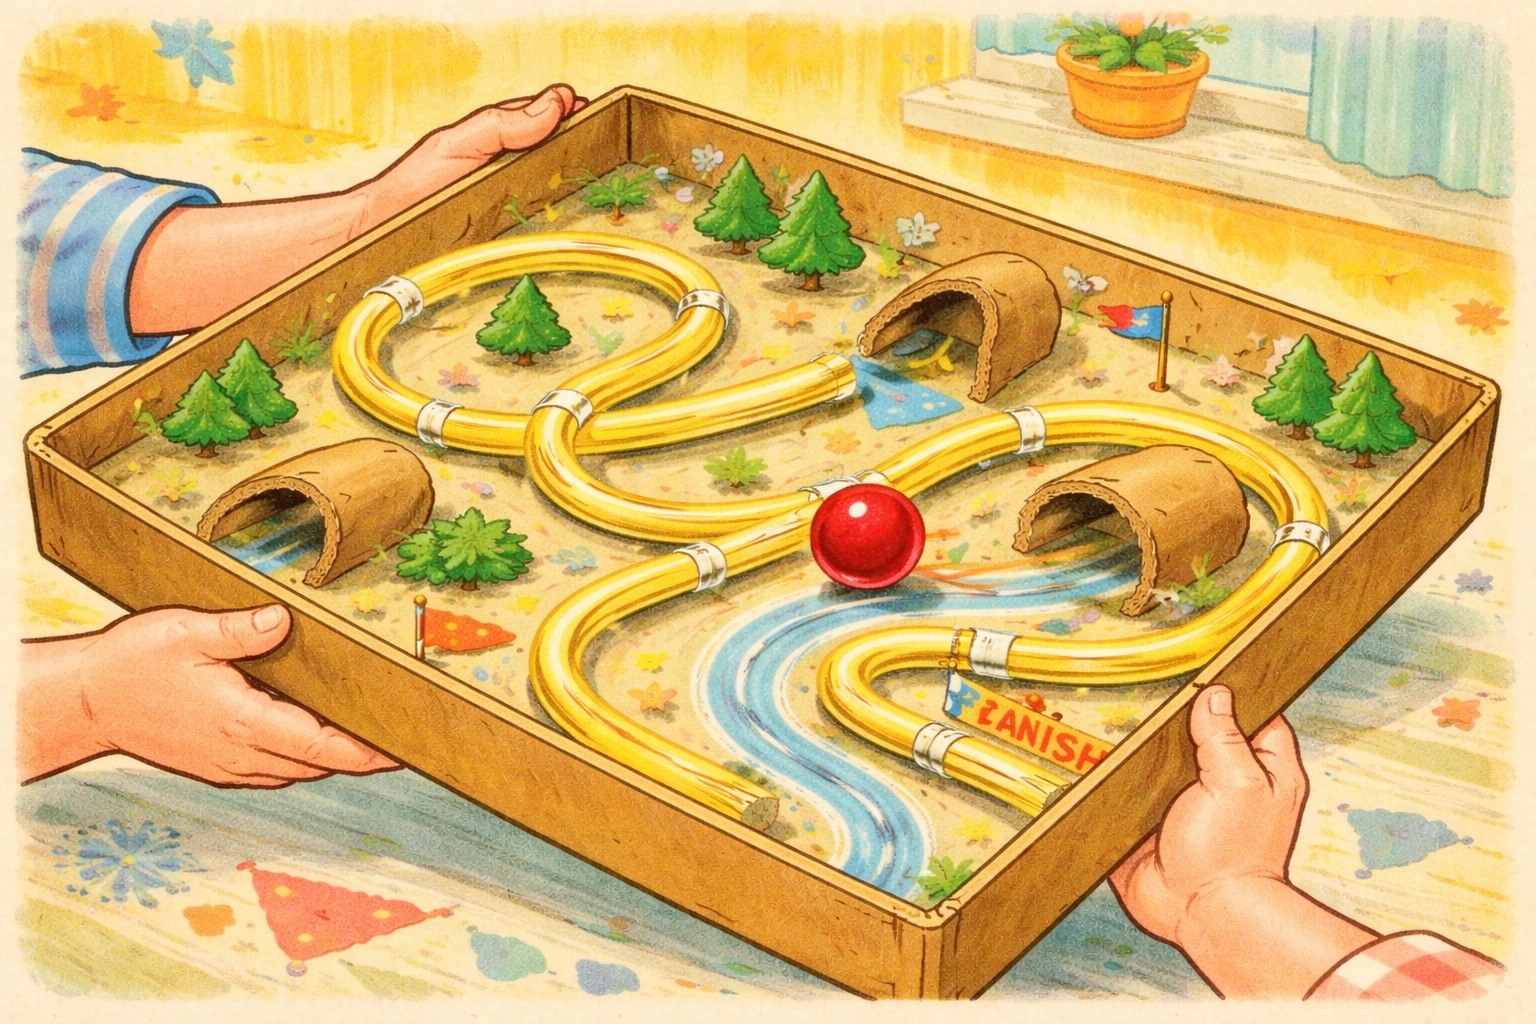
Step 5: Add Optional Tunnels and Obstacles
Want to level up your maze? Cut short sections of cardboard tubes (toilet paper rolls work great) and glue them horizontally to create tunnels. The marble or car disappears inside and pops out the other end: kids find this endlessly entertaining.
Other fun additions:
- Ramps: Angle small cardboard pieces to create hills
- Bumpers: Glue bottle caps or pom-poms as obstacles to navigate around
- Trap doors: Cut small holes that marbles can fall through (add a "rescue zone" below)
Step 6: Mark Start and Finish Points
Use markers or crayons to clearly label the starting circle and finish line. Some families like to decorate the entire maze with themes: race tracks, enchanted forests, outer space adventures, or underwater scenes.
This decorating step is entirely optional but adds personality and ownership to the project.
Step 7: Test, Adjust, and Play
Here's where the real fun begins. Tilt the maze gently to guide your marble from start to finish. Does it flow smoothly? Get stuck anywhere? Roll too fast around certain corners?
Testing often reveals design flaws, and that's perfectly okay: it's how engineers work in real life. Adjust wall heights, widen tight passages, or add new barriers as needed.
Once your maze works well, challenge family members to complete it. Time each attempt for friendly competition, or see who can design the trickiest course.
Variations to Try
Playdough maze: For very young children, roll playdough into snake shapes and press them onto a flat surface or box lid. This version allows for quick redesigns without any glue.
Pipe cleaner walls: Bendable pipe cleaners create curved walls and can be repositioned easily, making them ideal for kids who want to experiment with different layouts.
Double-decker maze: Stack two box lids with a hole connecting them. The marble drops from the upper level to continue through the lower maze: a satisfying engineering challenge for older kids.
Cooperative mega-maze: Connect multiple box lids together for a family-sized maze that everyone helps design and build.
Frequently Asked Questions
What age is appropriate for building marble mazes?
Children as young as four can participate with adult help, focusing on decorating and testing. Kids around seven or eight often manage most of the construction independently. The project scales nicely to different skill levels.
Can I use this project for toy cars instead of marbles?
Absolutely. Just make your pathways wider to accommodate the car's size. Matchbox and Hot Wheels cars work well, though you'll need slightly more tilting force since they're heavier than marbles.
What if we don't have drinking straws?
Cardboard strips, popsicle sticks, pipe cleaners, or even rolled-up paper can substitute as maze walls. Use whatever craft supplies you have available.
How do I make the maze more challenging?
Add dead ends, create narrow passages, include tunnels, or cut small holes that marbles can accidentally fall through. Multiple possible routes with only one correct path increases difficulty significantly.
Is hot glue necessary?
Not at all. White glue and masking tape work fine, though they require more patience while drying. Hot glue speeds things up but should only be handled by adults or older children with supervision.
Can we reuse the maze or should we make new ones?
Many families keep their mazes for weeks of play. When interest fades, you can peel off the walls and rebuild with a fresh design, or recycle the whole thing and start from scratch.
What's a good marble size for this project?
Standard glass marbles (about 5/8 inch diameter) work well for most mazes. Larger shooter marbles need wider pathways, while smaller marbles may escape through tiny gaps.
How can I make this educational?
Discuss concepts like gravity, friction, momentum, and angles while building and playing. Ask questions like "Why does the marble speed up here?" or "What happens if we make this ramp steeper?"
Looking for more hands-on projects to keep little ones busy? Check out our full collection of kids crafts for dozens of family-friendly activities that spark creativity and learning.


