

Salt & Ice Fishing: Melting Points and Freezing Tricks
At-a-Glance Experiment Overview
| Category | Details |
|---|---|
| Mess Level | 3/5 (wet hands, a little spilled water) |
| Time Required | 15–20 minutes |
| Estimated Cost | $1–$3 |
| Safety Gear | None required |
| Best For | Young and middle elementary kids |
| Core Science | Freezing point depression |
| Supervision Level | Light adult help for setup and patience coaching |
What Is Salt & Ice Fishing?
Imagine you could "catch" an ice cube using nothing but a piece of string and a sprinkle of salt, no hooks, no nets, just a little kitchen chemistry. That's the charm of salt and ice fishing, a simple experiment that lets kids experience freezing point depression in action. The process might seem like magic at first: lay a string across an ice cube, add salt, wait about 30 seconds, and then lift the string to pull the ice cube right out of the water. It's a wonderfully visual way to explore how salt changes the behavior of ice, and it works quickly enough to keep even wiggly little scientists engaged.
This experiment tends to work best with young and middle elementary students who are just starting to ask questions about why roads get salted in winter or how ice cream makers use salt to freeze their treats. The hands-on "fishing" game keeps the activity playful, while the underlying science opens the door to conversations about temperature, melting, and refreezing.
What You'll Need
You likely have everything for this experiment sitting in your kitchen right now:
- A shallow bowl or dish (wide enough to hold a few ice cubes with room to spare)
- Cold water (tap water is fine; just fill the bowl about halfway)
- Ice cubes (4–6 cubes work well; the bigger, the better)
- Cotton string or yarn (cut into 6–8 inch pieces, one per child or per "fishing" attempt)
- Table salt (regular iodized salt from the shaker works great)
- Optional: a timer or stopwatch (to help kids practice patience during the 30-second wait)
That's it. No fancy gear, no expensive supplies, and no trip to the store. If you want to extend the experiment, you can also grab a notebook and pencil for kids to record their observations or try variations with different types of salt (kosher, sea salt, rock salt) to see if the results change.
Step-by-Step Instructions
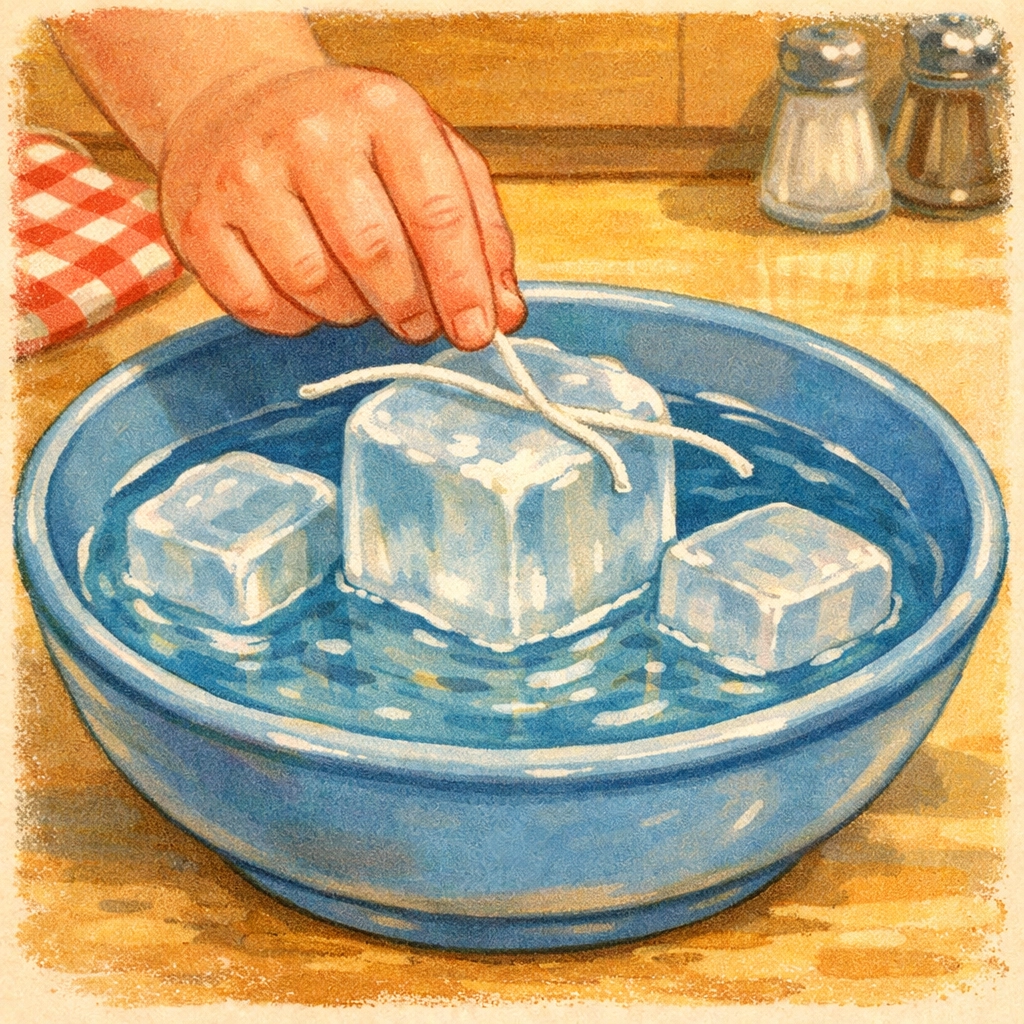
Step 1: Set Up Your Ice Bowl
Fill your shallow bowl or dish about halfway with cold tap water. Drop in 4–6 ice cubes and let them float on the surface. The ice cubes should have a bit of space around them so kids can easily place their strings across the top.
Adult tip: If your ice cubes are stuck together in a clump, gently separate them. The experiment works best when each child can target one ice cube with their string.
Step 2: Lay the String Across an Ice Cube
Cut a piece of string or yarn about 6–8 inches long. Lay it gently across the top of one ice cube, letting the ends drape down into the water on either side. The string should sit right on the surface of the ice, not floating off to the side.
What to tell the kids: "We're going to try to pick up this ice cube using just this string. No grabbing, no scooping, just the string. Think it'll work?"
Most kids will say no, which makes the next step even more fun.
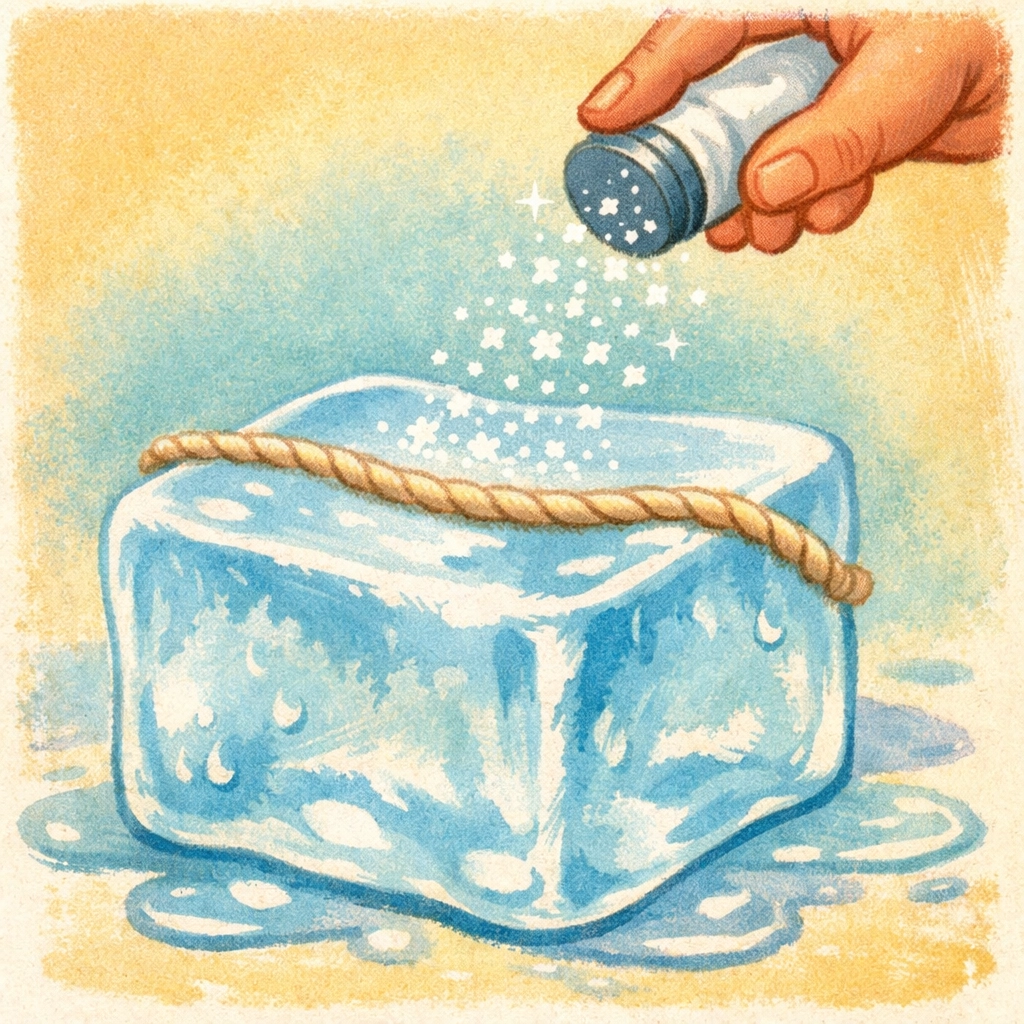
Step 3: Sprinkle Salt on the String and Ice
Take a generous pinch of table salt (about half a teaspoon) and sprinkle it directly over the string and the top of the ice cube. Try to cover the area where the string touches the ice.
What to tell the kids: "This is our secret ingredient. Salt is going to help us 'catch' the ice cube, but we have to be patient for about 30 seconds."
Step 4: Wait (and Watch)
Set a timer for 30 seconds, or count slowly together. During this time, the salt will start to melt the surface of the ice cube where it landed. You might even see a little puddle forming on top of the ice. This is a good moment to ask kids what they notice: Is the ice changing? Is the string moving?
Adult tip: Younger kids might have a hard time waiting. Turn it into a game by counting out loud, singing a short song, or asking them to guess what's happening under the salt.
Step 5: Lift the String
After 30 seconds (or up to a minute if you want to be extra sure), gently pick up both ends of the string and lift straight up. If the experiment worked, the string will be frozen to the ice cube, and you'll be able to pull the cube right out of the water.
What to tell the kids: "You just went ice fishing, and you caught one!"
If the string doesn't stick the first time, don't worry. Just try again with a fresh ice cube, a little more salt, or a slightly longer wait. Sometimes the water is too warm, or the salt didn't land in quite the right spot.

The Science Behind the Magic
So what's really happening when you sprinkle salt on ice? The answer comes down to something scientists call freezing point depression. Here's the simple version:
Ice normally freezes (and stays frozen) at 0°C or 32°F. But when you add salt to the surface of an ice cube, the salt starts to dissolve into the thin layer of water that exists on the ice's surface. As the salt mixes with that water, it lowers the freezing point of the mixture. This means the ice can't stay solid at 0°C anymore, it has to melt.
Here's where the "fishing" trick comes in: as the ice melts where the salt landed, a little puddle of salty water forms around your string. But that salty water is also very cold, colder than the surrounding ice water in the bowl. As the salt spreads out and dilutes, the freezing point starts to climb back up. When it does, the salty water refreezes, and this time it traps the string inside the ice.
It happens fast, often in less than a minute, because the melting and refreezing cycle is almost instant once the salt hits the ice. The more salt you use, the faster the initial melt happens, but if you use too much salt, the ice might melt so quickly that it doesn't have time to refreeze around the string.
This is the same reason cities and towns spread salt on icy roads in winter. The salt melts the ice, making the roads safer to drive on. It's also why old-fashioned ice cream makers use a mixture of ice and salt to freeze the cream, salt lowers the freezing point of the ice, making the ice bath cold enough to freeze the custard inside the canister.
Tips, Variations, and Troubleshooting
If the String Won't Stick:
- Use more salt. A light dusting might not be enough; try a heaping pinch.
- Wait a little longer. Some ice cubes need 45–60 seconds, especially if the water in the bowl is warmer.
- Use colder ice. Ice straight from the freezer works better than ice that's been sitting out for a while.
- Try a different string. Cotton string or yarn tends to work better than slippery synthetic materials.
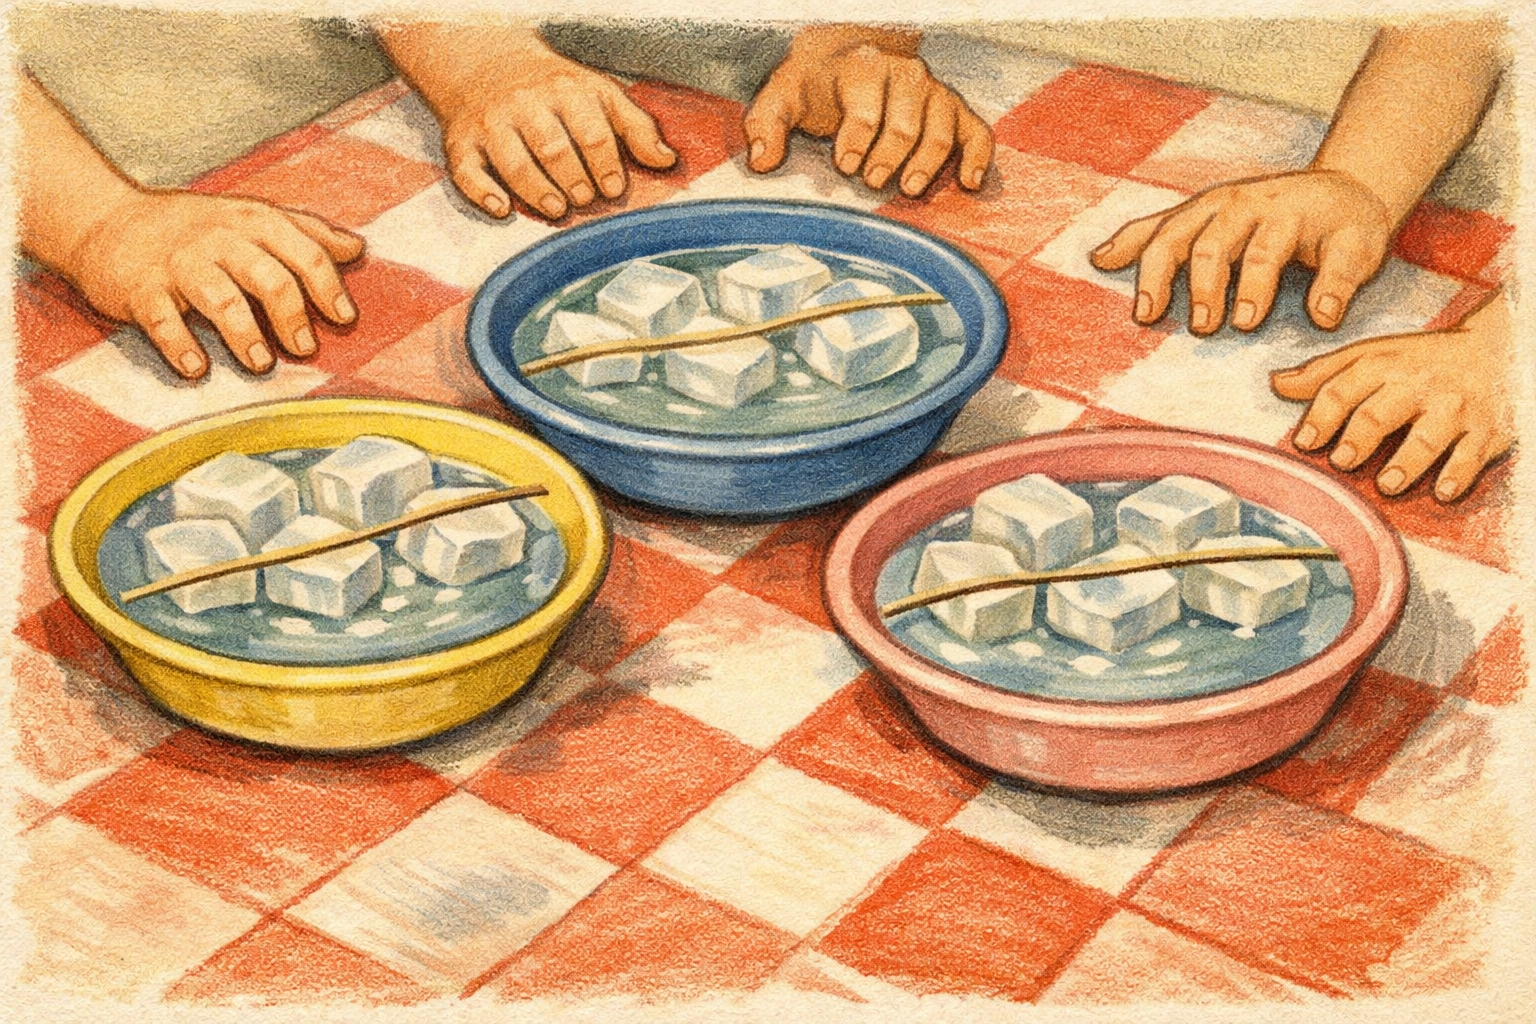
Fun Variations to Try:
- Ice Fishing Race: Set up multiple bowls and see who can "catch" their ice cube first.
- Different Salts: Compare table salt, kosher salt, and rock salt to see if one works faster than the others.
- Temperature Check: Use a thermometer to measure the temperature of the salty ice water versus plain ice water.
- Time-Lapse Photos: Set up a camera or phone to take a photo every 10 seconds and watch the melting and refreezing process in fast motion.
Frequently Asked Questions
Q: Can I use something other than salt?
A: Salt works best because it's easy to find and it lowers the freezing point effectively. Sugar won't work as well because it doesn't dissolve as quickly or lower the freezing point as much.
Q: Why does the string stick to the ice but not to the water?
A: The string sticks because the salty water refreezes around it. The plain water in the bowl stays liquid, so there's nothing to "glue" the string in place there.
Q: How long will the ice cube stay frozen to the string?
A: Once you lift the cube out of the water, the string will stay frozen to it for a few minutes, depending on how warm the room is. Eventually, the ice will melt and the string will come loose.
Q: Is this safe for toddlers?
A: Yes, with supervision. The materials are all non-toxic, but very young children might need help handling the string and understanding the "wait" step. Just keep an eye on them to make sure they don't put salty ice in their mouths.
Q: Can I do this experiment outside in winter?
A: Absolutely! If you live somewhere cold, you can try this with natural ice or snow. Just remember that the outdoor temperature will affect how quickly the ice melts and refreezes.
A Few Friendly Reminders
This experiment is designed to be simple and safe, but here are a couple of things to keep in mind:
- Cold hands: Ice and ice water can make little hands cold quickly. Have a towel nearby and remind kids to warm up their fingers if they start to feel uncomfortable.
- Wet surfaces: Water might splash or spill during the "fishing" process. Set up the experiment on a table or counter that can get a little wet, or lay down a towel first.
- Taste testing: While table salt is safe to eat, salty ice water doesn't taste great. Remind kids that this is a science experiment, not a snack.
- Patience practice: Some kids get frustrated if the string doesn't stick on the first try. Encourage them to try again and remind them that scientists often repeat experiments to get the best results.
As with any hands-on activity, results can vary depending on the temperature of your ice, the type of string you use, and how much salt you sprinkle. If something doesn't work the first time, treat it as a chance to talk about what might have gone wrong and how to adjust for the next round.
Salt and ice fishing is one of those kitchen experiments that feels like a magic trick but teaches real science. It's quick, it's visual, and it gives kids a hands-on way to explore how temperature and chemistry work together. Plus, it's a great excuse to talk about why we salt sidewalks in winter or how ice cream gets so cold and creamy. Give it a try on a rainy afternoon, and see who in your family can become the best ice fisherman: no pole required.
For more simple science experiments and hands-on learning ideas, check out our growing collection of family-friendly activities at Tierney Family Farms.