


Nature paint brushes are made by attaching natural materials like leaves, pine needles, or grass to a stick handle using string or elastic bands. The entire process takes about 15 minutes. No special tools required.
This project turns a simple outdoor walk into a hands-on art experience. Every brush creates unique textures. Every material behaves differently on paper. The results are unpredictable in the best way.
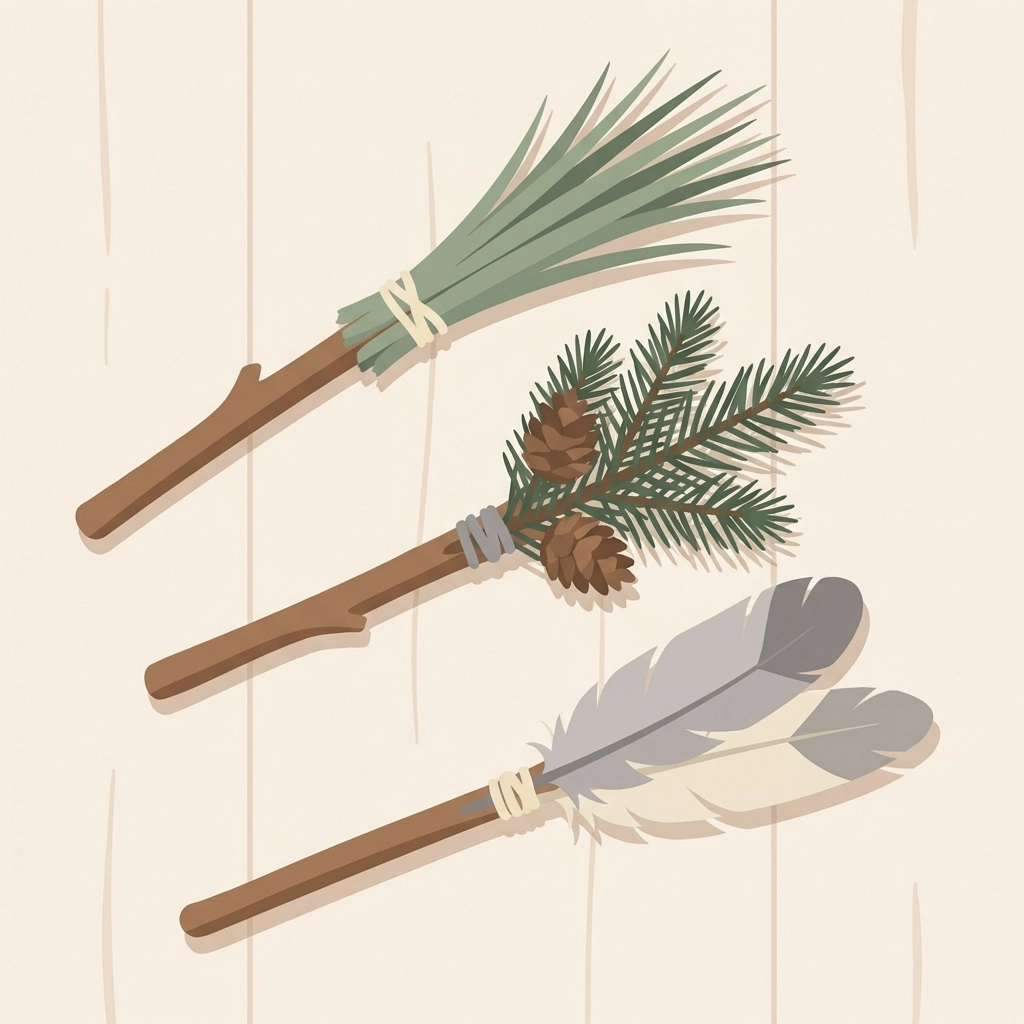
What Materials Work Best for Nature Paint Brushes?
A nature walk provides everything needed. The goal is variety in texture and shape.
For handles:
- Small sticks (roughly 15cm long)
- Twigs with interesting shapes
- Chopsticks (for younger children)
- Honeysuckle branches
- Dried bamboo pieces
For bristles:
- Pine needles
- Cedar leaves
- Evergreen sprigs
- Long grass blades
- Flower heads (dandelions work well)
- Fern fronds
- Spruce tips
- Small pinecones
- Feathers
- Seed pods
For fastening:
- Rubber bands
- Elastic hair ties
- Twine
- Cotton string
- Raffia

The best bristle materials are long and thin. These tie easily to the handle. They also hold paint without dripping excessively.
Rigid materials like pine needles create scratchy, textured marks. Soft materials like grass create smooth, sweeping strokes. Collecting both types expands the range of effects.
How Is a Nature Paint Brush Assembled?
Assembly follows three basic steps. The process is forgiving. Mistakes lead to interesting variations.
Step 1: Prepare the Handle
Select a stick approximately the length of a standard pencil. Remove any loose bark or sharp points. The stick needs to be comfortable to grip.
Thicker sticks work better for small hands. Thin twigs suit detailed work.
Step 2: Gather the Bristle Bundle
Group the chosen bristle materials together. Aim for a bundle roughly the diameter of a thumb. Smaller bundles create finer brushes. Larger bundles cover more surface area.
Align the ends of the bristle materials. This creates a more uniform brush tip. Alternatively, leave them uneven for a wilder effect.
Step 3: Attach Bristles to Handle
Place the bristle bundle against one end of the stick. The bristle ends should extend about 5-7cm beyond the stick.
Wrap a rubber band or string tightly around the connection point. Multiple wraps create a more secure hold. The wrapping should be tight enough that bristles stay in place when shaken.
For string or twine, tie a secure knot after wrapping. A simple overhand knot works fine.

What Techniques Improve the Final Brush?
A few adjustments transform a basic brush into a reliable tool.
Double-wrap the fastener. One layer often loosens during use. Two or three tight wraps hold everything in place.
Trim uneven bristle ends. Scissors create a cleaner brush edge. This produces more predictable marks.
Mix materials in one brush. Combining pine needles with grass creates brushes that make multiple textures in a single stroke.
Test before painting. Run the dry brush across paper first. This reveals how the bristles move and spread.
What Paints Work Best with Nature Brushes?
Tempera paint is ideal. It adheres well to natural materials. Cleanup is simple.
Watercolors work but require more paint loading. The bristles absorb water quickly.
Acrylic paint works for older children and adults. It dries fast, so brushes need rinsing between colors.
Paint consistency matters. Thin, watery paint drips off natural bristles. Thick paint clogs them. Medium consistency: like heavy cream: performs best.
What Surfaces Accept Nature Brush Marks?
Large paper works best. Butcher paper, kraft paper, or newspaper provide ample space for experimentation.
Cardboard accepts paint well. Its texture adds another layer of interest to the final piece.
Fabric takes nature brush marks with fabric paint. Old t-shirts and canvas bags become wearable art.
Rocks and wood slices work for smaller projects. Seal finished pieces with clear coat for outdoor display.
How Do Different Materials Create Different Effects?
Each natural material produces distinct marks. Experimentation reveals the full range.
| Material | Effect |
|---|---|
| Pine needles | Scratchy, parallel lines |
| Grass blades | Soft, sweeping strokes |
| Dandelion heads | Dotted, dabbing texture |
| Fern fronds | Feathery, layered patterns |
| Spruce tips | Dense, bushy coverage |
| Feathers | Wispy, delicate lines |
| Pinecones | Stamped, circular patterns |
The same brush behaves differently based on pressure. Light pressure creates faint, delicate marks. Heavy pressure spreads bristles and covers more area.
Dragging versus dabbing also changes results. Dragging creates strokes. Dabbing creates prints.
What Projects Suit Nature Paint Brushes?
Abstract art exploration. The unpredictable marks encourage creative freedom. No wrong answers exist.
Nature journaling. Paint observations from the same walk that provided the brush materials. A unified experience.
Greeting cards. Textured backgrounds make handmade cards distinctive.
Wrapping paper. Large sheets of kraft paper become custom gift wrap.
Collaborative murals. Multiple brushes and multiple hands create layered, complex pieces.
Seasonal decorations. Fall leaves painted with fall-foraged brushes. Spring flowers painted with spring materials.

How Long Do Nature Paint Brushes Last?
Single-use is the norm. Natural materials break down, especially after contact with water and paint.
Some brushes survive multiple sessions. Pine needle brushes are particularly durable. Grass brushes deteriorate fastest.
Storage extends lifespan slightly. Allow brushes to dry completely. Store flat in a dry location.
The temporary nature of these brushes is part of the appeal. New walks produce new brushes. No two are identical.
What Age Groups Benefit Most from This Activity?
Toddlers enjoy the sensory experience. Large brushes with thick handles suit small hands. Supervision prevents bristle-tasting.
Preschoolers and kindergarteners thrive with this project. The nature walk engages curiosity. The crafting builds fine motor skills. The painting encourages expression.
Elementary-age children can handle the entire process independently. They often experiment with material combinations adults overlook.
Teens and adults find relaxation in the simplicity. The project requires no artistic skill. Results satisfy regardless of experience level.
What Learning Opportunities Does This Project Offer?
Science connections:
- Plant identification during collection
- Observation of texture differences
- Cause and effect between materials and marks
Art concepts:
- Texture creation
- Color mixing
- Composition on large surfaces
Motor skill development:
- Wrapping and tying
- Grip strength
- Brush control
Environmental awareness:
- Sustainable art supplies
- Appreciation for natural materials
- Outdoor exploration as creative fuel
What Common Mistakes Should Be Avoided?
Collecting wet materials. Damp leaves and grass fall apart quickly. Wait for dry conditions or dry materials indoors first.
Using brittle sticks. Dead, dry sticks snap during use. Select flexible, green wood when possible.
Over-tightening fasteners on delicate materials. Flower petals crush easily. Gentle wrapping preserves their shape.
Skipping the test phase. Jumping straight into a “real” painting leads to frustration. Testing reveals each brush’s personality first.
Nature paint brushes transform ordinary outdoor materials into functional art tools. The project costs nothing. The learning runs deep. The art carries the texture of the natural world.


