


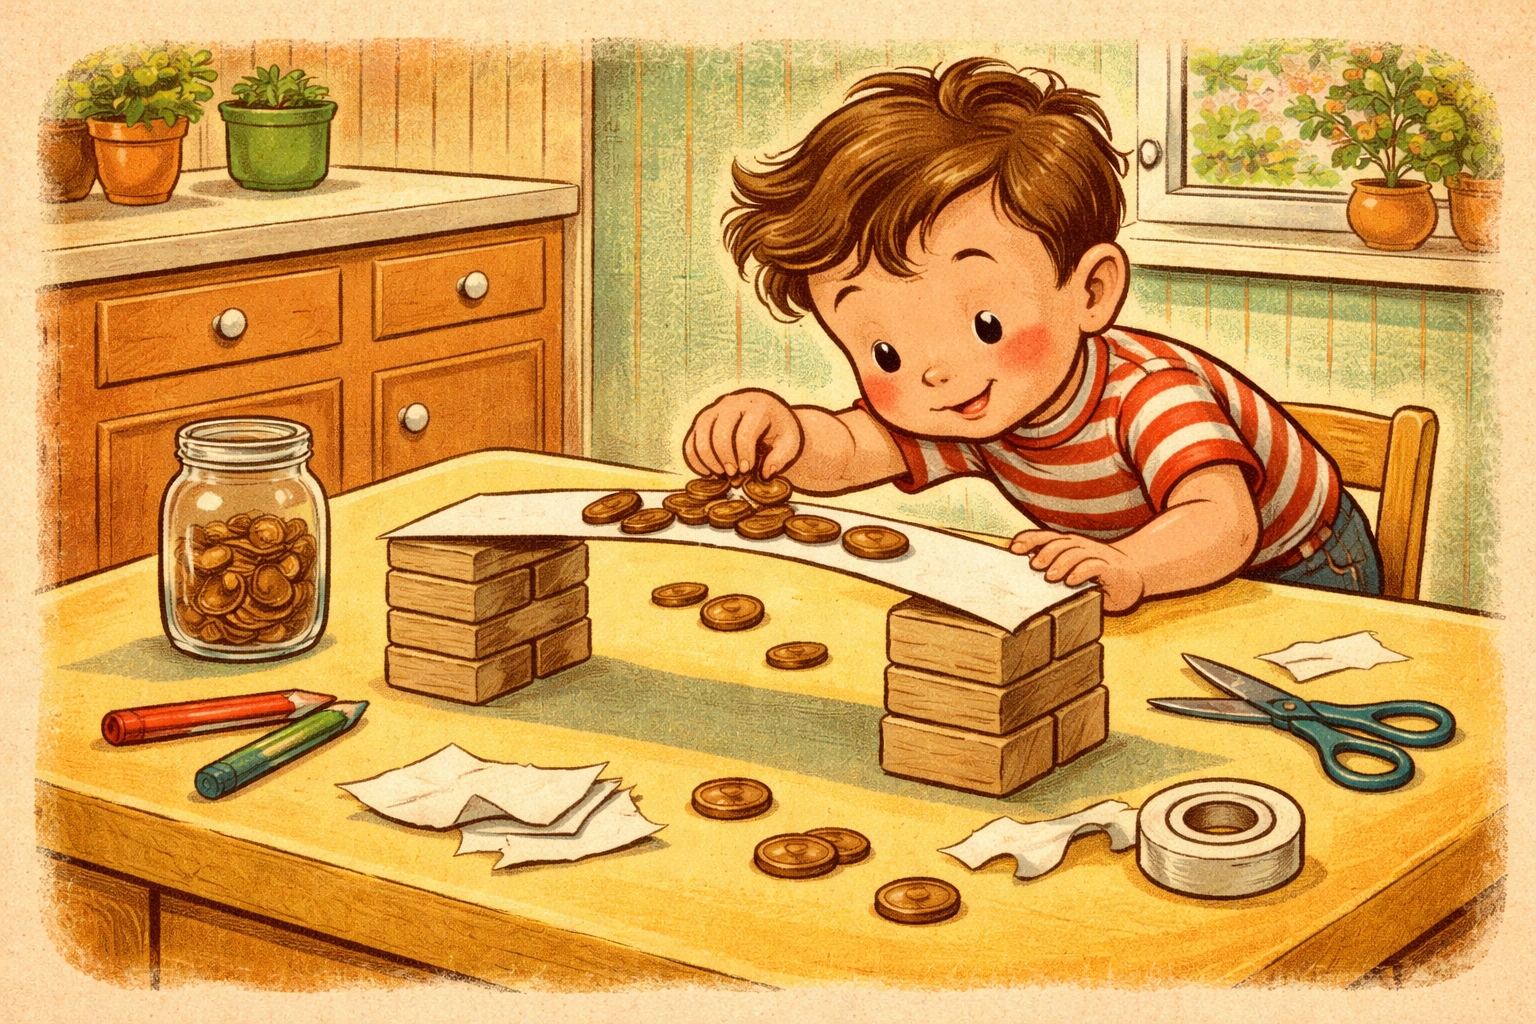
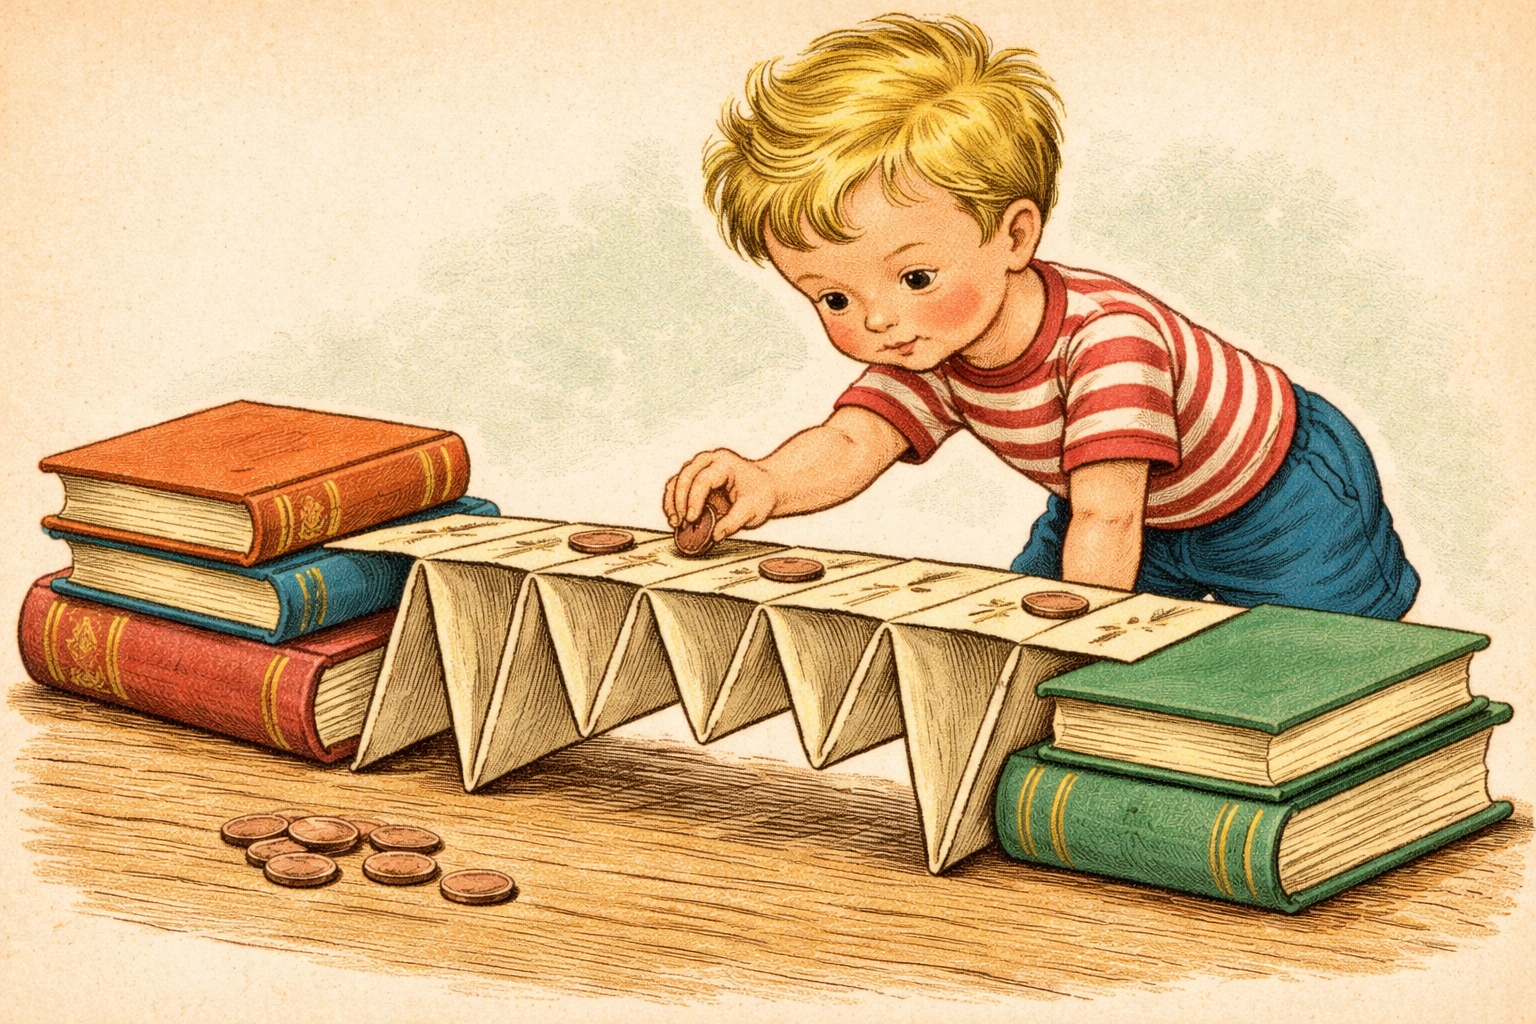
Building a paper bridge for a strength test is one of the more satisfying ways to introduce kids to basic engineering concepts using materials you likely already have at home. The answer is straightforward: fold standard printer paper into structural shapes like accordion pleats, triangular prisms, or rolled tubes, span the paper across a gap between two supports, and test how many coins or small weights the bridge can hold before it collapses. Kids often discover that a single flat sheet holds almost nothing, while a cleverly folded design can support dozens of pennies, sometimes even more.
This hands-on experiment teaches real principles that actual bridge engineers use every day, and it does so through trial, error, and plenty of satisfying crashes.
Why Paper Bridge Building Works as a Learning Activity
There's something almost magical about watching a flimsy piece of paper suddenly support a pile of coins. Kids get to make predictions, test their ideas, and see immediate results, which is basically the scientific method wrapped up in a craft project.
The activity naturally introduces concepts like compression, tension, and weight distribution without requiring a textbook explanation. When a bridge fails, kids can usually see exactly where and why it collapsed, which leads to better designs on the next attempt. That cycle of build-test-improve mirrors how engineers approach real-world problems.
Plus, it's genuinely fun to see how many pennies you can stack before everything comes tumbling down.
Materials You'll Need
Good news: this project typically costs well under $10, and you might already have everything on hand.
| Material | Purpose | Estimated Cost |
|---|---|---|
| Standard printer paper (5-10 sheets) | Bridge construction | $0 (household item) |
| Ruler or measuring tape | Measuring gap and folds | $0-$1 |
| Masking or clear tape | Reinforcing folds and joints | $1-$3 |
| Scissors | Optional shaping and cutting | $0 (household item) |
| Pennies, washers, or small weights | Testing bridge strength | $0-$2 |
| Two stacks of books or chairs | Bridge supports | $0 (household items) |
| Pencil and notebook | Recording predictions and results | $0 (household items) |
Total estimated cost: Under $5 for most families
Age Range and Time Estimate
Recommended ages: This activity tends to work well for kids ages 5 and up, though the experience differs by age group.
- Ages 5-6: Can fold simple designs with help and enjoy the testing phase. Focus on accordion folds and flat paper comparisons.
- Ages 7-9: Ready to try multiple design types independently and record results. They often become competitive about beating their own records.
- Ages 10+: Can explore more complex concepts like combining designs, strategic tape placement, and analyzing why certain shapes perform better.
Time needed: Plan for roughly 30-45 minutes, though many kids want to keep experimenting well beyond that once they get going.
Step-by-Step Instructions
Step 1: Set Up Your Bridge Supports
Position two stacks of books, two chairs, or two small tables approximately 15-16 inches apart (about 40 centimeters). This gap represents the "river" or "canyon" your bridge needs to cross.
Make sure both supports are the same height and stable enough that they won't wobble during testing.
Step 2: Test a Flat Sheet First
Before getting into fancy designs, lay a single flat sheet of paper across the gap. This becomes your baseline measurement.
Have your child predict how many pennies the flat paper will hold. Write down the prediction, then carefully place pennies one at a time in the center of the paper until it collapses.
Most flat sheets hold very few coins, sometimes just one or two before sagging into the gap. This "failure" is actually the point. It shows kids why structural design matters.
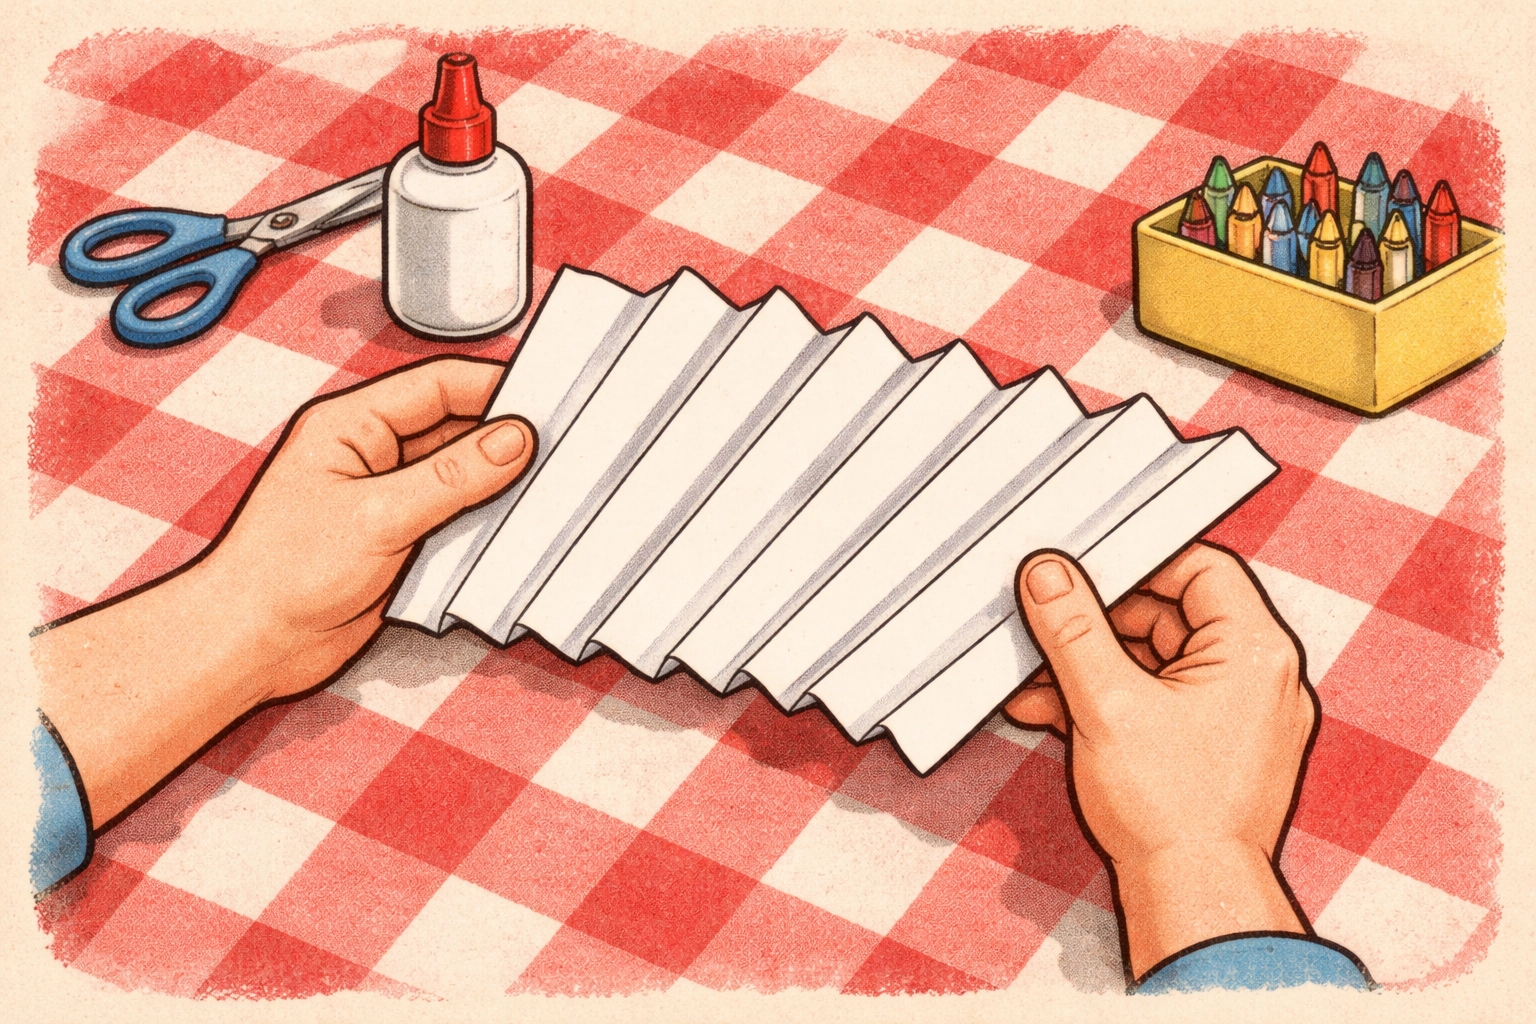
Step 3: Try the Accordion Fold Design
The accordion fold (sometimes called a concertina or fan fold) is often one of the more effective designs and a great place to start.
How to make it:
- Take a fresh sheet of paper and fold it lengthwise in approximately 1-inch accordion pleats
- Continue folding back and forth until the entire sheet is pleated
- Place the pleated paper across the gap with the folds running perpendicular to the length of the bridge
- Secure the ends with small pieces of tape if needed
Test this design the same way, pennies one at a time, recording results. Most kids are surprised by how much stronger this simple fold makes the paper.

Step 4: Build a Triangular Prism Bridge
Triangles are among the strongest shapes in structural engineering, and kids can test this principle directly.
How to make it:
- Fold a sheet of paper lengthwise into thirds
- Crease the folds firmly, then open slightly to form a triangular tube shape
- Tape the long edge closed to maintain the triangle
- Place across the gap and test with pennies
Compare results to both the flat sheet and the accordion design. Which held more weight?
Step 5: Roll a Cylinder Bridge
Tubes distribute weight evenly around their circumference, which makes them surprisingly strong.
How to make it:
- Roll a sheet of paper lengthwise into a tight tube
- Secure with tape along the seam
- Place across the gap and test
Some kids find that cylinders work better when placed with the seam facing down, while others don't notice a difference. Let them experiment and draw their own conclusions.
Step 6: Combine Designs for Maximum Strength
Once kids have tested individual designs, encourage them to combine approaches. Some ideas to try:
- An accordion-folded base with a triangular prism on top
- Multiple cylinders bundled together with tape
- Layered accordion folds (two or three sheets folded together)
- Strategic tape reinforcement at the weakest points
The goal isn't necessarily to find the "right" answer, it's to encourage experimentation and observation.
Tips for Stronger Bridges
Through testing, kids often discover these principles on their own:
Folding increases strength. Any fold tends to add rigidity compared to flat paper. More folds generally mean more strength, up to a point.
Joints are usually the weak spots. Bridges often fail where folds meet or where tape connects pieces. Reinforcing these areas can significantly improve performance.
Weight distribution matters. Designs that spread the load across multiple points tend to hold more than designs that concentrate stress in one area.
Thickness helps. Using multiple sheets together or laminating with tape creates a stronger starting material.
Making It a Learning Conversation
After testing several designs, take a few minutes to talk through what happened:
- Which design held the most weight? Which held the least?
- Where did each bridge fail? What does that tell us about weak points?
- Why do you think folded paper is stronger than flat paper?
- How might real bridge builders use these same ideas?
These conversations help kids connect their hands-on experience to bigger concepts without turning the activity into a lecture.
Frequently Asked Questions
What type of paper works for this activity?
Standard printer paper (20 lb or 80 gsm) works well for most designs. Heavier cardstock creates stronger bridges but can be harder for small hands to fold precisely.
Can we use something besides pennies for testing?
Definitely. Washers, nuts, bolts, small toys, or even dried beans work fine. The key is using identical weights so you can count and compare accurately.
How wide should the gap be between supports?
A gap of about 15-16 inches (40 cm) provides enough challenge without making the task impossible. Adjust narrower for younger kids or wider for an extra challenge.
Why does folding make paper stronger?
Folding adds depth and rigidity to the paper, which helps it resist bending. The folds create multiple small beams that share the load instead of one thin, flexible sheet.
Is tape considered cheating?
Not at all. Real bridges use connectors and reinforcements. Tape teaches kids about the importance of joints and how engineers strengthen connection points.
What if my child gets frustrated when bridges collapse?
Reframe failures as data collection. Each collapse tells us something useful about how to improve the next design. The goal isn't perfection, it's learning through experimentation.
Can this activity work for multiple kids at once?
Yes, and it often becomes more engaging with a little friendly competition. Give each child identical materials and see who can build the strongest bridge.
How do I explain engineering concepts without overcomplicating things?
Let the testing do most of the teaching. Kids naturally observe that "the folded one held more" or "it broke right there." You can introduce terms like compression and tension, but the hands-on experience matters more than vocabulary.
For more hands-on STEM projects and family activities, explore our Kids Crafts collection at Tierney Family Farms.
References:
- Paper bridge STEM activity guides and structural engineering principles for children
- Educational resources on geometric shapes and load distribution in bridge design


