


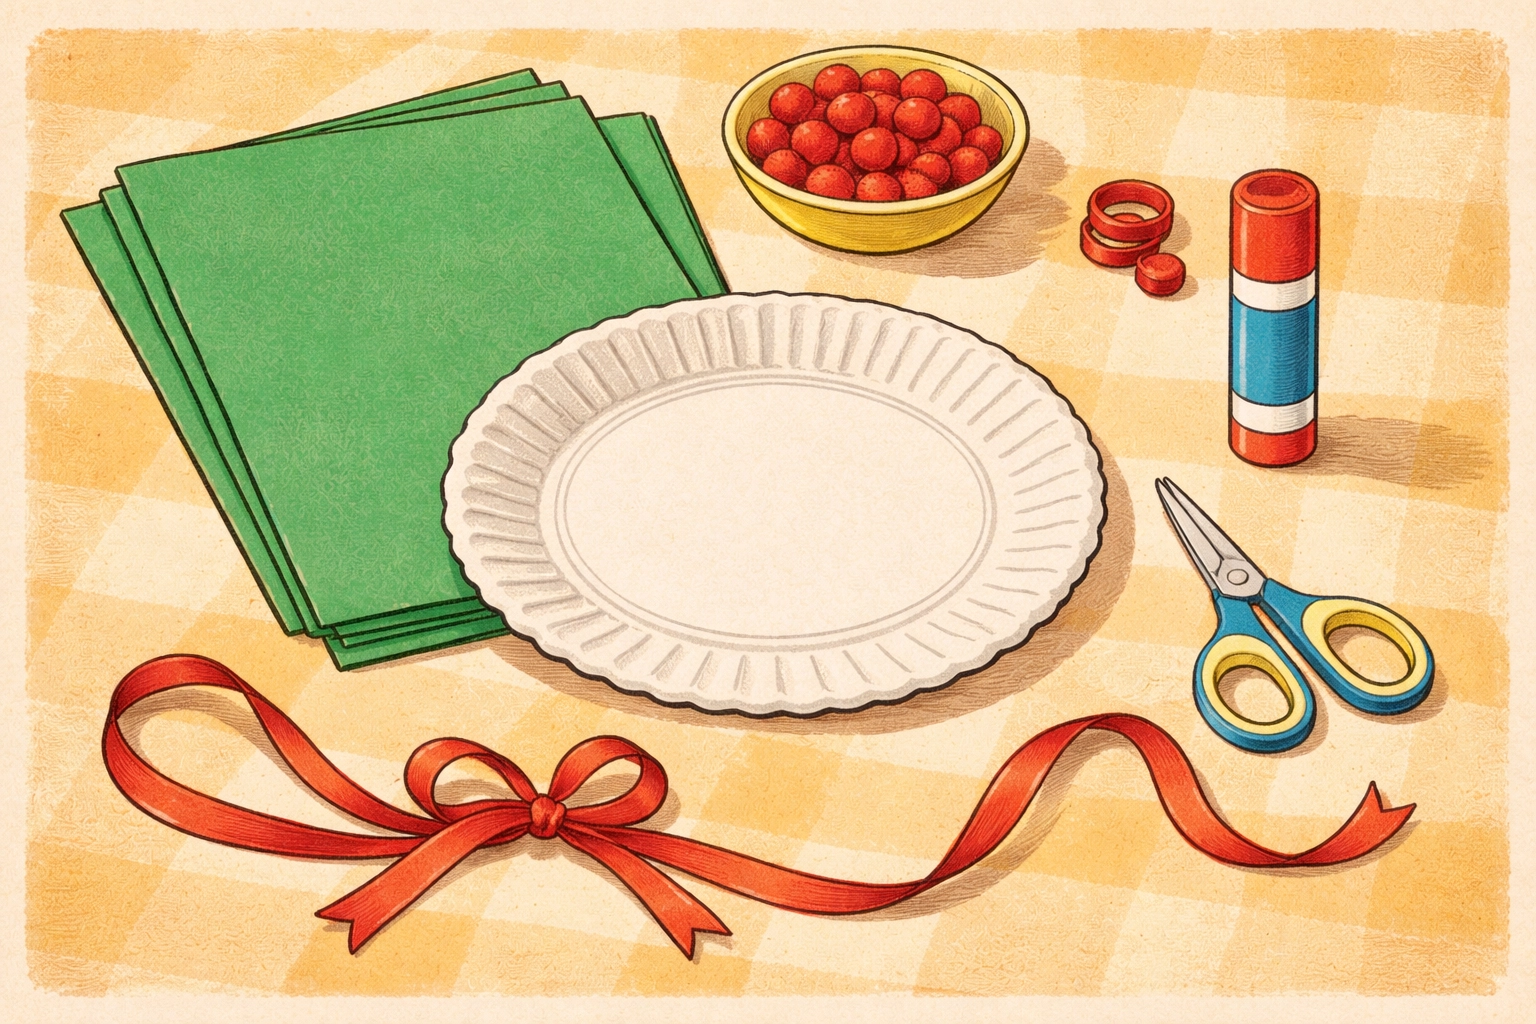
A DIY handprint wreath is made by tracing and cutting out your child's handprints from green paper, then gluing them in a circle on a paper plate base with fingers pointing outward like leaves. Add paper berries (red circles or pom poms) and a ribbon bow, and you've got a keepsake decoration that costs just a few dollars and takes about 30-45 minutes to complete with little ones.
This craft has been a family favorite for generations: and for good reason. It's affordable, uses materials you likely have around the house, and creates something your kids can proudly hang up. Plus, those little handprints become precious memories as the years go by and those hands grow bigger.
Who Is This Craft For?
| Age Range | Skill Level | Enjoyment Level |
|---|---|---|
| 2-3 years | Tracing help needed; can glue and decorate | High (loves the mess!) |
| 4-5 years | Can trace with assistance; cuts with kid scissors | Very High |
| 6-8 years | Can do most steps independently | High (feels accomplished) |
Time Estimate: 30-45 minutes (plus drying time if painting)
This project works well for a wide age range. Toddlers enjoy the stamping and gluing parts, while older kids can handle tracing, cutting, and arranging on their own. It's also a great activity for siblings to work on together: everyone contributes their own handprints to one wreath, or each child makes their own.
Materials You'll Need (Under $10 Total)
| Material | Estimated Cost | Notes |
|---|---|---|
| Paper plate (1) | $0.10-0.25 | Standard dinner size works well |
| Green construction paper (3-4 sheets) | $0.50-1.00 | Different shades add nice variety |
| Red construction paper or pom poms | $0.25-0.50 | For berries |
| Scissors | Already owned | Kid-safe scissors for little hands |
| Pencil | Already owned | For tracing |
| Glue stick or white glue | $1.00-2.00 | Glue sticks are less messy |
| Ribbon (12 inches) | $0.50-1.00 | For bow and hanging loop |
| Optional: Markers or crayons | Already owned | For extra decoration |
Total estimated cost: $2.50-$5.00
Most families already have scissors, pencils, and glue on hand, which brings the actual out-of-pocket cost down even further. If you're making multiple wreaths (say, for a playdate or classroom), buying a multipack of paper plates and a construction paper pad keeps costs low.
Step-by-Step Instructions
Step 1: Prepare Your Paper Plate Base
Take your paper plate and cut out the center circle, leaving a ring shape about 2-3 inches wide. This becomes the base your handprints will attach to.
If you'd like, paint the ring green and let it dry before moving on. This step is optional: the handprints will cover most of it anyway: but it gives a nice finished look if any white peeks through.
Tip: An adult should handle the initial cutting for younger children. The center of a paper plate can be tricky to start.
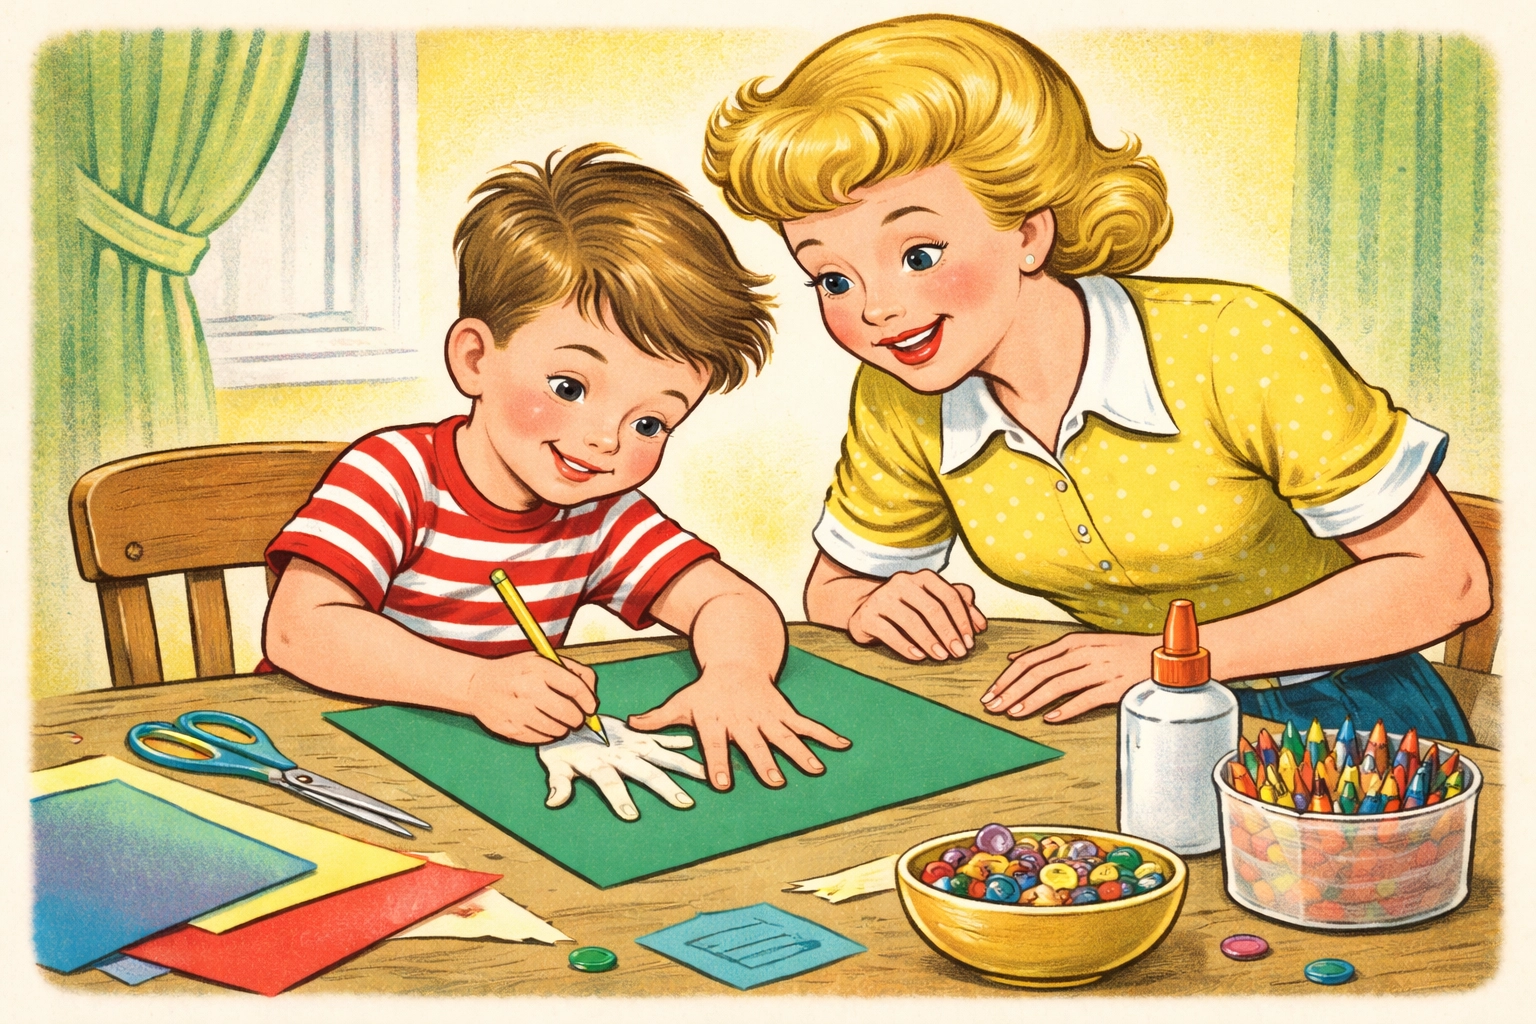
Step 2: Trace and Cut Handprints
Place your child's hand on a piece of green construction paper with fingers spread apart. Trace around it with a pencil, then cut out the shape.
You'll need somewhere between 15-25 handprints depending on your plate size and how much you overlap them. This sounds like a lot, but here's a shortcut: stack 2-3 sheets of paper together and cut through all layers at once.
Pro tip: Rotate the hand template as you trace so the fingers face different directions. This creates a more natural, leafy appearance when you arrange them.
Step 3: Arrange Handprints Around the Ring
Before gluing anything down, do a "dry fit" first. Lay the handprints around the paper plate ring with the fingers pointing outward (like sun rays or leaf tips). Overlap them slightly so no plate shows through.
Play around with the arrangement. Some families like all the fingers pointing the same direction; others prefer a more random, organic look. There's no wrong answer here: let your child decide what looks good to them.
Step 4: Glue Everything in Place
Once you're happy with the arrangement, start gluing. Work in small sections, lifting one handprint at a time, applying glue to the palm area, and pressing it back down.
For younger kids, a glue stick tends to be easier to manage and dries faster. Older children might prefer white glue for a stronger hold, especially if you're planning to hang the wreath somewhere it might get bumped.
Helpful hint: Start with the bottom layer of handprints first if you're overlapping multiple layers. Let that layer set for a few minutes before adding the top layer.
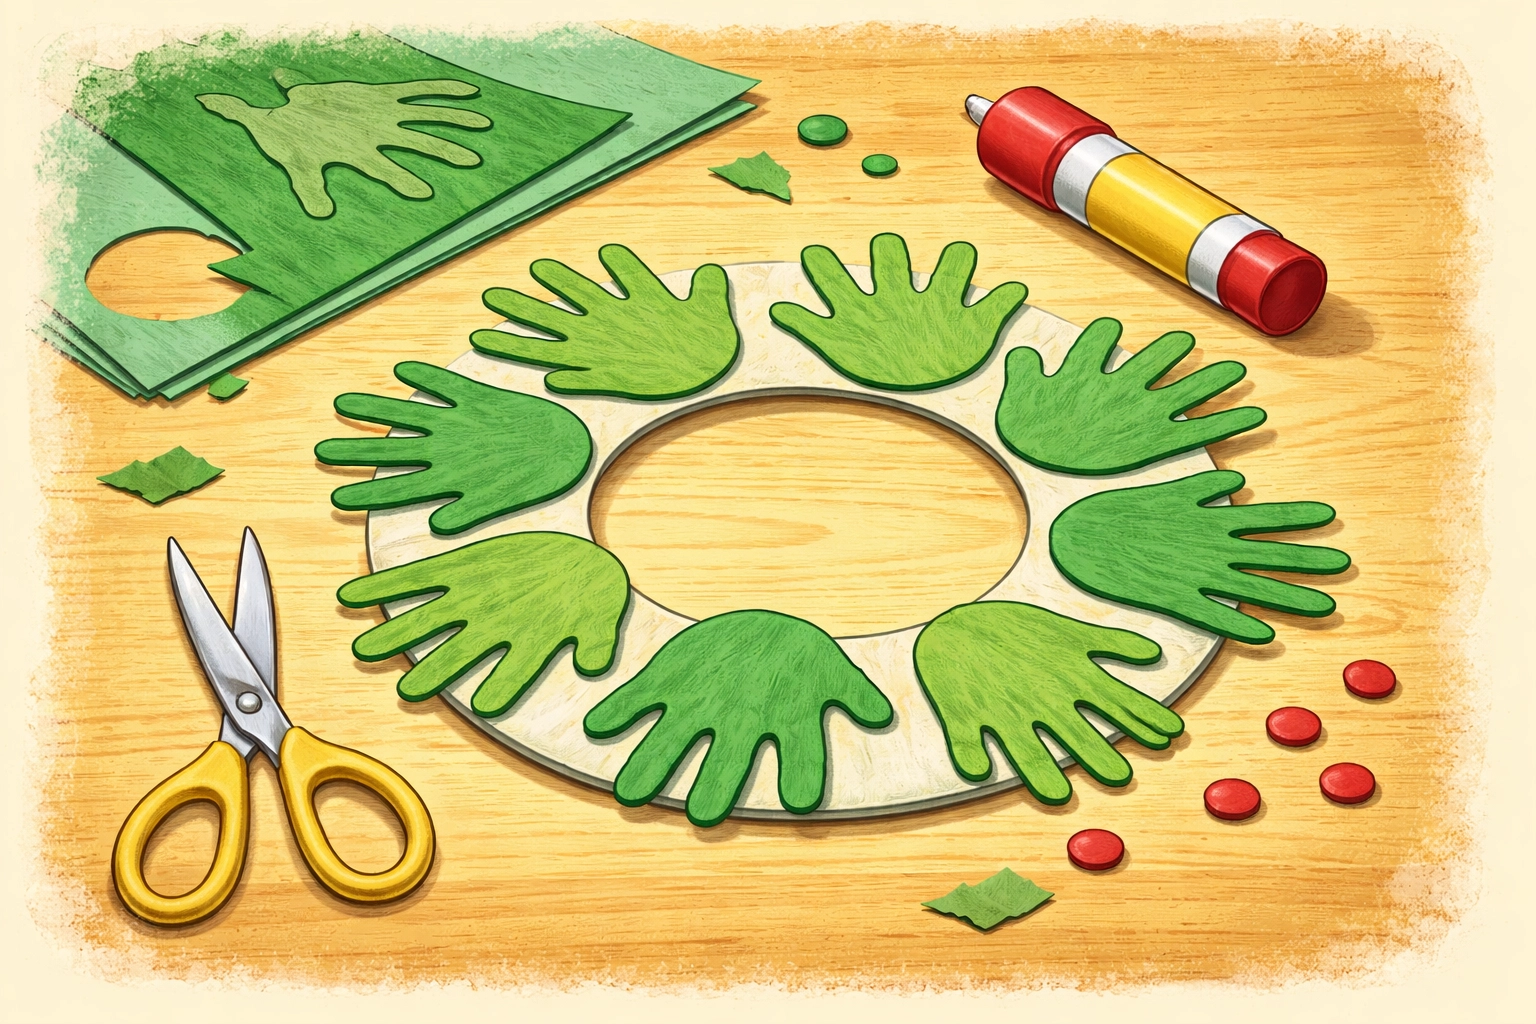
Step 5: Add Berries and Decorations
Now for the fun finishing touches! Cut small circles (about the size of a nickel) from red construction paper, or use red pom poms if you have them. Glue these "berries" in clusters of 2-3 around the wreath.
Some families also like to add:
- A ribbon bow at the bottom
- Glitter glue accents
- A small photo in the center
- The year written on the back
Step 6: Attach a Hanging Loop
Cut a piece of ribbon about 6-8 inches long. Fold it in half to make a loop and glue or tape both ends to the back of the wreath at the top. Let it dry completely before hanging.
And that's it: you've got a handprint wreath ready to display!

Tips for Success
Work in batches with multiple kids. If you're crafting with several children, have all the tracing and cutting done before you start gluing. Little ones tend to lose interest if there's too much waiting around.
Use different shades of green. Mixing light green, dark green, and even a yellowish-green gives your wreath more depth and visual interest: kind of like real leaves.
Save a few handprints. Consider cutting one or two extras and writing the date and your child's age on the back. Tuck them away as keepsakes.
Don't stress about perfection. Slightly wonky handprints and uneven spacing are part of the charm. This is a kid's craft, not a Pinterest competition.
Frequently Asked Questions
Can I use paint instead of cutting out paper handprints?
You can! Paint your child's hand green and press it directly onto the paper plate ring. Just be prepared for a messier process and longer drying time. Some families prefer the cut-paper method because it's quicker and less cleanup.
What if my child won't sit still for tracing?
Try tracing while they watch a short video, or trace an adult's hand instead and tell them it's a "family wreath." You can also trace their hand while they're sleeping (sounds sneaky, but it works).
How many handprints do I really need?
For a standard dinner-plate-sized wreath, plan on 18-25 handprints. Smaller plates need fewer; larger bases need more. When in doubt, cut a few extras.
Can this be adapted for other holidays?
Definitely. Use orange and red handprints for a fall wreath, pastels for spring, or red and pink for Valentine's Day. The technique stays the same: just swap the colors and decorations.
What's the right age to start this craft?
Kids as young as 2 can participate in parts of this project (like gluing berries), while children around 5-6 can often complete most steps with minimal help. It really depends on your child's attention span and fine motor skills.
How do I preserve the wreath so it lasts?
Store it flat in a large envelope or between two pieces of cardboard. Some families laminate theirs or spray with a clear sealant, though paper wreaths can last years if kept away from moisture and direct sunlight.
Can I make this with a group or classroom?
This works great for groups. Have each child contribute 2-3 handprints to one large collaborative wreath, or set up stations so kids can rotate through tracing, cutting, and gluing.
What if I don't have construction paper?
Printer paper works in a pinch: just color it green with crayons or markers first. You can also use pages from old magazines that have green areas, or even fabric scraps if you're feeling adventurous.
Looking for more budget-friendly crafts to try with your kids? Check out our Kids Crafts collection for dozens of ideas that keep little hands busy without breaking the bank.


