


A paper chain countdown is a simple craft where you create a chain of colorful paper loops that kids remove one at a time each day, helping them visualize how many days remain until a special event. Whether you're counting down to a birthday, the first day of school, a holiday, or a family vacation, this hands-on activity gives kids a tangible way to understand the passage of time: and it doubles as cheerful decoration for your home.
This project takes roughly 20 to 45 minutes depending on how many links you're making and how much decorating your little ones want to do. The materials typically cost less than $10 (and you likely have most of them already), making it a budget-friendly craft that delivers days or even weeks of daily excitement.
What Ages Is This Craft Suited For?
| Age Range | Skill Level | Enjoyment Level |
|---|---|---|
| 2–3 years | Helper (tearing paper, choosing colors) | High |
| 4–5 years | Can loop and tape with guidance | Very High |
| 6–8 years | Can complete independently | High |
| 9+ years | Can lead younger siblings | Moderate to High |
Younger toddlers often enjoy selecting colors and ripping strips while an adult or older sibling handles the looping. Kids around age four or five typically have the fine motor skills to form loops and seal them with tape. Older children may enjoy adding written activities or decorations to each link.
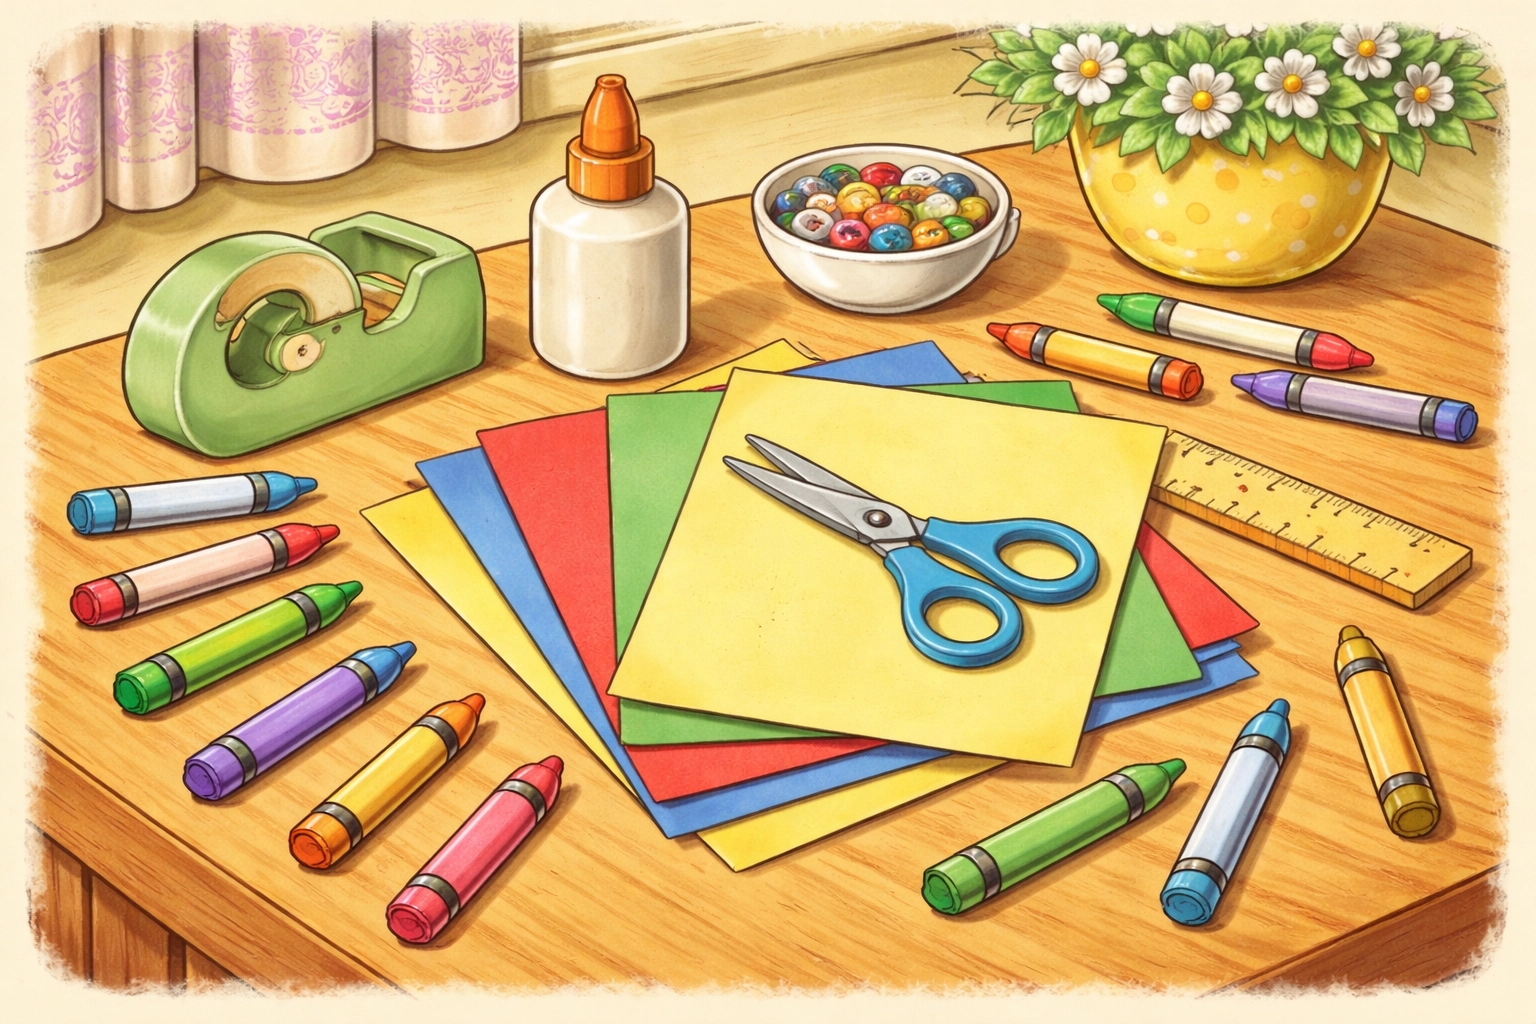
Materials You'll Need
| Material | Estimated Cost | Notes |
|---|---|---|
| Construction paper (assorted colors) | $2–$4 | One pack usually provides plenty of strips |
| Scissors | $1–$3 (or use what you have) | Kid-safe scissors work well |
| Tape or stapler | $1–$2 | Tape tends to be easier for small hands |
| Markers or crayons | $1–$3 | For decorating or numbering links |
| Ruler (optional) | Free (household item) | Helps cut uniform strips |
Total estimated cost: Under $10
Most families find they already have these supplies in a craft drawer or junk drawer, so you may spend nothing at all.
Time Estimate
- Prep time: 5–10 minutes (cutting strips)
- Assembly time: 15–30 minutes (depending on chain length)
- Total project time: 20–45 minutes
A 10-link chain for a short countdown goes quickly. A 25-day holiday countdown takes a bit longer but remains very manageable in a single crafting session.
Step-by-Step Instructions
Step 1: Decide What You're Counting Down To
Pick your event and count the number of days from today until the big day. Grab a calendar if you need help: this is a great opportunity to practice calendar skills with younger kids. Write down the total number of days so you know how many paper strips you'll need.
Step 2: Cut Your Paper Strips
Cut construction paper into strips approximately 1 to 1.5 inches wide and 6 to 11 inches long. The exact size is flexible; shorter strips create a tighter chain while longer strips make bigger, loopier links. Cut one strip for each day in your countdown.
Tip: Letting kids choose the colors for each strip often keeps them engaged. You might alternate colors, create a rainbow pattern, or use themed colors (orange and black for Halloween, red and green for the winter holidays).
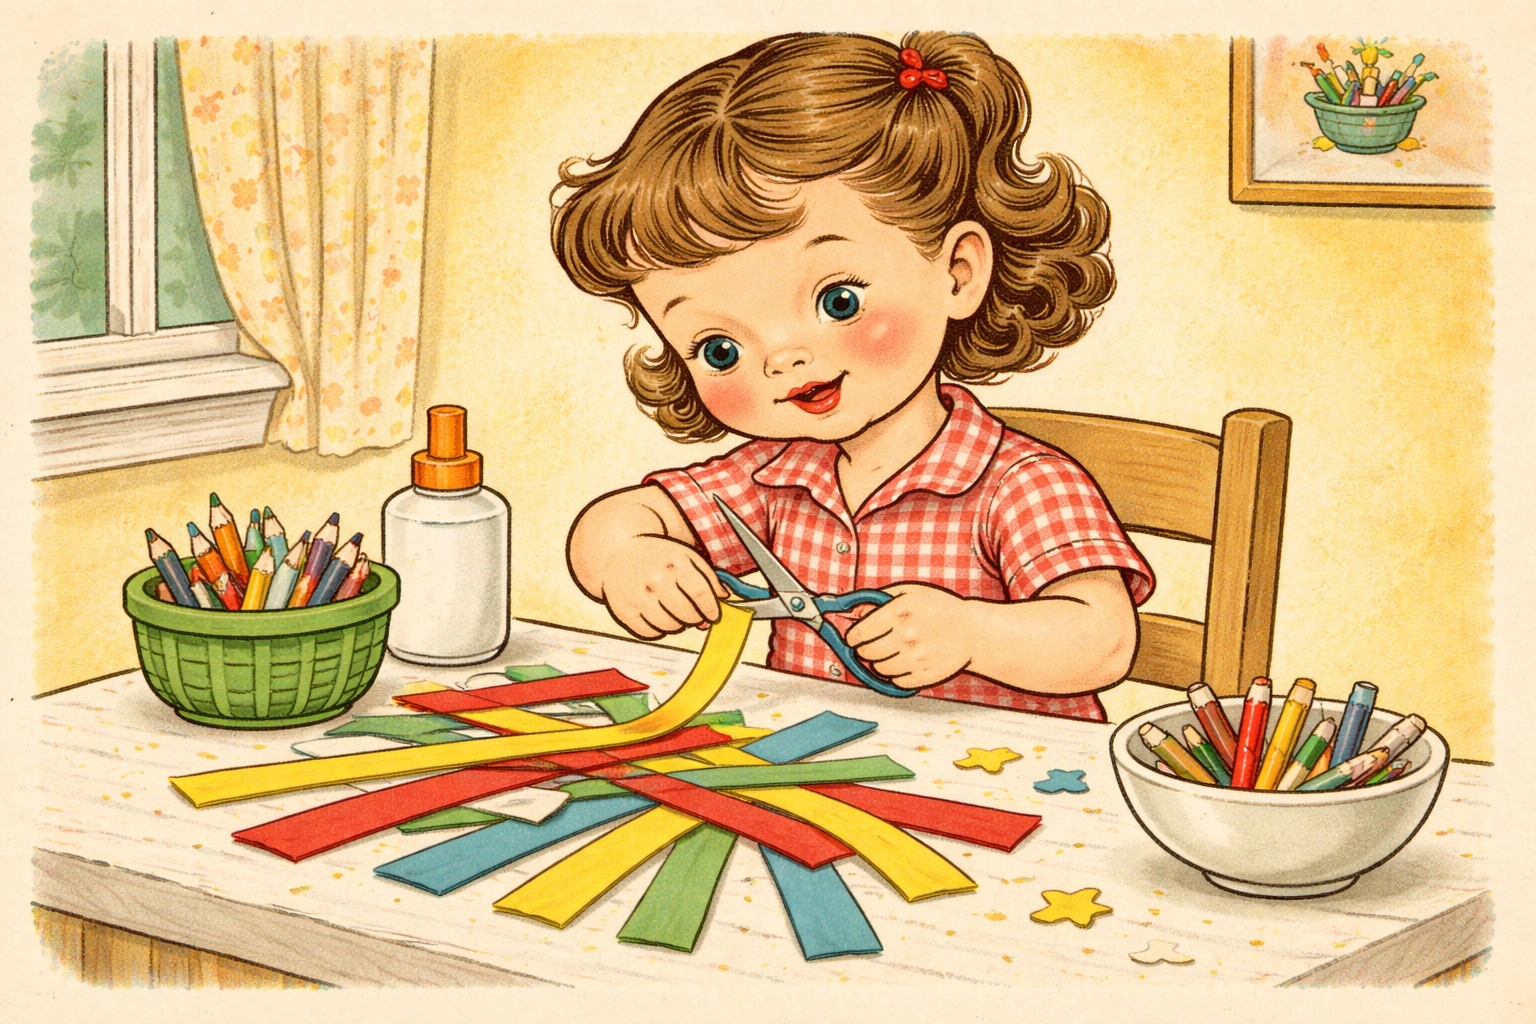
Step 3: Number or Decorate Each Strip
Before assembling, have your child write a number on each strip: either the countdown number (10, 9, 8…) or the calendar date. This step reinforces number recognition and sequencing for younger kids.
If you want to add extra fun, write a simple activity on each strip that your child can do when they remove that link. Ideas include:
- Read an extra bedtime story
- Have a dance party
- Pick what's for dinner
- Do 10 jumping jacks together
You can also let kids draw small pictures or doodles on each strip.
Step 4: Form Your First Loop
Take the strip that represents the final day of your countdown (the one they'll remove first each morning). Curl the ends together to form a circle or oval shape. Secure with a piece of tape or a staple. This is your first link.
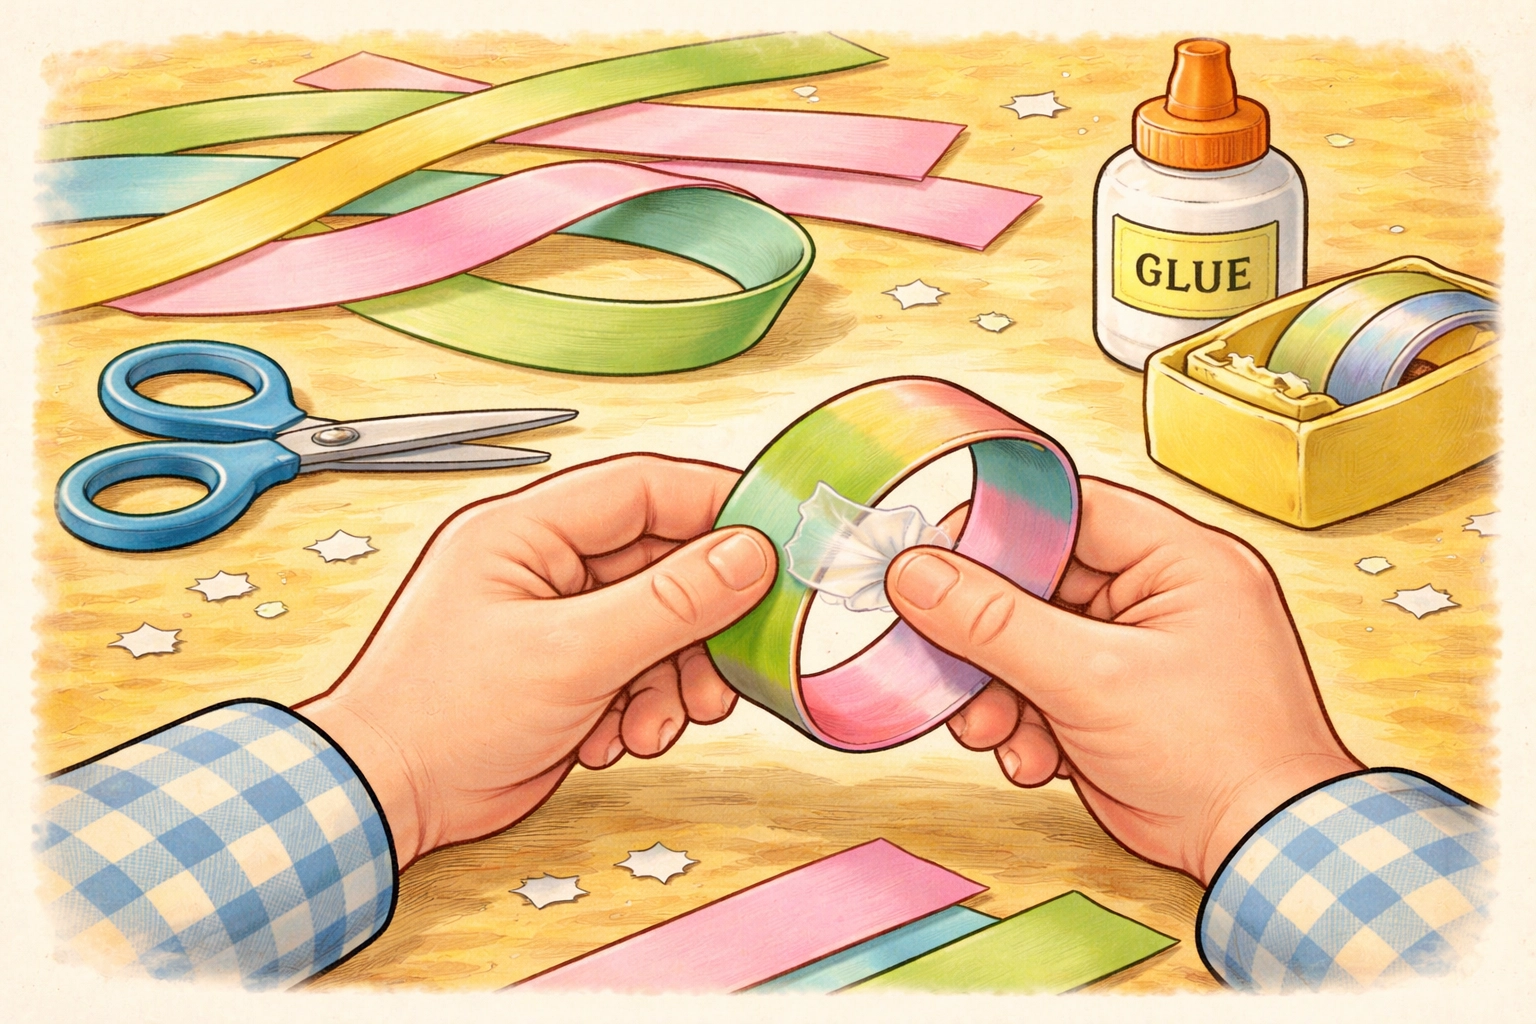
Step 5: Build the Chain
Thread the next strip through your first loop, then curl and tape the ends together. Now you have two connected links. Continue this process, threading each new strip through the previous loop before sealing it, until you've used all your strips.
Pro tip: Work from the last day backward. The strip marked "1" (or the event date) should be at the very end of the chain: the final link your child removes on the big day.
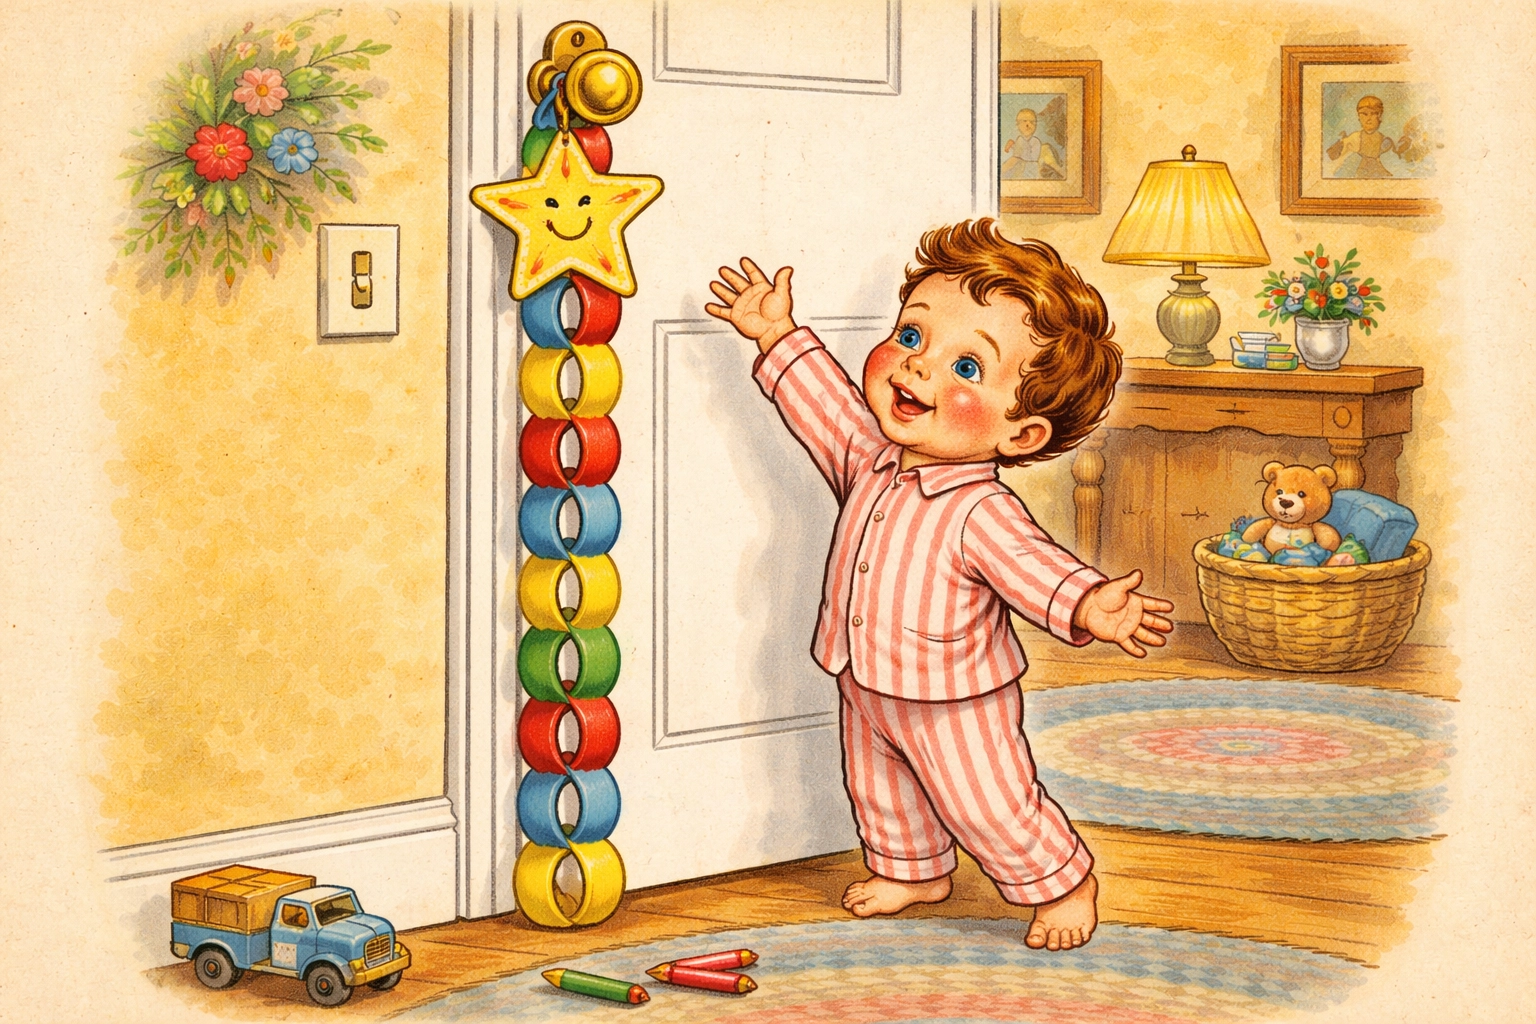
Step 6: Add a Decorative Topper (Optional)
For extra charm, cut a shape from construction paper to attach at the top of your chain. A star works nicely for general countdowns, while themed shapes (a pumpkin, a birthday cake, an apple for back-to-school) make the chain feel more special. Tape or staple this topper to the top link.
Step 7: Hang and Start Counting
Find a visible spot to display your chain: a doorknob, a hook on the wall, or draped over a curtain rod. Each morning (or evening, depending on your family's preference), have your child remove one link. They'll watch the chain shrink day by day until the exciting event arrives.
Variations to Try
Color Pattern Chains: Challenge kids to create repeating color patterns (red, blue, green, red, blue, green) for a sneaky math lesson in sequencing.
Gratitude Chains: Instead of activities, write something you're grateful for on each link. Read it aloud as a family when removing the daily link.
Advent-Style Chains: For holiday countdowns, tuck a tiny treat or slip of paper with a fun activity inside each loop before sealing.
Collaborative Chains: If you have multiple children, assign each kid certain links to decorate. This encourages teamwork and gives everyone ownership of the project.
Frequently Asked Questions
How long does a paper chain countdown usually last?
Most families create chains ranging from 7 to 30 days. Shorter countdowns (a week to 10 days) often work well for younger children who may struggle with longer waits, while older kids can handle month-long countdowns.
What if my child wants to rip off more than one link per day?
This is common, especially with eager little ones. Setting a clear routine: like removing the link right after breakfast: helps establish expectations. You might also let them hold the removed link and add it to a "done" pile so they still feel a sense of accomplishment.
Can I use regular printer paper instead of construction paper?
You can, though construction paper tends to be sturdier and more colorful. If you use printer paper, consider letting kids color or paint the strips first to make them more festive.
Is tape or a stapler better for securing the loops?
Tape is generally easier for small hands and less likely to snag on little fingers. Staples hold securely but require adult supervision, especially with younger children.
How do I store a paper chain if we make it early?
Gently coil the chain and place it in a paper bag or box. Avoid crushing the links. When you're ready, uncoil and hang it up.
Can this craft reinforce learning skills?
Definitely. Counting links, practicing number writing, creating color patterns, and reading calendar dates all sneak in educational value without feeling like a lesson.
What's a good length for each paper strip?
Strips between 6 and 11 inches long work well for most projects. Shorter strips create a compact chain; longer strips make larger, more dramatic loops.
How can I involve toddlers who can't cut or tape yet?
Let them choose colors, tear pre-cut strips into smaller pieces for confetti decoration, or hand you strips as you assemble. They can also practice counting finished links out loud.
Looking for more hands-on projects to try with your kids? Explore our Kids Crafts collection for plenty of budget-friendly, family-tested ideas.


