


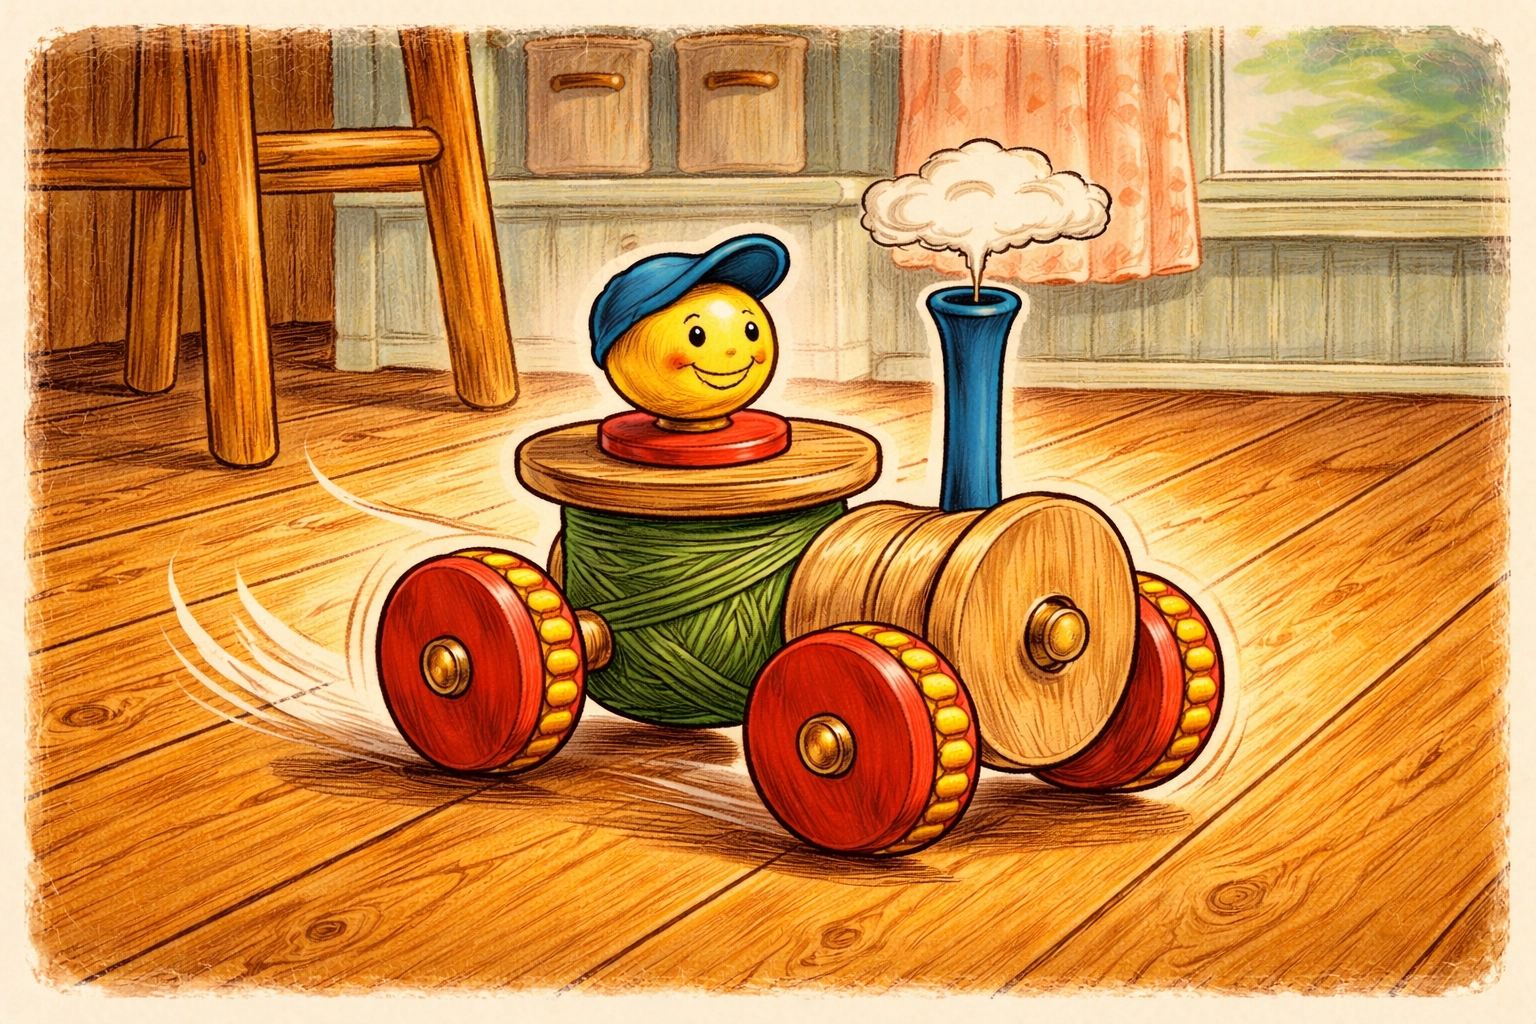
A spool and stick tractor is a simple self-propelled toy made from an empty thread spool, a rubber band, and a clothespin or stick. You thread the rubber band through the spool's center hole, anchor one end with a paper clip, attach the clothespin to the other end, wind it up, and watch it crawl across the table like a tiny farm machine. The whole project typically takes about 15-20 minutes and costs just a few dollars using materials you likely already have at home.
This old-fashioned toy has been entertaining kids for generations, and there's something deeply satisfying about watching your child's face light up when their handmade creation starts moving on its own. It's part craft project, part science experiment, and entirely charming.
What You'll Need
| Material | Purpose | Estimated Cost |
|---|---|---|
| Empty wooden thread spool | Main body of the tractor | Free (from sewing supplies) or ~$2 for a pack |
| Rubber band (medium length) | Powers the movement | ~$1 for a bag |
| Clothespin (wooden, spring-type) | Drive mechanism/handle | ~$2 for a pack |
| 2 paper clips | Anchoring the rubber band | ~$1 for a box |
| Petroleum jelly or candle wax | Lubrication for smooth rolling | ~$2-3 |
Total estimated cost: Under $10 (and you'll have plenty of supplies left over for more tractors)
Age Range and Time Estimate
Skill level: This project tends to work well for kids ages 5 and up with adult assistance. Children around 8-10 years old can often handle most steps independently.
Enjoyment range: Honestly, kids from toddler age through tweens seem to get a kick out of watching these little tractors scoot across surfaces. Even adults find themselves winding them up "just one more time."
Time needed: Plan for about 15-20 minutes for assembly, though first-time builders might take closer to 30 minutes. Budget extra time for the inevitable races and experiments afterward.

Step-by-Step Instructions
Step 1: Prepare Your Spool
Start with a clean, empty wooden thread spool. Plastic spools can work, but wooden ones tend to grip surfaces better and have that classic look. If your spool still has thread on it, this is a good excuse to finally use it up on a mending project.
Check that the center hole runs completely through the spool: you'll need the rubber band to pass through easily.
Step 2: Thread the Rubber Band
Take one paper clip and slide it through the loop at one end of your rubber band. This paper clip will act as an anchor.
Now for the slightly tricky part: feed the other end of the rubber band through the spool's center hole. If your rubber band is being stubborn, straighten out your second paper clip to use as a threading needle. Hook the rubber band onto the straightened clip and push it through.
Once the rubber band pokes out the other side, remove the threading clip. You should now have a rubber band running through your spool with a paper clip anchoring one end.
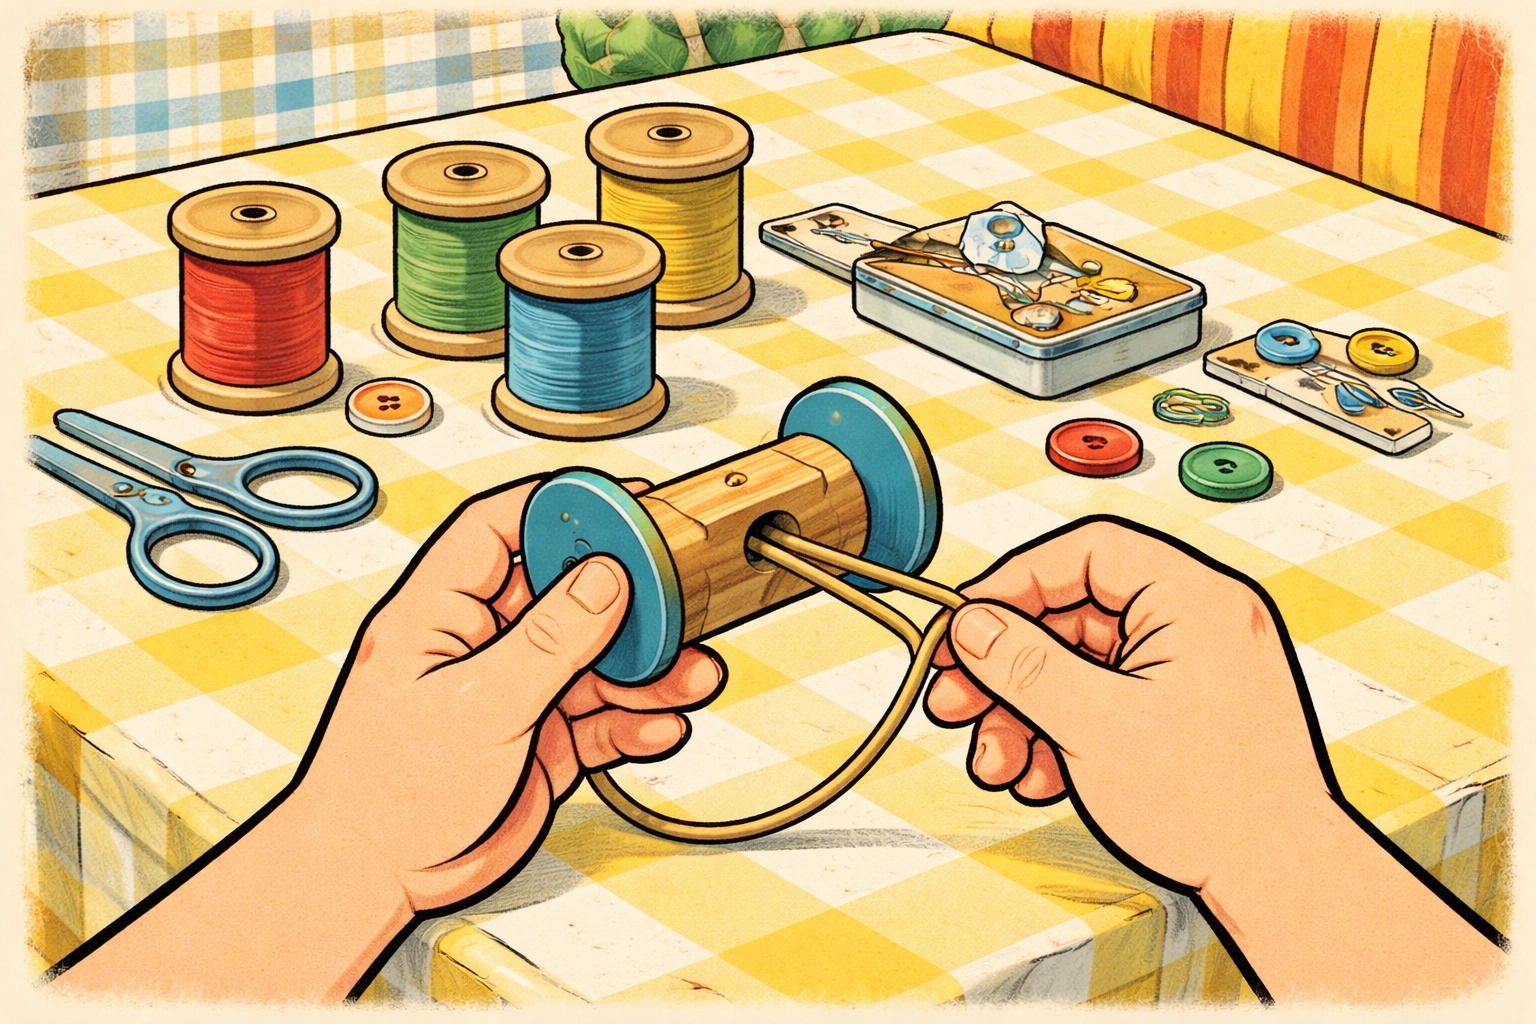
Step 3: Create the Drive Mechanism
Grab your wooden clothespin and pull it apart into two halves (remove the spring: you won't need it for this project, but save it for another craft).
Take one clothespin half and loop the free end of the rubber band around its center. Position this clothespin piece so it rests flat against the end of the spool.
Here's a helpful trick: before inserting the paper clip end into the spool hole, wind the rubber band around itself 2-3 times near the paper clip. These extra twists create a small "plug" that helps prevent the rubber band from slipping back through during operation.
Step 4: Add Lubrication
This step makes a real difference in how well your tractor performs. Apply a thin layer of petroleum jelly (or rub some candle wax) onto the flat end of the spool where the clothespin half makes contact.
The lubrication reduces friction, allowing the wound rubber band to unwind smoothly and steadily. Without it, your tractor might jerk, stall, or refuse to move at all.
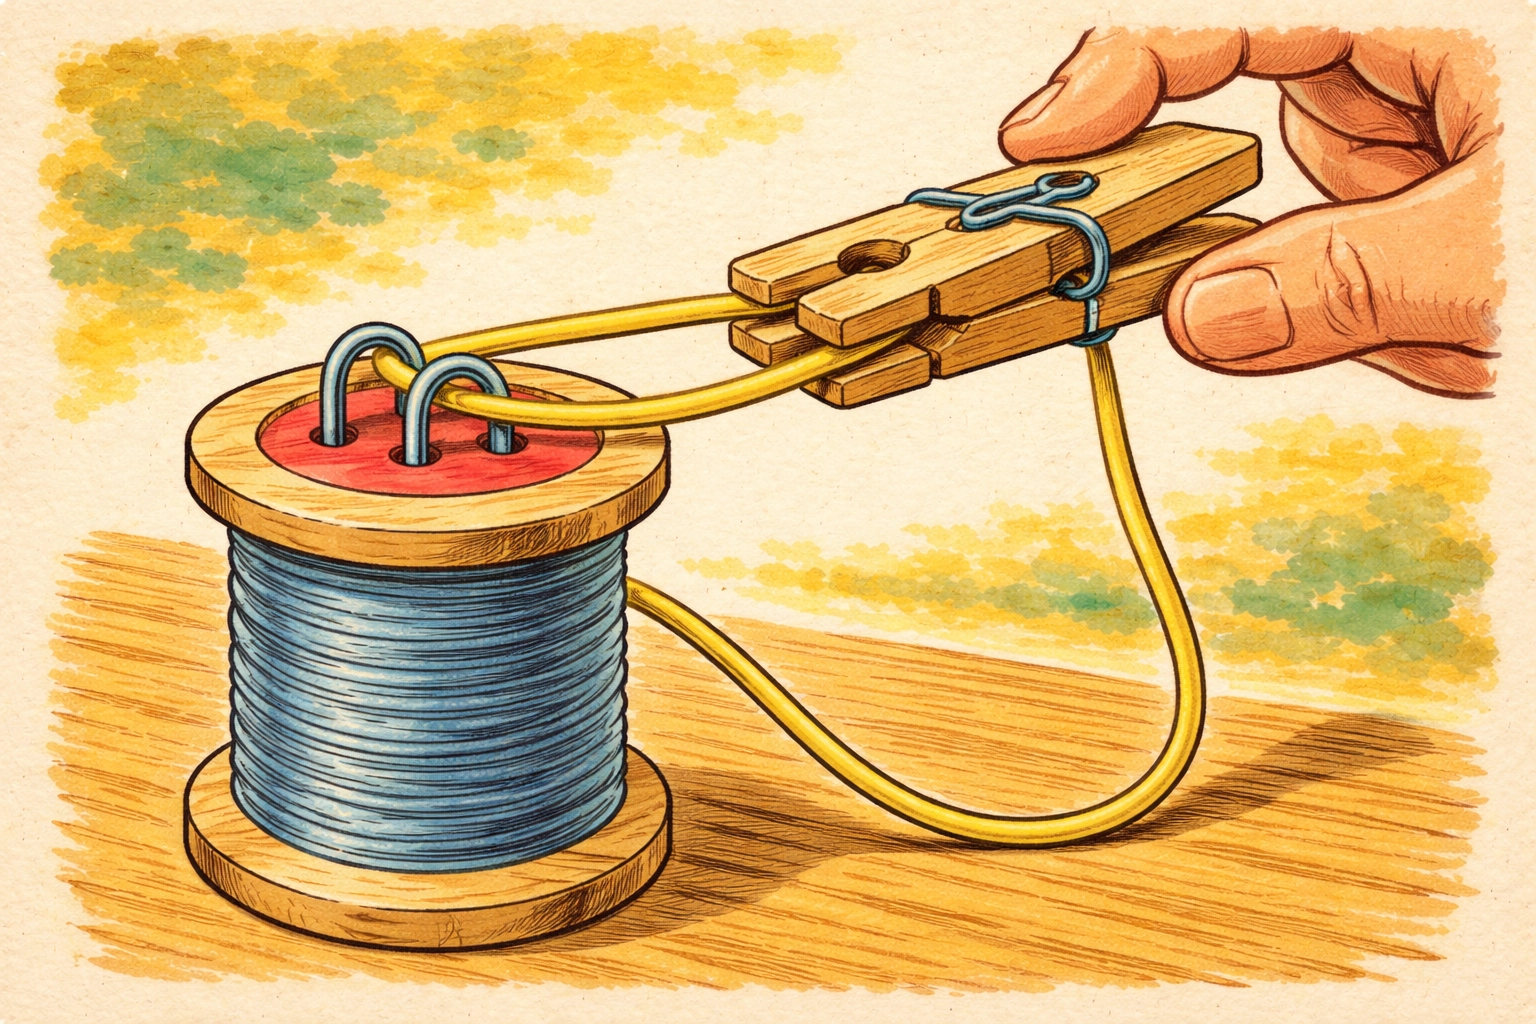
Step 5: Wind It Up and Let It Go
Hold the spool steady in one hand. With your other hand, twist the clothespin half to wind up the rubber band. You'll feel the tension building: usually 15-25 turns works well, though you can experiment.
Place your tractor on a smooth, flat surface like a hardwood floor, table, or countertop. Release the clothespin, and watch your creation crawl forward as the rubber band slowly unwinds.
Pro tip: Carpeted surfaces tend to create too much resistance. Stick to smooth surfaces for the most satisfying results.
Troubleshooting Common Issues
Tractor won't move: Check your lubrication. The clothespin needs to spin freely against the spool end. Add more petroleum jelly and try again.
Rubber band slips through: Make sure you've wound the rubber band around itself a few times near the paper clip anchor. This creates that plug effect mentioned earlier.
Movement is jerky: You might have over-wound the rubber band, or your surface could be too rough. Try fewer winds or a smoother surface.
Tractor moves backward: No worries: you just wound it the opposite direction. Wind it the other way next time.
Variations to Try
Once your kids master the basic design, consider these fun modifications:
Decorate the spool: Use markers, stickers, or paint to give your tractor some personality. Farm colors like red and green tend to be popular choices.
Experiment with rubber band sizes: Thicker bands store more energy but are harder to wind. Thinner bands wind easily but may not travel as far.
Try different stick lengths: A longer clothespin half can make winding easier and allows for more turns.
Build a fleet: Make several tractors and race them across the kitchen floor. Different spool sizes create different speeds and distances.
For more hands-on projects like this one, check out our kids crafts collection for additional family-friendly DIY ideas.
Why This Project Works So Well
Beyond the obvious entertainment value, spool tractors offer a gentle introduction to some basic physics concepts. Kids experience potential energy (the wound rubber band), kinetic energy (the moving tractor), and friction (why lubrication matters) without needing a formal lesson.
There's also something to be said for building a toy from scratch. In an age of plastic electronics and screen-based entertainment, creating something simple that actually does something can feel almost magical to kids: and to the adults building alongside them.
Frequently Asked Questions
Can I use a plastic spool instead of a wooden one?
Plastic spools can work, though wooden ones generally perform better. The wood provides more grip on surfaces and tends to be heavier, which helps with stability.
What if I don't have a clothespin?
A popsicle stick, pencil, or any small wooden stick can substitute. You just need something to grip and wind the rubber band.
How far will the tractor travel?
Most spool tractors travel somewhere between 2-6 feet, depending on the rubber band size, number of winds, and surface smoothness.
Is this safe for toddlers?
Younger children should be supervised due to small parts like paper clips and rubber bands. The finished toy is generally safe for toddlers to watch and chase, but assembly is better suited for older kids.
Can we use something besides petroleum jelly?
Candle wax, soap, or even a small dab of butter can work as lubricants. The goal is just reducing friction between the clothespin and spool.
Why does my tractor keep tipping over?
The clothespin half might be too long or positioned unevenly. Try trimming it shorter or repositioning it so the weight is more balanced.
How many times should I wind the rubber band?
Start with about 15-20 turns and adjust from there. Too few winds means less travel distance; too many can cause the rubber band to snap or the tractor to spin in place.
Can we make this with craft store supplies if we don't have a sewing spool?
Craft stores often sell wooden spools specifically for projects like this. Look in the woodworking or kids' craft sections.
References
- Classic spool tractor construction methods
- Vintage rubber band-powered toy designs
- Traditional children's craft techniques


