


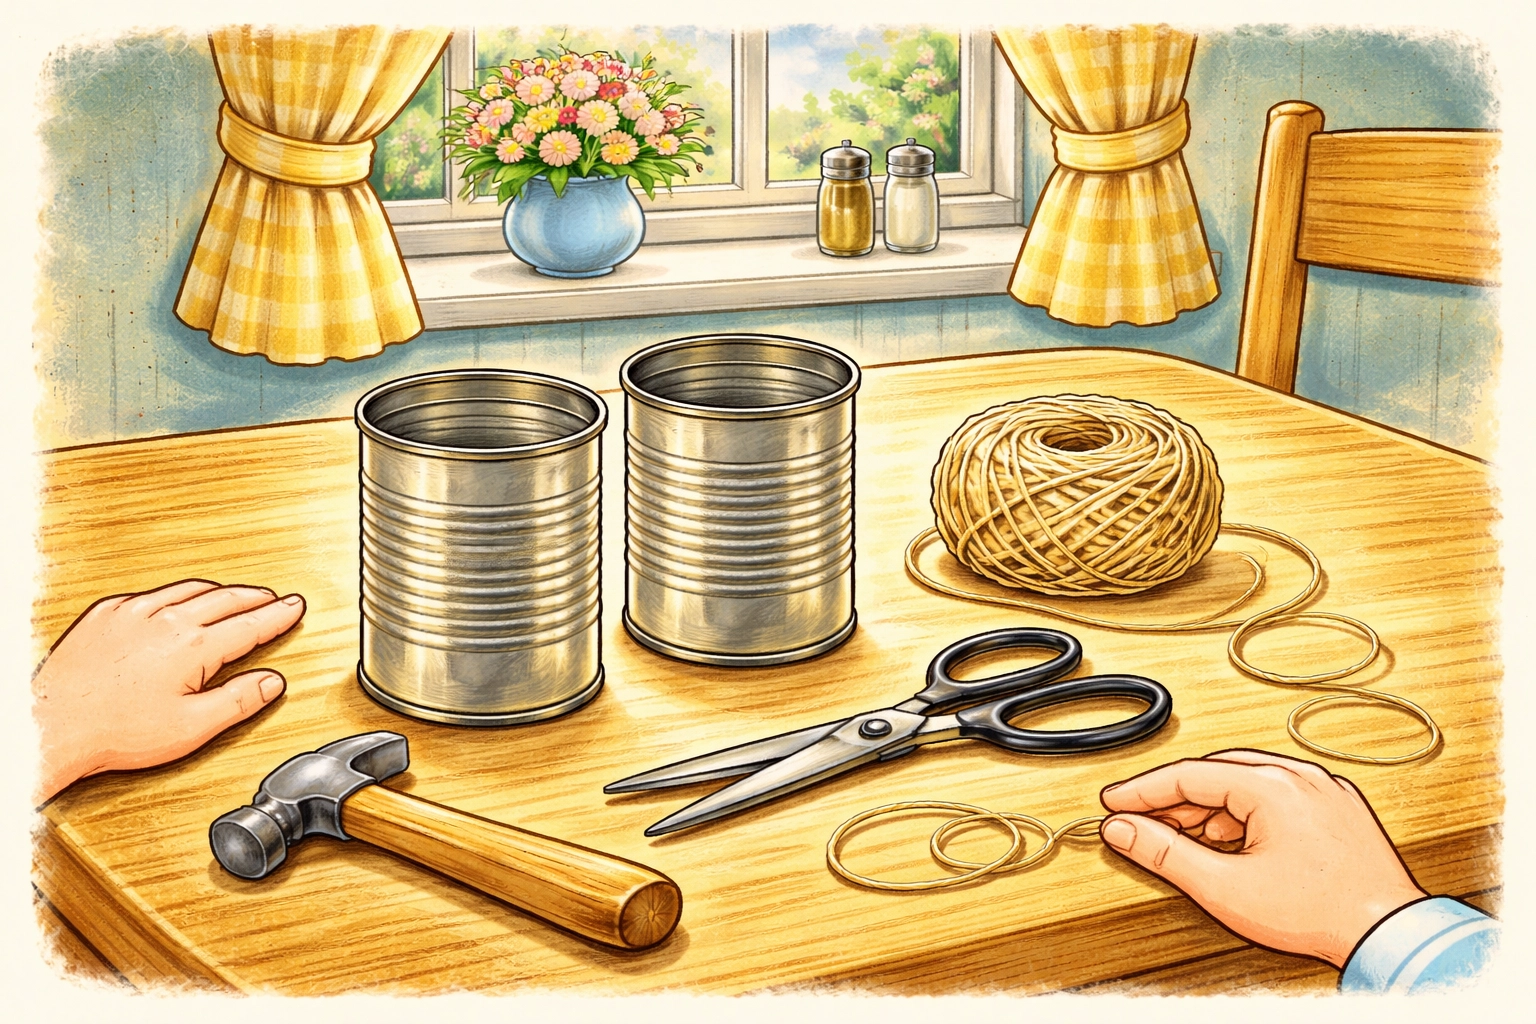
To make a tin can telephone, you'll need two empty tin cans (or paper cups), a length of string, and something to poke a hole. Thread the string through the bottom of each can, knot it securely inside, stretch the string tight between two people, and you've got a working telephone. The whole project takes about 15-20 minutes and costs practically nothing, making it one of those classic crafts that never gets old.
This is the kind of hands-on activity that slips a little science education in through the back door. Kids think they're just playing with cans and string. Meanwhile, they're actually learning about sound waves, vibration, and how telephones work. Sneaky? Maybe. Effective? Definitely.
What You'll Need
Good news: you probably have most of these materials sitting around your house right now. If not, a quick trip to the dollar store should cover everything.
| Material | Purpose | Estimated Cost |
|---|---|---|
| 2 empty tin cans or paper cups | The "phones" | Free – $2 |
| String (10-30 feet) | Transmits sound vibrations | $1 – $3 |
| Nail or sharp tool | Punches holes in cans | Free (from toolbox) |
| Hammer | Helps punch holes safely | Free (from toolbox) |
| Paper clips or small washers | Anchors string inside cans | $1 |
| Masking tape | Covers sharp edges | $1 – $2 |
| Scissors | Cuts string to length | Free |
Total estimated cost: Under $10 (and often free if you're resourceful)
Age Range
This project works well across a pretty wide age range, though the experience looks different depending on who's participating:
- Ages 3-4: Can decorate cups, hold the "phone," and participate in the talking/listening fun. Adult handles all sharp tools and assembly.
- Ages 5-7: Can thread string through holes, tie knots with some help, and start understanding the basic science concepts.
- Ages 8-10: Can likely complete most steps independently and may enjoy experimenting with different materials to compare results.
- Ages 11+: Great candidates for turning this into a fuller STEM experiment, testing variables, recording observations, and explaining the science to younger siblings.
Time Estimate
- Prep time: 5 minutes
- Assembly time: 10-15 minutes
- Play and experimentation: As long as they want (usually at least 20-30 minutes)
Step-by-Step Instructions
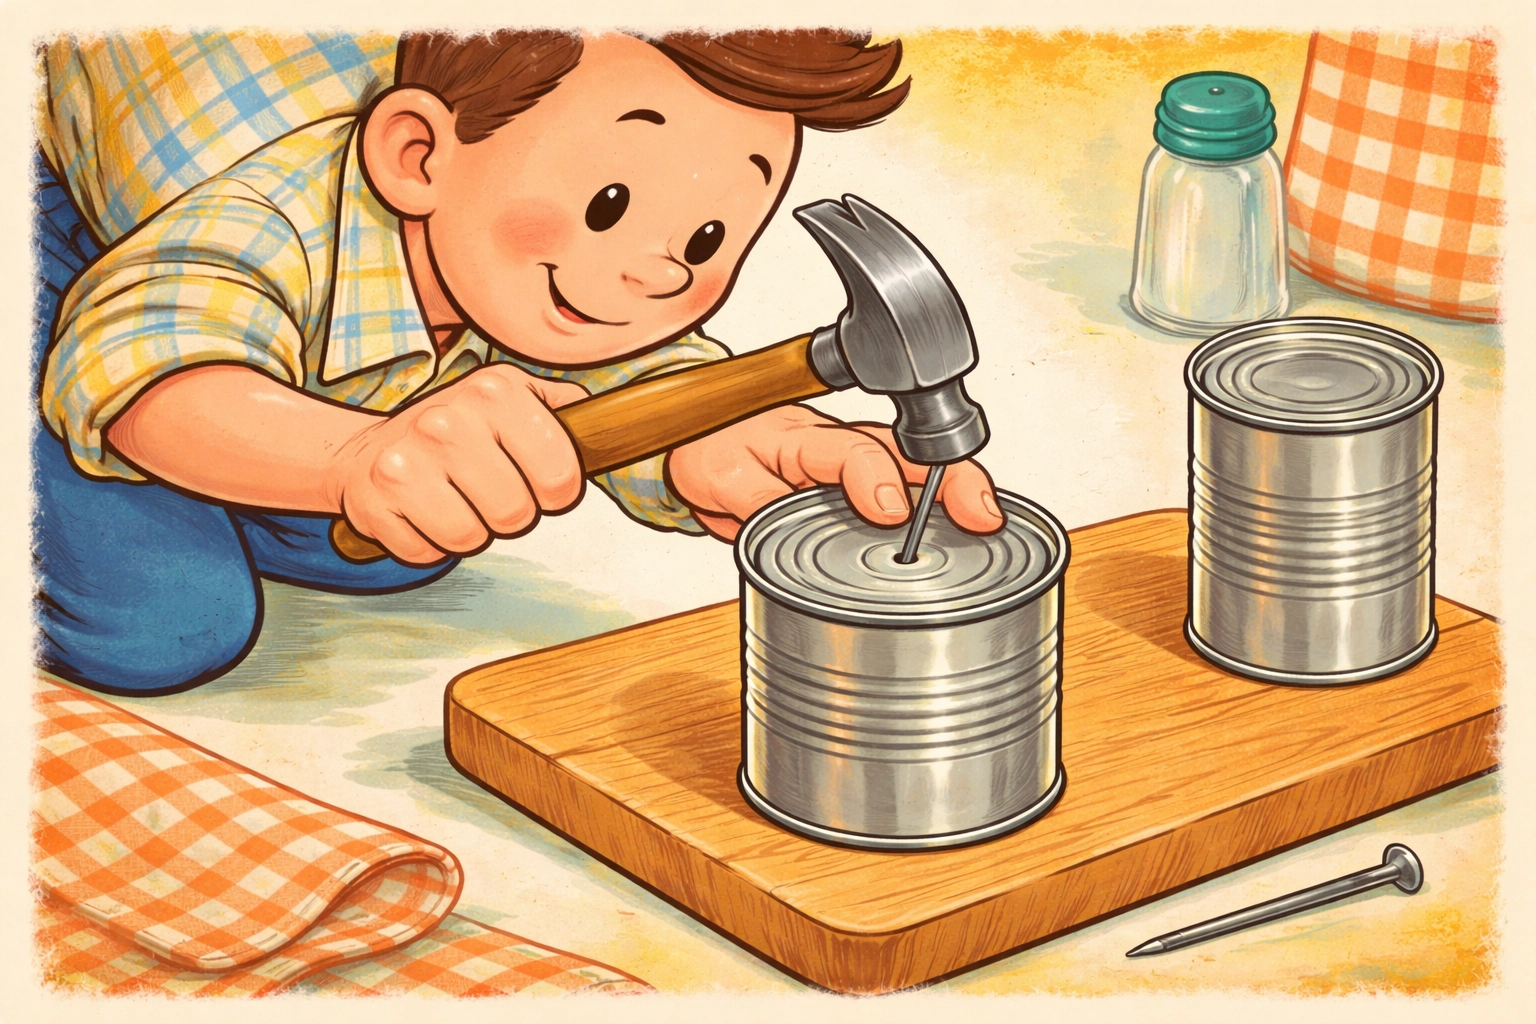
Step 1: Gather and Prepare Your Cans
Start by collecting two empty tin cans. Soup cans, vegetable cans, or coffee cans all work, just make sure they're clean and completely empty.
Safety note: Run your finger carefully around the inside rim. If there are any sharp edges, cover them with a strip of masking tape. This step matters, especially with younger kids who might stick their fingers inside.
If you'd rather skip the sharp edge concern entirely, paper cups work just as well. Some folks actually find that paper cups transmit sound slightly better than metal cans, so don't feel like you're taking the easy way out.
Step 2: Punch the Holes
Using a nail and hammer, carefully punch a small hole in the center of each can's bottom. Place the can upside down on a stable surface (a cutting board or piece of scrap wood works great), position the nail in the center, and give it a firm tap with the hammer.
For paper cups: You can use a sharp pencil, a nail, or even a ballpoint pen to poke through. No hammer needed.
The hole should be just big enough for your string to pass through, roughly the width of a pencil tip.
Step 3: Thread and Secure the String
Cut your string to your desired length. For indoor use, 10-15 feet usually works well. For backyard adventures, you can go up to 30 feet or more.
Thread one end of the string through the hole in the first can, pulling it through from the outside to the inside. Here's where those paper clips or washers come in handy: tie the string to a paper clip or washer, then pull it snug against the inside bottom of the can. This keeps the string from slipping back through the hole.
Alternatively, you can simply tie a large knot in the string, just make sure it's big enough that it won't pull through.
Repeat this process with the second can on the other end of the string.
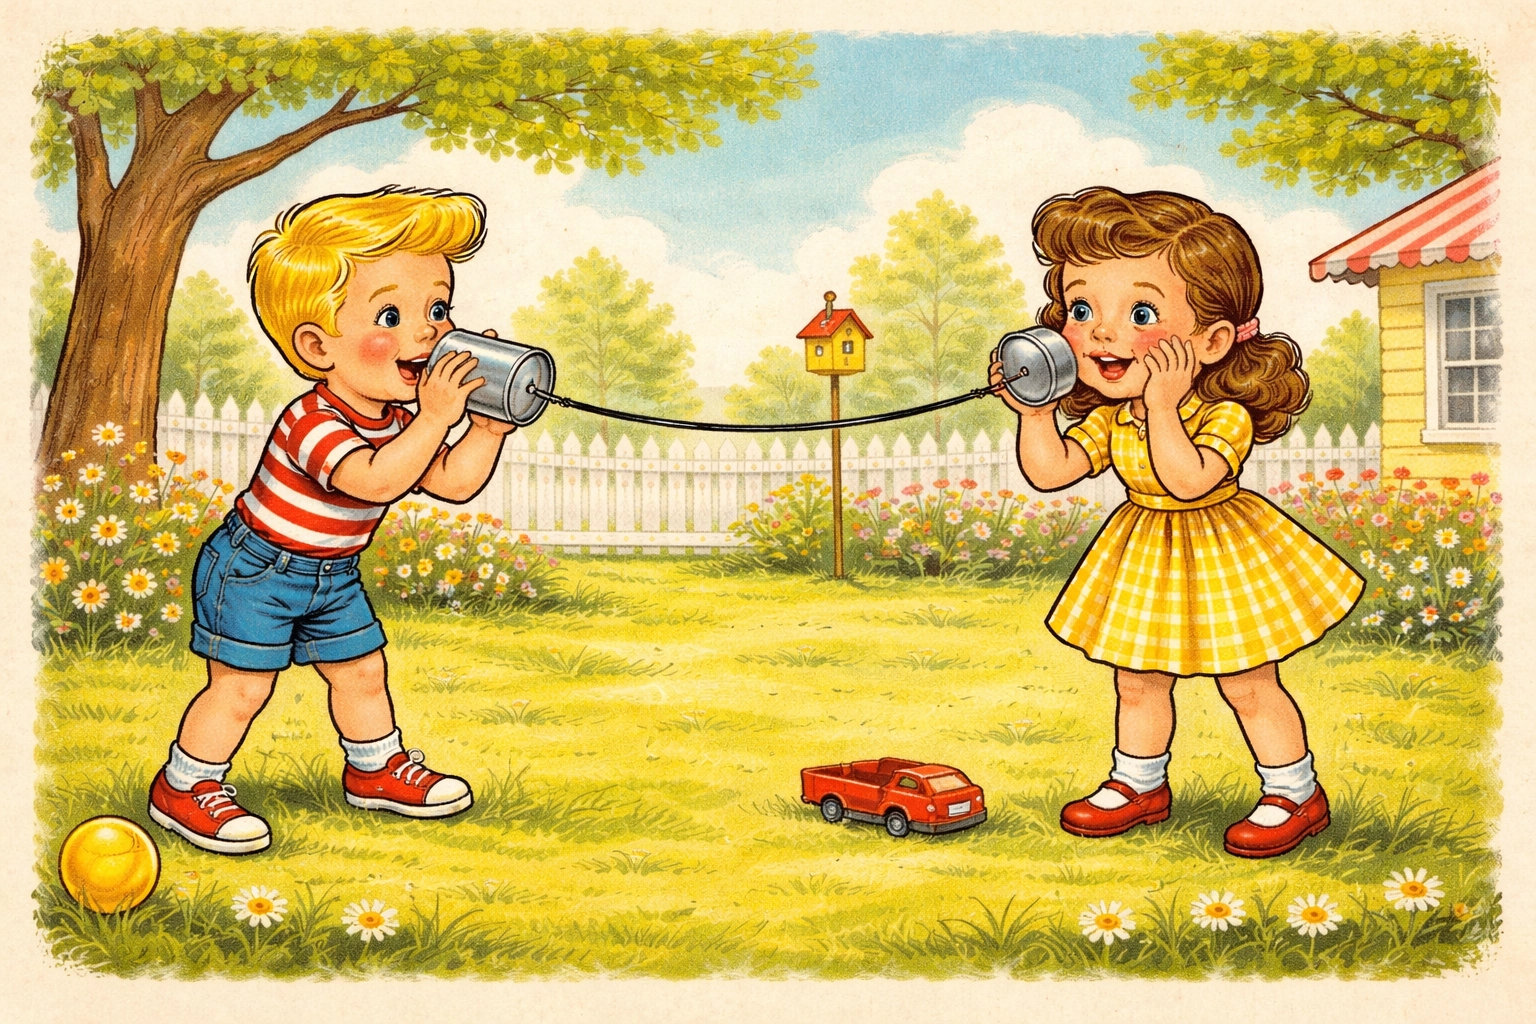
Step 4: Test Your Telephone
Now for the fun part. Have two people each take one can. Walk apart from each other until the string is completely straight and pulled tight. This part is important, the string cannot be slack or touching anything else.
One person holds their can up to their ear. The other person speaks clearly (but not loudly) into their can. Then switch roles.
You should be able to hear each other's voices traveling through the string. It might sound a bit tinny or muffled, but that's part of the charm.
Why Does This Actually Work?
Here's the science happening behind the scenes:
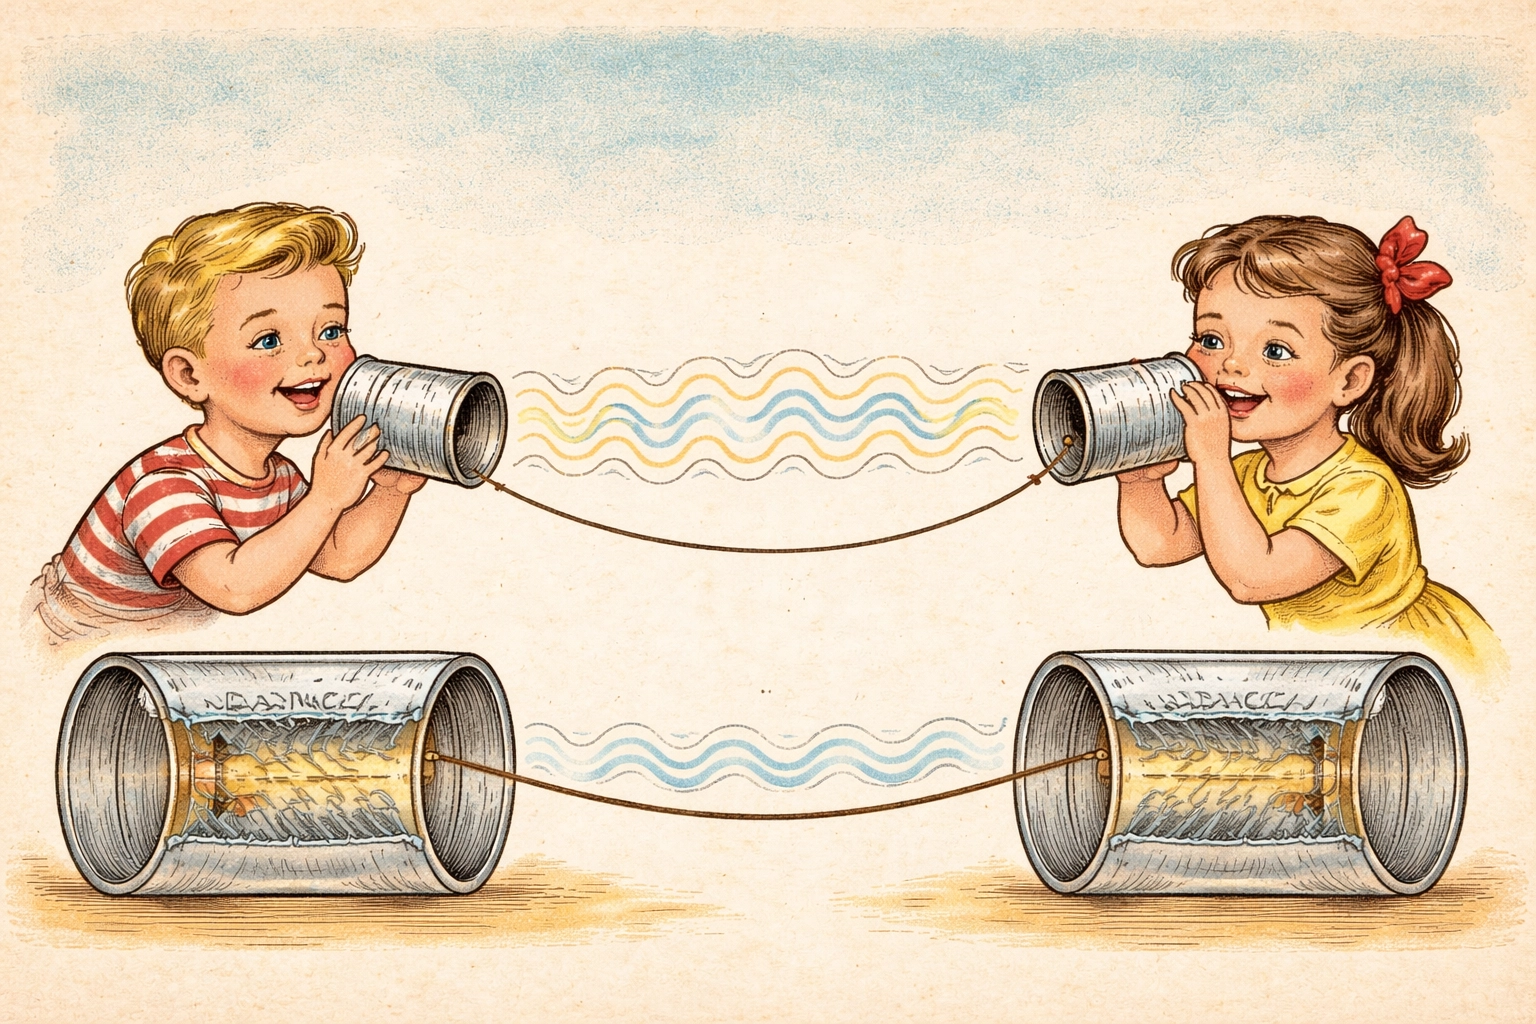
When you speak into the can, your voice creates sound waves, tiny vibrations in the air. Those vibrations hit the bottom of the can and make it vibrate too. Because the string is attached to that vibrating surface, the vibrations travel along the string to the other can.
At the receiving end, the vibrations move from the string to the bottom of the second can, which then vibrates the air inside. That vibrating air reaches your ear as sound.
The key ingredient is tension. The string needs to be pulled tight so the vibrations can travel efficiently. A loose or saggy string absorbs the vibrations instead of transmitting them, which is why you'll get nothing but silence if the string goes slack.
This is actually similar to how early telephones worked, just with electrical signals instead of a piece of string.
Tips for Better Results
Keep that string tight. This is the number one reason tin can telephones fail. If the string touches the ground, wraps around a tree branch, or just hangs loosely, the sound won't travel.
Start with shorter distances. With younger kids, begin at just 5-6 feet apart. Once they get the hang of it, gradually increase the distance.
Experiment with materials. Try different types of string, kite string, fishing line, yarn, or cotton twine. See which one transmits sound best. You can also compare tin cans versus paper cups versus plastic cups.
Avoid Styrofoam cups. They tend to crush or tear when you pull the string tight.
Speak clearly, not loudly. Shouting into the can doesn't help and can actually distort the sound. A normal speaking voice works better.
Frequently Asked Questions
How far apart can tin can telephones work?
Most homemade tin can telephones work reasonably well up to about 50-100 feet under good conditions. Beyond that, sound quality tends to drop off significantly. For best results with kids, stick to 10-30 feet.
Do tin cans or paper cups work better?
Paper cups often work slightly better because they're lighter and vibrate more easily. However, tin cans are more durable and give the project that classic look. Both are worth trying.
What type of string works best?
Tightly woven string like kite string or fishing line generally transmits sound better than loose, fluffy materials like yarn. Cotton twine falls somewhere in the middle and works fine for most purposes.
Can the string touch anything?
Ideally, no. When the string touches another object: a wall, a branch, someone's hand: it absorbs some of the vibrations and weakens the sound. Keep the string free and clear for best results.
Why can't I hear anything?
The most common culprits: the string is too loose, the string is touching something, or the holes in the cans are too big. Double-check each of these before troubleshooting further.
Can I decorate the cans?
Absolutely. Paint, markers, stickers, washi tape: go wild. Just avoid putting anything thick over the bottom of the can where the string attaches, as this could dampen the vibrations.
Is this safe for toddlers?
Toddlers can participate in talking and listening, but keep them away from the hole-punching step. Supervise closely to ensure they don't put small parts (like paper clips) in their mouths.
Can I use this as a science fair project?
Yes! Testing different variables: cup materials, string types, string lengths: makes for a solid experiment. Have your child form a hypothesis, test it, and record the results.
Looking for more hands-on projects to try with your crew? Check out our kids crafts collection for dozens of ideas that keep little hands busy and curious minds engaged.


