Microgreens are tiny vegetable greens that pack a powerful punch of flavor, nutrition, and versatility. Although small in size, they have gained immense popularity among home gardeners, chefs, and health enthusiasts alike. If you’re new to microgreens or have never even heard of them, this guide will cover everything you need to know to get started.
What Are Microgreens?
Microgreens are young, edible plants harvested at an early stage of growth, usually after the first true leaves appear. They are different from sprouts, which are germinated seeds consumed with their roots. Microgreens grow in soil or a growing medium and only the stem and leaves get harvested.
Common varieties include:
- Leafy Greens and Brassicas
- Arugula – Peppery flavor, adds spice to salads and sandwiches.
- Kale – Mild and slightly sweet, packed with nutrients.
- Spinach – Mild flavor, great for smoothies and salads.
- Swiss Chard – Earthy and slightly sweet, vibrant red and green stems.
- Mustard Greens – Spicy, with a wasabi-like kick.
- Cabbage – Mild flavor, often red or green in color.
- Herbs
- Cilantro – Bold, citrusy flavor, popular in Mexican and Asian dishes.
- Basil – Sweet, aromatic, and perfect for Italian cuisine.
- Dill – Fresh and slightly tangy, great for fish dishes.
- Parsley – Earthy and fresh, used in a wide variety of cuisines.
- Chervil – Mild, with hints of anise and parsley.
- Legumes
- Pea Shoots – Sweet and crunchy, often used in salads or stir-fries.
- Lentils – Mild and nutty, good for adding protein.
- Grasses and Cereals
- Wheatgrass – Known for juicing and its high chlorophyll content.
- Barley Grass – Similar to wheatgrass, used for juicing and health drinks.
- Alliums
- Chives – Mild onion flavor, great as a garnish.
- Garlic Chives – Garlic-like flavor, used in Asian dishes.
- Other Favorites
- Radish – Spicy and crunchy, adds a kick to dishes.
- Broccoli – Mild flavor, rich in sulforaphane.
- Sunflower Shoots – Nutty and crunchy, popular as a snack or salad topping.
- Beet Greens – Earthy and slightly sweet, vibrant red stems.
- Amaranth – Mild and slightly sweet, with striking red or pink leaves.
- Fenugreek – Slightly bitter, with a maple syrup-like aroma.
People desire microgreens for their taste, appearance, and high nutritional density, making them a staple in home kitchens, restaurants, and health-conscious diets.
Why Are Microgreens Popular?
- Nutritional Powerhouses: Studies show microgreens can contain up to 40 times more vitamins and nutrients than their mature counterparts. They are rich in vitamins C, E, and K, antioxidants, and essential minerals.
- Culinary Appeal: Their vibrant colors and intense flavors make them a favorite garnish and ingredient in gourmet dishes.
- Ease of Growth: They grow quickly (usually within 7–21 days) and require minimal space, making them ideal for home gardening.
- Sustainability: Growing microgreens uses fewer resources than traditional farming indoors year-round.
How Are Microgreens Different from Sprouts?
A common question is how microgreens differ from sprouts. Here’s a quick comparison:
| Feature | Microgreens | Sprouts |
| Growth Medium | Soil or a growing medium | Water or moist environment |
| Harvest Time | 7-21 days | 2-7 days |
| Parts Eaten | Leaves and stems | Entire plant, including roots |
| Flavor | Intense and varied | Mild |
Commonly Asked Questions About Microgreens
Let’s dig into some of the most common questions about microgreens. If you’re curious about these little greens, you’re not alone—here’s what people often want to know:
Are Microgreens Hard to Grow?
Not at all! In fact, they’re probably one of the easiest things you can grow at home. You don’t need a garden or a green thumb. As long as you have a shallow tray, some seeds, and a sunny spot (or grow lights), you’re good to go. Plus, they grow fast—most are ready to harvest in just a week or two. Even if you forget to water them occasionally, microgreens are pretty forgiving.
How Do Microgreens Taste?
They’re little flavor bombs! Here are some favorites:
- Radish: Imagine the zippy spice of a radish, but concentrated into a tender green.
- Sunflower: Nutty, crunchy, and totally satisfying.
- Peas: Sweet and fresh, almost like eating raw sugar snap peas.
Different varieties bring different vibes, so there’s always something new to try.
Are Microgreens Expensive?
Buying them at the store can be pricey—you might pay $5 or more for a small container. But growing them at home? It’s super affordable. A packet of seeds that costs just a few dollars can yield several trays of microgreens. Plus, once you start growing them, it’s addictive. You’ll want to experiment with all kinds of varieties.
Can I Grow Microgreens Without Soil?
Absolutely! You can grow them hydroponically using water or special mats made from coconut coir or felt. This method is clean and mess-free, which is perfect if you don’t want to deal with soil. Just keep the growing medium moist, and your microgreens will thrive.
How Do I Use Microgreens?
Let me tell you, this is where microgreens really shine! You can toss them into just about anything to make a dish healthier and tastier. Salads? Add a handful of pea shoots or arugula microgreens for a fresh, zesty kick. Soups? Sprinkle a few radish microgreens on top for a burst of spice and color. Sandwiches? Stack them high—sunflower shoots are a game-changer with their nutty crunch.
And smoothies? This is where you can get sneaky-healthy. Blend a few broccoli or spinach microgreens into your green smoothie, and you won’t even taste them, but your body will thank you. Oh, and have you ever tried microgreen pesto? Swap out basil for arugula or cilantro microgreens, and you’ve got a unique, gourmet spread that’ll elevate any meal. Seriously, once you start adding microgreens to your meals, you’ll wonder how you ever lived without them!
How to Grow Microgreens at Home
Materials Needed:
- Seeds: Choose untreated seeds labeled for microgreen growing.
- Growing Tray: Use shallow trays with drainage holes.
- Growing Medium: Soil, coconut coir, or hydroponic mats.
- Light Source: Natural sunlight or grow lights.
- Spray Bottle: For misting water evenly.
Step-by-Step Process:
- Prepare the Tray: Fill the tray with about an inch of growing medium and moisten it evenly.
- Sow the Seeds: Scatter seeds evenly across the surface without overlapping too much.
- Cover and Germinate: Lightly press the seeds into the medium and cover the tray to retain moisture.
- Water and Wait: Mist with water daily and remove the cover once sprouts appear.
- Harvest: Use scissors to cut the greens just above the soil line when they are 1-3 inches tall.
Common Issues and Troubleshooting
Why Are My Microgreens Wilting?
- Cause: Overwatering or lack of light.
- Solution: Water less frequently and ensure proper light exposure. Ensure your tray has proper drainage to avoid waterlogged soil.
Why Is Mold Growing?
- Cause: Poor air circulation or excessive moisture.
- Solution: Improve ventilation by placing your trays in a breezy spot or using a fan. Avoid overwatering and ensure trays dry slightly between waterings.
Why Are My Microgreens Leggy?
- Cause: Insufficient light.
- Solution: Move the tray closer to a light source or increase the duration of exposure to grow lights. Ensure the light source is bright enough to support healthy growth.
Why Are My Seeds Not Germinating?
- Cause: Seeds may be old, planted too deeply, or not kept moist enough.
- Solution: Use fresh seeds and scatter them evenly across the surface of the growing medium. Cover lightly with soil or keep them uncovered, depending on the seed type, and mist frequently to maintain moisture.
How Can I Prevent Pests?
- Cause: Pests like fungus gnats thrive in overly moist conditions or poorly maintained trays.
- Solution: Allow the top layer of soil to dry slightly between waterings and consider using sticky traps for gnats. Keep the growing area clean and remove debris promptly.
Why Do My Microgreens Have Yellow Leaves?
- Cause: Lack of light during or after germination.
- Solution: Ensure your microgreens are exposed to light as soon as the seeds germinate. Avoid keeping them covered for too long during the sprouting phase.
Why Are My Microgreens Dying After Sprouting?
- Cause: Damping-off disease, caused by fungal infections in overly wet conditions.
- Solution: Use sterilized soil and clean trays. Avoid overwatering and ensure good airflow to reduce humidity levels.
Why Are My Microgreens Growing Unevenly?
- Cause: Uneven seed distribution or inconsistent watering.
- Solution: Spread seeds evenly over the growing medium and water uniformly. Rotate the tray daily if using a window to ensure even light exposure.
Can I Reuse Growing Mediums?
- Cause: Used growing medium may harbor mold or pathogens.
- Solution: Avoid reusing growing mediums unless they are sterilized. Fresh medium ensures healthier microgreen growth and reduces contamination risks.
The History of Microgreens
Microgreens have a surprisingly rich history that extends far beyond their trendy reputation today. While they became a culinary darling in the 1980s, particularly in upscale California restaurants, the use of young, tender greens dates back centuries. Ancient civilizations, including the Egyptians and Chinese, cultivated young plants not just for their nutritional value but also for medicinal purposes. They believed that the tender shoots of certain herbs and vegetables were potent remedies and sources of energy.
The modern rediscovery of microgreens began when chefs sought out ingredients that could elevate both the flavor and presentation of their dishes. California’s culinary scene in the 1980s was a hub for innovation, and chefs found that these tiny greens added vibrant color, a concentrated burst of flavor, and a sophisticated touch to their creations. Over time, their popularity spread from gourmet kitchens to home cooks and health enthusiasts.
Today, advancements in agriculture and indoor growing technologies have made microgreens accessible to nearly everyone. Urban farmers and hobbyists worldwide now cultivate these greens year-round, utilizing methods like hydroponics and vertical farming to grow them sustainably. From their ancient roots to their current role in modern cuisine and wellness, microgreens have cemented their place as both a practical and gourmet staple.
Cultural Uses of Microgreens
Microgreens are not just decorative garnishes; they are integral to flavor enhancement and cultural authenticity in various global cuisines. Let’s dive deeper into how these tiny greens shine in culinary traditions:
- Asian Cuisine: In many Asian dishes, microgreens like cilantro and mustard greens add both flavor and visual appeal. Micro cilantro is a staple for garnishing soups like pho, while mustard greens bring a spicy kick to stir-fried vegetables and noodles. In Japanese cuisine, radish microgreens often accompany sushi, providing a fresh and slightly spicy contrast to the richness of fish.
- Mediterranean Cuisine: Arugula microgreens are beloved in Mediterranean dishes for their peppery flavor. They are often tossed into fresh salads with olive oil and lemon or used to top pizzas for a sharp, vibrant note. Micro basil and parsley are frequently sprinkled over hummus, roasted vegetables, and grain bowls, infusing these dishes with earthy, herbaceous flavors.
- Mexican Cuisine: Micro cilantro is a must-have in Mexican cooking, enhancing the flavors of tacos, guacamole, and salsas. Chefs also use micro radish for its zesty heat, which complements the bold spices found in many Mexican dishes. These microgreens not only elevate the flavor but also add a pop of color to traditional plates.
- Middle Eastern Cuisine: Micro parsley and dill are often featured in dishes like tabbouleh and yogurt-based dips, offering a burst of freshness. They are also used to garnish grilled meats and kebabs, adding both flavor and vibrancy.
- Modern Fusion Cuisine: In contemporary cooking, chefs are blending cultural traditions by incorporating microgreens into fusion dishes. For example, pea shoots might find their way into Asian-inspired tacos, or sunflower microgreens could top Mediterranean-style flatbreads.
Microgreens’ versatility makes them a favorite among chefs and home cooks alike, providing endless possibilities for enhancing both traditional and modern recipes.
The Science of Growth
Microgreens are nutritional powerhouses, and their exceptional nutrient density comes down to their growth stage. When seeds germinate, they undergo a process that activates enzymes and metabolizes stored energy to fuel the plant’s rapid development. This stage concentrates vital nutrients—including vitamins, minerals, and phytochemicals—to support early growth. The result? Microgreens boast significantly higher levels of nutrients than their mature counterparts.
This concentrated nutrient profile is due to the seed’s “growth energy.” During germination, plants synthesize compounds like chlorophyll and carotenoids while unlocking antioxidants that combat cellular damage. For example, broccoli microgreens contain higher levels of sulforaphane—a powerful antioxidant—compared to mature broccoli heads.
Microgreens also retain a high-water content, which contributes to their tender texture and intense flavors. The early harvesting stage ensures their nutrients remain uncompromised, offering a fresh, flavorful burst with every bite. Their rapid growth cycle, typically 7 to 21 days, ensures they remain free from significant nutrient loss, making them an unparalleled choice for anyone seeking a healthy diet. By understanding the science behind their growth, it’s easy to see why microgreens have become a staple in nutrition and wellness conversations.
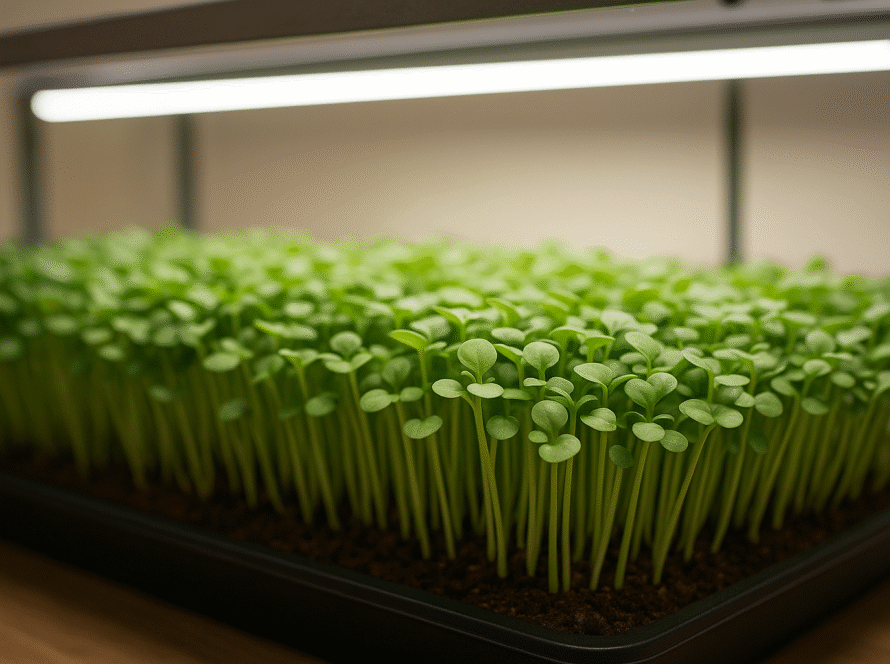
Microgreens in Hydroponics
Hydroponic growing is a highly efficient and sustainable way to produce microgreens without the need for soil. By using water-based systems and alternative growing mediums, you can cultivate nutrient-dense greens in almost any environment. Here’s how it works in greater detail:
- Medium: Instead of soil, use mats made from coconut coir, hemp, or felt to anchor the seeds. These mediums retain moisture well and support root growth while staying clean and easy to manage.
- Watering: Keep the mats moist by using a shallow water tray. The roots absorb water directly from the meat, ensuring consistent hydration. Regularly check and refill the water tray to maintain the right moisture levels.
- Light: Place trays under grow lights or near a bright window. LED grow lights are especially effective, as they provide the right spectrum of light for photosynthesis. Aim for 12-16 hours of light per day to ensure healthy growth.
In addition, hydroponic systems can be customized for optimal results. Advanced setups might include:
- Wicking Systems: Where the mat draws water up from a reservoir automatically, reducing the need for manual watering.
- Nutrient Solutions: Adding liquid nutrients to the water can boost growth and nutrient density in the microgreens.
- Automation: Timers for lights and water pumps can simplify the process, making it ideal for busy growers.
Pros of Hydroponics:
- Cleaner harvest with no soil residue, which means less washing and preparation.
- Reduced risk of pests and mold due to controlled indoor environments.
- Efficient use of water, as hydroponics typically requires 90% less water than traditional farming methods.
- Space-saving design, perfect for urban or indoor environments.
Cons of Hydroponics:
- Higher initial setup costs for trays, grow lights, and nutrient systems.
- Requires consistent monitoring of moisture and nutrient levels to avoid over- or under-watering.
- Learning curve for managing hydroponic-specific issues like algae growth in water trays or nutrient imbalances.
Hydroponics offers an innovative approach to growing microgreens, making it accessible to people who don’t have traditional gardening spaces. Once you get the hang of it, you’ll find it to be an efficient, rewarding way to grow fresh, healthy greens year-round.
DIY Growing Kits
For beginners, microgreen growing kits are an ideal entry point into the world of gardening. These kits simplify the entire process, allowing you to grow nutrient-packed greens without the need for extensive knowledge or equipment. Most kits come with:
- Trays: Shallow containers that are perfect for holding the growing medium and providing a stable environment for your microgreens.
- Growing Medium: Options like soil, coconut coir, or hydroponic mats are often pre-measured and included.
- Seeds: High-quality, untreated seeds specifically selected for microgreen cultivation.
- Detailed Instructions: Step-by-step guides tailored for beginners to ensure success right out of the box.
Some advanced kits even include tools like spray bottles for misting, humidity domes to maintain moisture during germination, and LED grow lights for year-round growing, making them suitable for various living spaces and climates.
Tips for Choosing the Right Kit
- Space Considerations: If you have limited space, look for compact kits designed for countertops or windowsills. For larger setups, modular systems allow for scaling up as you gain confidence.
- Light Availability: If your home doesn’t get much natural light, opt for kits that include grow lights or provide recommendations for supplemental lighting.
- Seed Variety: Many kits include a mix of seeds, but some focus on specific types, like spicy mixes or mild greens. Choose based on your flavor preferences.
- Reusable Components: High-quality kits often include reusable trays and tools, making them eco-friendlier and more cost-effective in the long run.
Why Start with a Kit?
For those new to growing microgreens, kits remove much of the guesswork. You don’t have to worry about sourcing individual components or figuring out the correct proportions for your setup. Plus, they’re a fun, low-commitment way to try gardening—perfect for families, kids, or anyone looking to add fresh greens to their meals. Once you’ve mastered the basics, you can branch out into customizing your own setups or experimenting with new varieties and techniques.
Closing Thoughts
Microgreens are more than a trendy garnish—they’re a gateway to healthier eating, sustainable living, and culinary creativity. Whether you’re a seasoned grower or just starting, these tiny greens offer immense rewards. With minimal effort, you can grow fresh, nutrient-packed microgreens year-round, adding vibrancy and nutrition to every meal.
So, grab some seeds, a tray, and start growing. Let these small but mighty greens transform your meals and elevate your well-being! Happy growing!